Table of Contents
Advertisement
Available languages
Available languages
Quick Links
Advertisement
Chapters
Table of Contents

Related Manuals for ureach NV-BM Series


Summary of Contents for ureach NV-BM Series
- Page 1 NV-BM Series PCIE Duplicator and Sanitizer User Manual v A.04...
-
Page 2: Table Of Contents
Index Table v A.04.4 Product Disclaimer ............................. 3 Warranty ................................3 Piracy Statement ..............................3 Before You Start ..............................4 Notice Symbols ..............................4 Functions Table ..............................5 Product Overview ............................10 Functions ................................12 1.Copy ..............................12 2. Compare ............................... 13 3. -
Page 3: Product Disclaimer
Product Disclaimer U-Reach is not accountable for any incidental or consequential damages, including, but not limited to property harm, loss of time or data from use of any U-Reach product, or any other damages attributable to product malfunction or failure of including without limitation, those attributed to reliance of the materials provided, costs of product replacement, loss of use, data or profits, delays or business interruptions, any principle of legal responsibility arising from or in reference to the use, overall performance, delays in... -
Page 4: Before You Start
Before You Start Important Notice Carefully read the entire manual before operating. Make sure the source device is correct and functioning. Equal capacity of source and target is recommended for guaranteed data consistency. Using the Copy+Compare function provides the most flawless duplication. Damage incurred due to non-compliance with U-Reach operating instructions will void the warranty. -
Page 5: Functions Table
Functions Table Functions Descriptions 1.1 Source Port Copies data from the device connected to the Source Port (Port #1). 1. Copy 1.2 Internal Storage (Available when internal SSD is installed) Copies saved data images from the duplicator’s internal storage device. 2.1 Source Port Verifies data, bit-by-bit, from the device connected to the Source Port (Port #1). - Page 6 5.3 System Info. Displays system information such as controller, model number, software version, etc. 5.4.1 Load New Firmware 5.4.2 Burn FW→SSD Slot1 5.4.3 Burn FW→SSD Slot2 5.4 Burn SSD Firmware Begins firmware update for 5.4.4 Burn FW→SSD Slot3 compatible SSDs. 5.4.5 Burn FW→All Slot 5.4.6 Show SSD Version 5.4.7 Power Off Time...
- Page 7 Copy Unknown 6.6.1 Copies unknown format(s). Unknown Skip Unknown Format Skips unknown format(s). Disabled Source port will be unable to erase. 6.6.2 Erase Master Enabled Source port will be able to erase. One Byte Random character written per byte. 6.6.3 Erase Pattern Big Random Data Random character written in a set of area.
- Page 8 6.6.11 Delete Device Signature Do not copy the disk signature onto target After Copy devices. 6.6.12 PCIe Speed Sets data transmission speed. 6.6.13 Target Tolerance Sets the capacity tolerance range between the source and target. The default setting is “No limit”. 6.6.14 The default setting is “No”.
- Page 9 8.4 Show One Image Display image information. 8.5 Rename One Image Rename an image file. 8.6 Delete One Image Delete an image file of the internal SSD. 8.7 Format Image Tank Formats the internal SSD for duplicator.
-
Page 10: Product Overview
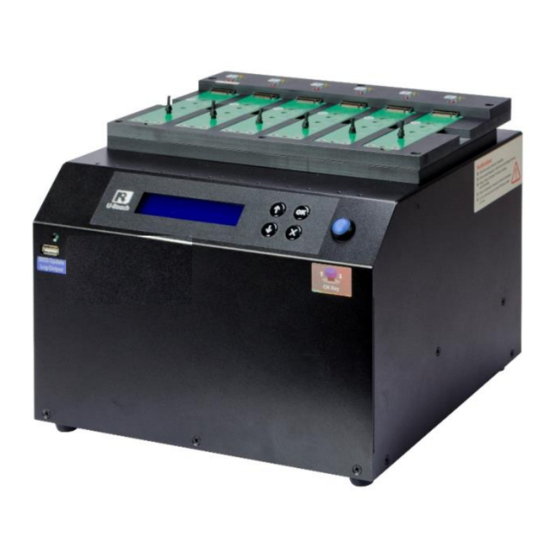
Product Overview Front View USB port for Log Report Outputs and Firmware Control Buttons Updates. OK Button LCD Display SSD slot for saving Master Image. Back View USB Port for PC-LINK Power Input Grounding Port Power Switch... - Page 11 LED Status Yellow: Powered Green: Pass Red: Fail LCD Configuration Number of Target Device Confirm/OK Total Size Forward Function Backward The slowest Cancel/Back Device Time elapsed and Copied processed size copy progress...
-
Page 12: Functions
Functions 1.Copy Step 1: Prepare source and target devices. Recommendation: Target device(s)’ capacity must be equal to or larger than Note the source device capacity. Step 2: Connect source and target devices. Step 3: Proceed to copy. Scroll to select “1. Copy”, then press “OK” to select which source to copy from. Scroll to select “1.1 Source Port”... -
Page 13: Compare
1.2 Internal Storage (Available when internal SSD is installed) Scroll to select “1. 2 Internal Storage”, then press “OK” to select which GOB Image to copy from the duplicator’s built-in storage device. The GOB Image is created through U-Reach’s proprietary software that is included with the duplicator. 1. -
Page 14: Erase
3.1 Source Port Scroll to select “3. 1 Source Port”, then press “OK” to copy to and verify targets from the source port. 3.2 Internal Storage (Available when internal SSD is installed) Scroll to select “3. 2 Internal Storage” , then press “OK” to select which GOB Image to copy and verify from the duplicator’s built-in storage device. -
Page 15: Utility
4.3 DoD Erase This function will erase all data per DoD 5220.22-M Standards of the connected device(s). Scroll to select “4.3 DoD Erase”, then press “OK” to start the erasing process. 4.4 DoD EraseComp This function will erase all data per DoD 5220.22-M Standards, then verifies the erasure of the connected device(s). - Page 16 The firmware update process may take longer than 5 minutes. Please do not Caution disrupt power or process during BIOS update. If interrupted, the system will become useless. U-Reach will not be held responsible for any damages. 5.3 System Info This function will display basic information such as device model, name, capacity, etc…...
-
Page 17: Setup
6. Setup This menu will reveal submenus related to device information, system information and updates. Scroll to select “6. Utility”, then press “OK” to view the submenus. 6.1 Start-up Menu This function allows user to select the default function to display after equipment initialization. - Page 18 All Partitions Copy or skip HPA, DCO, unknown partitions, modified formats, etc. defined by settings. Scroll to select “6.2 Copy Area > All Partitions”, then press “OK” to save the copy method. The target device’s capacity must be equal to or larger than the source device’s capacity. Whole HDD Copies all source data, bit-by-bit.
- Page 19 Percentage (%) Select percentage of source capacity to copy. Scroll to select “6.2 Copy Area > Percentage”, then press “OK” to save the copy method. Deep Analysis This copy area is designed to handle special format devices. It analyzes the whole device and then copies the data area.
- Page 20 1. Use a clean source device to make the analyzed data capacity shorter. (Clean Source Device means no garbage data in the source device.) Caution 2. The target device must be new or wholly cleaned prior to copy. Otherwise, there is risk for data combination. 6.3 Copy GPT Backup Area Disabling this function makes the duplicator ignore the GPT backup area, and thus allows the duplicator to copy from a big capacity device to a small capacity device(s).
- Page 21 6.5 Language Select English or Japanese. Scroll to select “6.5 Language”, then press “OK.” Then scroll through select the desired language. 6.6 Advanced Setup This function contains settings to fine tune copy and erase functions. Scroll to select “6.6 Advanced Setup”, then press “OK” to view the submenus. 6.6.1 Unknown Format This function only works with copy functions: “System and Files”...
- Page 22 Scroll to select “6.6.3 Erase Pattern”, then press “OK”. Then scroll through to select one of two settings. One Byte Random character written per byte. Scroll to select “One Byte”, then press “OK” to save this setting. Big Random Data Random character written in a set of area.
- Page 23 HPA function “Copy and Setting” may change the original parameter of target Caution devices. To reset it, user must set “6.5.6 Clear HPA at Erase >> Clear HPA Setting” and then execute “4. Erase.” 6.6.6 Clear HPA at ERASE Sets to clear HPA setting during erase. Scroll to select "6.6.5 Clear HPA at Erase”, then press "OK"...
- Page 24 Users do not need a password to access the system. Enabled Requires the password to access the system. Caution The system must be returned for reset if the password is forgotten. 6.6.11 Delete Device Signature After Copy Set at “Yes” means do not copy the disk signature part. This function is for Windows only.
-
Page 25: Log Manager
7. Log Manager This menu allows user to access several submenus. Scroll to select “7. Log Manager”, then press “OK” access submenus. Log Report Diagram Background information of this log report Source device Info. Result Port/Date/Time(Lapsed Time) [ Model No. ] [Revision][S/N] Capacity(Sectors)[Write Speed] S.M.A.R.T Info. - Page 26 ➌ Export Custom Log Report Exports a specific time period’s log report via USB port to a USB drive. 7.1 Out Today Report Outputs current day log report Scroll to select “7.1 Out Today Report”, then press “OK” to output log report to a USB drive. 7.2 Out Recent Report Outputs recent log report Scroll to select “7.2 Out Recent Report”, then press “OK”...
-
Page 27: Image Manager
8. Image Manager This function allows user to mange the image files stored in the internal SSD. 8.1 Copy SSD to Image Upload the source data into the internal SSD as an image file. 8.2 Compare SSD with Image Compare the source data with an image file in the internal SSD. 8.3 Show Image Tank Display the information for internal SSD. -
Page 28: Image Management
Image Management Users can easily create a GOB image on PC, upload it to the machine and do duplication. 1. Software Introduction 1.1 Connect the PC Link USB drive/disc on PC, it will show two folders. PCIe Software: The installation software is stored in this folder. Please copy the folder from PC Link USB drive/disc to PC. - Page 29 If the device has not been detected in the list, please click “renew button” Note in the right. Please note the GOB Image file will not copy to smaller target capacities than Caution the original source drive capacity. 2.4 There are 3 modes for making GOB image files, System and Files, Whole Device, and Depth Profiling Analysis.
- Page 30 c. After completion, the detail of image information will display at the bottom. D:\Scan ➋ Whole Device a. Click "Whole HDD," named the image and click "Save." The GOB file will be created. D:\Scan Test01...
- Page 31 b. During compiling process, the percentage of production is shown in the "Progress". D:\Scan c. After completion, the detail of image information will display at the bottom. D:\Scan CRC32:D68BA4C...
- Page 32 ➌ Depth Profiling Analysis This function is specially designed for data format which “System and Files copy mode” doesn’t support. It detects data area in the source and makes the image file. a. Click "Deep HDD," name the image and click "Save." The device will start the deep analyze process, and the GOB file will be created.
- Page 33 3. Upload the GOB Image to PCIE Duplicator Steps 3.1 to 3.4 are for users who have purchased an optional internal SSD and will be setting it up for the first time. 3.1 Insert an SSD into the internal port of the PCIE duplicator. 3.2 Connect your computer via USB cable to the PCIE duplicator with both systems powered 3.3 Double click and execute “GOB Uploader...
- Page 34 3.6 The progress bar will launch. It uploads the GOB image to the duplicator’s internal SSD and completes at 100%. ● To verify the GOB file in the duplicator, please power off, remove the USB link cable, and then power on the machine. Scroll through to select “1.2 Internal Storage”, then press “OK”...
- Page 35 4. How to copy by selecting GOB Image 4.1 Confirm that the GOB Image is stored on duplicator successfully. 4.2 Remove the USB connection cable from duplicator to PC and reboot the duplicator. 4.3 Scroll to select “1. 2 Internal Storage”, then press “OK” to select the GOB Image to copy from the duplicator’s built-in storage device.
- Page 36 Caution Please backup all important data before using this function. AutoCopy: It will automatically copy after the image is uploaded. More Information For additional details on the U-Reach® NV-BM Series, please visit: http://www.ureach-usa.com/PCIe-1-to-20.html Specifications are subject to change without notice.
- Page 37 Series NV-BM Duplicador y Desinfectante PCIE Manual de Usuario v A.04...
- Page 38 Index Table v A.04.4 Descargo de responsabilidad del producto ..................... 39 Garantía ................................39 Declaración de piratería ........................... 39 Antes de empezar ............................40 Símbolos de Notificaciones ..........................40 Functions Table ..............................41 Descripción del producto ..........................46 Funciones ................................. 48 1.Copy (Copiar)............................
-
Page 39: Descargo De Responsabilidad Del Producto
Descargo de responsabilidad del producto U-Reach no es responsable de ningún daño incidental o consecuente, que incluye, entre otros, daños a la propiedad, pérdida de tiempo o datos por el uso de un producto U-Reach, o cualquier otro daño atribuible al mal funcionamiento o falla del producto (incluido sin limitación, aquellos atribuibles a: (1) dependencia de los materiales proporcionados, (2) costos de reemplazo del producto, (3) pérdida de uso, datos o ganancias, (4) retrasos o interrupciones comerciales, (5) y cualquier principio de responsabilidad legal, (que surja de... -
Page 40: Antes De Empezar
Antes de empezar Noticia Importante Lea atentamente todo el manual antes de operar. Asegúrese de que el dispositivo fuente sea correcto y funcione. Se recomienda la misma capacidad de origen y destino para garantizar la coherencia de los datos. El uso de la función Copiar + Comparar proporciona la duplicación más impecable. Los daños ocasionados por el incumplimiento de las instrucciones de funcionamiento de U- Reach anularán la garantía. -
Page 41: Functions Table
Functions Table Funciones Descripción 1.1 Source Port (Puerto de origen) Copia datos del dispositivo conectado al puerto de origen (puerto n. ° 1). 1. Copy 1.2 Internal Storage (Almacenamiento interno (disponible cuando se (Copiar) instala SSD interno) Copia imágenes de datos guardadas del dispositivo de almacenamiento interno del duplicador. - Page 42 5.2 System Update (Actualización del sistema) Actualiza el firmware del sistema en el puerto SD trasero. 5.3 System Info (Información del sistema) Muestra información del sistema como controlador, número de modelo, versión de software, etc. 5.4.1 Load New Firmware 5.4.1 Cargar firmware nuevo 5.4.2 Burn FW→SSD Slot1 5.4.2 Grabar FW →...
- Page 43 6.4 Skip Bad Sectors (Omitir sectores defectuosos) Omite los sectores defectuosos durante la función de Copiar/Comparar. 6.5 Language (Idioma) Establece el idioma preferido: Inglés o Japonés. Copy Unknown (Copiar desconocido) 6.6.1 Copia formatos desconocidos. Unknown Format (Formato Skip Unknown (Saltar Desconocido) desconocido) Omite formatos desconocidos.
- Page 44 Lock Key Enabled (Activado) Tecla de bloqueo Solo los botones arriba / abajo están desactivados. Reinicie el sistema para que la configuración esté en vigor. 6.6.9 Detener el tiempo del motor Establece el tiempo de búfer de apagado del dispositivo antes de la desconexión del dispositivo.
- Page 45 7.4.1 Clear All Logs (Borrar todos los registros) 7.4 Advanced Borre todos los registros. Function 7.4.2 Password Setup (Configuración de contraseña) Default password: Permite el cambio de contraseña. 123456 7.4.3 Adjust Time/Date (Ajustar hora / fecha) Función avanzada Cambiar la fecha y la hora. Contraseña predeterminada: 7.4.4 Add Watermark at text File (Agregar marca de...
-
Page 46: Descripción Del Producto
Descripción del producto Vista Frontal Puerto USB para salidas de informes de registro Botones de control y actualizaciones de firmware. Botón OK Pantalla LCD Ranura SSD para guardar Imagen maestra. Vista Posterior Puerto USB para PC- LINK Entrada de Puerto de alimentación puesta a tierra Interruptor de... - Page 47 Indicadores de luz LED Amarillo: Encendido Verde: Pase Rojo: falló Configuración de la pantalla LCD Número de Confirmar / Dispositivo de Tamaño Adelante Aceptar destino Función total El dispositivo Hacia atrás Cancelar / Atrás más lento Tiempo transcurrido y Tamaño procesado progreso de la copia copiado...
-
Page 48: Funciones
Funciones 1.Copy (Copiar) Paso 1: preparar los dispositivos de origen y de destino. Recomendación: la capacidad de los dispositivos de destino debe ser igual o Nota mayor que la capacidad del dispositivo de origen . Paso 2: Conecte los dispositivos de origen y de destino. Paso 3: Proceda a copiar. -
Page 49: Compare
1.2 Internal Storage (Almacenamiento interno) (Disponible cuando está instalado SSD interno) Desplácese para seleccionar “1. 2 Internal Storage”, then press “OK” to select which GOB Image to copy from the duplicator’s built-in storage device. The GOB Image is created through U-Reach’s proprietary software that is included with the duplicator. 1. -
Page 50: Erase (Borrar)
3.1 Source Port Desplácese para seleccionar “3. 1 Source Port”, luego presione “OK” para copiar y verificar destinos desde el puerto de origen. 3.2 Internal Storage (Available when internal SSD is installed) Desplácese para seleccionar “3. 2 Internal Storage”, luego presione “OK” para seleccionar qué... -
Page 51: Utility (Utilidad)
4.2 Full Erase (Borrado completo) Esta función borrará todos los datos según los estándares NIST 800-88 en los dispositivos conectados. Desplácese para seleccionar "4.2 Full Erase”, luego presione "OK" para iniciar el proceso de borrado. 4.3 DoD Erase (Pase DoD) Esta función borrará... - Page 52 directorio raíz del dispositivo. Nota El formato del dispositivo debe ser: FAT16 o FAT32. Paso 2: proceda a actualizar el firmware Conecte la tarjeta SD a la parte posterior del duplicador. Desplácese para seleccionar "5.2 Actualizar BIOS", luego presione "Aceptar" para iniciar el proceso de actualización del firmware.
-
Page 53: Setup (Configuración)
El proceso de actualización del firmware puede tardar más de 5 minutos. No interrumpa la alimentación ni el proceso durante la actualización del Precaución BIOS. Si se interrumpe, el dispositivo se volverá inútil. U-Reach no se hace responsable de ningún daño.. 5.5 Calc. - Page 54 System and Files (Sistema y Archivos) Copia datos y omite el espacio vacío. Solo admite formatos estándar. Desplácese para seleccionar “6.2 Copy Area > System and Files”, luego presione “OK” para guardar el método de copia. Permite al usuario copiar el sistema y los archivos del dispositivo de origen, en lugar de todo el dispositivo.
- Page 55 (Se copiarán 350GB de todas las particiones junto con su contenido) Whole HDD (Disco duro completo) Copia todos los datos de origen, bit a bit. Desplácese para seleccionar “6.2 Copy Area > Whole HDD”, luego presione “OK” para guardar el método de copia. Copia todo el dispositivo de origen, independientemente del contenido, formato, partición o espacio vacío.
- Page 56 (Se copia el área seleccionada) Deep Analysis (Análisis profundo) Esta área de copia está diseñada para manejar dispositivos de formato especial. Analiza todo el dispositivo y luego copia el área de datos. Se requiere que el dispositivo de destino se limpie por completo antes de realizar la copia. Desplácese para seleccionar “6.2 Copy Area >...
- Page 57 El tamaño de la partición del disco duro de origen debe ser menor que la Nota capacidad de destino. De lo contrario, se recomienda dejar intacta el área de copia de seguridad de GPT. GPT Index Partition Desactivando la función “5.3 Copy GPT Backup Area”...
- Page 58 Esta función contiene ajustes para ajustar con precisión las funciones de copia y borrado. Desplácese para seleccionar “6.6 Advanced Setup”, luego presione “OK” para ver los submenús. 6.6.1 Unknown Format (Formato desconocido) Esta función solo funciona con funciones de copia: “System and Files” y “All Partition”. Desplácese para seleccionar “6.6.1 Unknown”, luego presione “OK”.
- Page 59 para seleccionar una de las dos configuraciones. One Byte (Un byte) Carácter aleatorio escrito por byte. Desplácese para seleccionar "One Byte”, luego presione "OK” para guardar esta configuración. Big Random Data (Grandes datops aleatorios) Carácter aleatorio escrito en un conjunto de áreas. Desplácese para seleccionar "Big Random Data”, luego presione "OK"...
- Page 60 configuración. ❷ Setting Target HPA (Configuración de HPA de destino) Copia la configuración de HPA del dispositivo de origen al de destino. Desplácese para seleccionar "HPA Copy Modes >> Setting Target HPA”, luego presione "OK" para guardar esta configuración. ❸ Copy and Setting (Copiar y configurar) Copia la configuración y los datos de HPA desde el dispositivo de origen al de destino.
- Page 61 Esta función permite al usuario habilitar o deshabilitar los 4 botones del panel de control. Desplácese para seleccionar “6.6.7 Lock Key”, luego presione "OK" para acceder a la configuración disponible. Disabled (Desactivado) Desplácese para seleccionar “Disabled”, luego presione "OK" para guardar esta configuración.
-
Page 62: Log Manager (Administrador De Registros)
6.6.13 Target Tolerance (Tolerancia objetivo) Esta función establece el rango de tolerancia de capacidades entre el dispositivo de origen y el de destino. Si la capacidad está fuera del rango de tolerancia, la copia fallará.. 6.6.14 Clean SSD Before Copy (Limpiar SSD antes de copiar) Configura para borrar SSD antes de la función de copia. - Page 63 IV. How to Export Log Reports (Cómo exportar informes de registro) La herramienta de administración de informes de registro ayuda a los usuarios a monitorear, registrar y administrar todo el proceso de duplicación. Al mostrar información detallada para cada puerto, esta herramienta ayuda a identificar el dispositivo de escritura más lento que, a su vez, mantiene la operación funcionando de manera eficiente.
-
Page 64: Image Manager (Administrador De Imágenes)
7.4.1 Clear All Logs (Borrar todo el registro) Borre todos los registros. Desplácese para seleccionar "7.4.1 Clear All Logs”, luego presione "OK" para borrar todos los registros. 7.4.2 Setup Password (Configurar contraseña) Permite el cambio de contraseña. Desplácese para seleccionar "7.4.2 Setup Password”, luego presione "OK"... - Page 65 Seleccionar y eliminar un archivo de imagen. 8.7 Format Image Tank (Formato de tanque de imagen) Formatee el SSD interno. Precaución Esta función eliminará los datos en el SSD interno .
-
Page 66: Image Management (Gestión De Imágenes)
Image Management (Gestión de imágenes) Los usuarios pueden crear fácilmente una imagen GOB en la PC, cargarla en la máquina y realizar la duplicación. 1. Software Introduction (Introducción al software) 1.1 Conecte la unidad / disco USB PC Link en la PC, mostrará dos carpetas. PCIe Software: El software de instalación se almacena en esta carpeta. - Page 67 Si el dispositivo no se ha detectado en la lista, haga clic en "botón de Nota renovación" a la derecha. Tenga en cuenta que el archivo de imagen GOB no se copiará a capacidades Precaución de destino más pequeñas que la capacidad de la unidad de origen original . 2.4 Hay 3 modos para crear archivos de imagen GOB,System and Files, Whole Device, y Depth Profiling Analysis.
- Page 68 c. Una vez finalizado, el detalle de la información de la imagen se mostrará en la parte inferior.. D:\Scan ➋ Whole Device (Dispositivo complete) a. Clic "Whole HDD," nombró la imagen y haga clic en "Save." Se creará el archivo GOB. D:\Scan Test01 b.
- Page 69 D:\Scan c. Una vez finalizado, el detalle de la información de la imagen se mostrará en la parte inferior.. D:\Scan CRC32:D68BA4C ➌ Depth Profiling Analysis (Análisis de perfiles de profundidad) Esta función está especialmente diseñada para formatos de datos que “System and Files...
- Page 70 copy mode” no admite. Detecta el área de datos en la fuente y hace que el archivo de imagen. a. Clic "Deep HDD," nombre la imagen y haga clic en "Save." El dispositivo iniciará el proceso de análisis profundo y se creará el archivo GOB. D:\Scan Test01 b.
- Page 71 3. Upload the GOB Image to PCIE Duplicator (Cargue la imagen GOB en PCIE Duplicator) Los pasos 3.1 a 3.4 son para usuarios que han comprado un SSD interno opcional y lo configurarán por primera vez. 3.1 Inserte un SSD en el puerto interno del duplicador PCIE. 3.2 Conecte su computadora mediante un cable USB al duplicador PCIE con ambos sistemas encendidos.
- Page 72 3.6 Se abrirá la barra de progreso. Carga la imagen GOB en el SSD interno del duplicador y se completa al 100%. ● Para verificar el archivo GOB en el duplicador, apague, retire el cable de enlace USB y luego encienda la máquina. Desplácese para seleccionar “1.2 Internal Storage”, luego presione “OK”...
- Page 73 4. How to copy by selecting GOB Image (Cómo copiar seleccionando GOB Image) 4.1 Confirme que la imagen GOB se haya almacenado correctamente en el duplicador. 4.2 Retire el cable de conexión USB de la duplicadora a la PC y reinicie la duplicadora. 4.3 Desplácese para seleccionar “1.
- Page 74 Haga una copia de seguridad de todos los datos importantes antes de usar Precaución esta función . AutoCopy: (AutoCopia) Se copiará automáticamente después de que se cargue la imagen. More Information (Más información) Para obtener detalles adicionales sobre la serie U-Reach® NV-BM, visite: http://www.ureach-usa.com/PCIe-1-to-20.html Specifications are subject to change without notice.
Need help?
Do you have a question about the NV-BM Series and is the answer not in the manual?
Questions and answers