Table of Contents
Advertisement
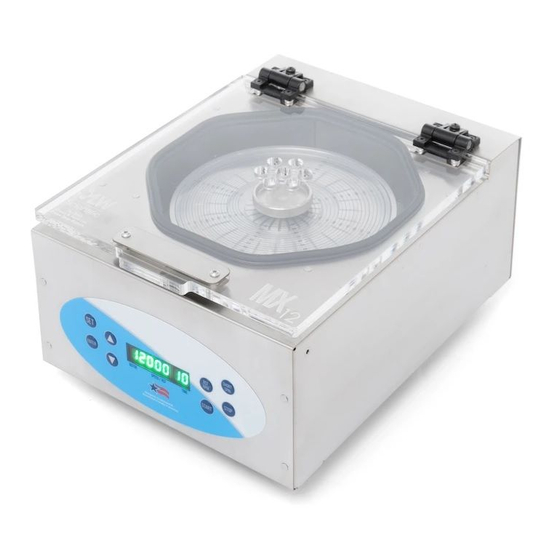
MX12 Micro-Combo Centrifuge
Instruction Manual
Designed, Engineered &
Assembled Proudly in America
Introduction
The LW Scientific MX12 Micro-Combo centrifuge spins microhematocrit (PCV) and/or microtubes in one small unit. The
MX12 Micro-Combo is designed, engineered, and assembled in Atlanta, GA. This all-metal-construction unit is small,
conserving valuable counter space in the lab, but also sturdy and heavy with suction-cupped feet for stability. The
digital controls allow speed and time to be adjusted with the touch of a finger and will show real-time speed and time
remaining. The powerful, maintenance-free, brushless motor spins at 12,000 rpm producing serum and PCV results in 3
minutes. The included reader disk allows tubes to be read while still on the rotor. The MX12 Micro-Combo centrifuge is
the smart choice for any clinic or laboratory.
P. 770.270.1394
F. 770.270.2389
865 Marathon Parkway Lawrenceville GA 30046
Advertisement
Table of Contents

Subscribe to Our Youtube Channel
Related Manuals for LW Scientific MX12


Summary of Contents for LW Scientific MX12
- Page 1 The powerful, maintenance-free, brushless motor spins at 12,000 rpm producing serum and PCV results in 3 minutes. The included reader disk allows tubes to be read while still on the rotor. The MX12 Micro-Combo centrifuge is the smart choice for any clinic or laboratory.
-
Page 2: Unpacking And Setup
•Two 5-amp 250v Fuses (Pre-installed) LW Scientific packs each MX12 Micro-Combo centrifuge with utmost care. All units undergo a QC check prior to shipping from LW Scientific headquarters in Lawrenceville, GA to ensure proper operation. Examine the outer and inner containers for any visible damage, and retain the packing material. - Page 3 Selecting and Changing Rotors Place the centrifuge on a sturdy, level surface. Verify that there are no loose objects or packing material in the tube chamber. Select a rotor and slide it down over the motor shaft. WARNING: Please use the provided thumbscrew / hex screw that comes with the rotor you are installing, DO NOT use screws for other rotors.
-
Page 4: Testing The Unit
Testing the Unit Set the time for 3 minutes and set the speed for 2,000 rpm. Press the START button. The unit should come up to speed with no vibration and a smooth and quiet sound. To set the speed: Press the SET button once and the Speed will start flashing. Now use the UP and DOWN buttons to set your desired speed. -
Page 5: Loading And Operation
WARNING: Use ONLY 24-place microhematocrit rotor or other rotors approved by LW Scientific for use in this centrifuge. Use of non-LW Scientific approved and tested rotors could lead to personal injury or damage to the centrifuge. WARNING: DO NOT OPEN LID WHILE ROTOR IS SPINNING. -
Page 6: Rotor Configurations
Rotor Configurations 24-place Microhematocrit Rotor • 100 to 12,000rpm • 13,533g (max) • Spins 24, 75mm capillary tubes 12-place Microtube Rotor • 100 to 12,000rpm • 9,177g (max) • Spins 12, 1-2ml microtubes 24-place Microtube Rotor • 100 to 12,000rpm •... -
Page 7: Care And Maintenance
Because of safety issues with high g-forces in a centrifuge, it is recommended that rotors be inspected monthly for wear and fatigue. If there is any indication of wear, the rotor should be removed from service. Contact LW Scientific for return instructions so the rotor can be evaluated by a technician for repair or replacement. -
Page 8: Specifications
G-Force Chart 24-place Microhematocrit Rotor 12-place Microtube Rotor 24-place Microtube Rotor Rotor Radius: 84mm Rotor Radius: 57mm Rotor Radius: 84mm Speed G-Force Speed G-Force Speed G-Force (rpm) (RCF) (rpm) (RCF) (rpm) (RCF) 1000 1000 1000 2000 376g 2000 380g 2000 376g 3000 845g...
Need help?
Do you have a question about the MX12 and is the answer not in the manual?
Questions and answers