Table of Contents
Advertisement
Quick Links
Advertisement
Chapters
Table of Contents

Related Manuals for KERN Optics OIV-2


Summary of Contents for KERN Optics OIV-2
- Page 1 KERN & Sohn GmbH Ziegelei 1 Tel: +49-[0]7433- 9933-0 D-72336 Balingen Fax: +49-[0]7433-9933-149 E-mail: info@kern-sohn.com Internet: www.kern-sohn.com User instructions Video microscope KERN OIV-2 OIV 254, OIV 255 Version 1.0 11/2020 OIV-2-BA-e-2010...
-
Page 3: Table Of Contents
KERN OIV-2 Version 1.0 11/2020 Operating instructions Video microscope Table of contents Before use ..................3 General notes ..........................3 Notes on the electrical system ....................3 Storage ............................4 Maintenance and cleaning ....................... 5 Nomenclature ................6 Basic data ..................7 Assembly .................. -
Page 4: Before Use
If you use an extension cable, the mains cable used must be grounded. All handling of the units that involves contact with the electrics, such as changing lamps, may only be carried out when the power supply is disconnected. OIV-2-BA-e-2010... -
Page 5: Storage
Dust or dirt inside the optics of a microscope can in many cases cause irreversible malfunctions or damage. The best way to store accessories which consist of optical elements, such as, for example, additional objectives, is in a dry box with desiccant. OIV-2-BA-e-2010... -
Page 6: Maintenance And Cleaning
Special cleaner for optical lenses Special optical cleaning cloths Bellows Brush If handled correctly and checked regularly, the microscope will function smoothly for many years. Should a repair still be necessary, contact your KERN dealer or our Technical Service. OIV-2-BA-e-2010... -
Page 7: Nomenclature
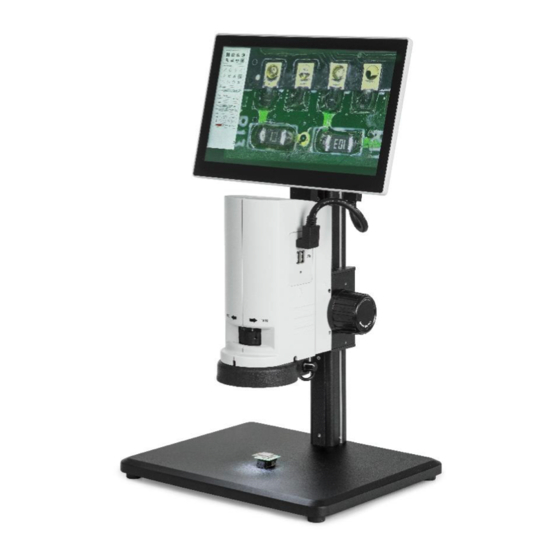
2 Nomenclature Screen HDMI connection Housing for microscope and camera USB connection (2) Power connection Snapshot button (OIV 254) Focus wheel Zoom adjustment wheel Dimmer LED ring illumination Microscope stand OIV-2-BA-e-2010... -
Page 8: Basic Data
Screen size 12 inch Screen resolution 1920x1080 HD Camera resolution 2 MP Data storage External via USB (Max 128 GB) Net weight 6 kg Dimension product WxDxH 320x260x483 mm Gross weight 7 kg Dimension packing WxDxH 510x430x350 mm Standard configuration OIV-2-BA-e-2010... -
Page 9: Assembly
Remove the cover ① with a pointed tool. Loosen the screw ② with the M3 Allen key. Adjust the flexibility using a screwdriver on the screws ③ + ④ . Replace the cover ① . The flexibility is already preset on delivery. OIV-2-BA-e-2010... -
Page 10: Operation And Functionality
① . Turn the adjustment wheel to the maximum magnification. Focus the image using the focus wheel adjustment ② . Repeat the process if necessary. The max/min parfocality is already optimally preset on delivery. OIV-2-BA-e-2010... -
Page 11: Locked Magnification
Both our OIV 255 and our OIV 254 with snapshot function require a USB stick to be connected for data storage. An image can be triggered on our OIV 254 model via the snapshot button ④ . The LED ③ indicates that the camera is operational. OIV-2-BA-e-2010... -
Page 12: Equipment
Replace it with new lighting. The LED light has Use a suitable external power The voltage is too high. suddenly burnt out. adapter. The illumination Use a suitable external power brightness is not The voltage is too low. adapter. sufficient. OIV-2-BA-e-2010... -
Page 13: Service
The illustrations may differ slightly from the product. The descriptions and illustrations in these operating instructions are subject to change without notice. Further developments to the unit may entail such changes. language versions include non-binding translation. The original German document is binding. OIV-2-BA-e-2010... - Page 14 11/2020 System This instruction manual is for the pre-installed software of the OIV-2 video microscopes. Please read this manual carefully before use and keep it in a safe place. The manufacturer reserves the right to make technically necessary modifications to the software.
- Page 16 KERN OIV-2-SW Version 1.0 11/2020 Operating instructions Software system Table of contents System and features ........................3 Functions ............................4 Switch on ..........................4 User interface .......................... 4 Controls - Auxiliary Tools ......................5 3.3.1 Image transmission ......................5 3.3.2 Photo (snapshot) ......................
-
Page 17: System And Features
2 System and features The OIV-2 software system is a new intelligent measuring system developed by Wise Image. The powerful, easy-to-use and customisable interface allows you to work with templates, a DXF import and export function, automatic edge finding and mirror function. A wide range of measuring tools are available, such as line, circle and angle measurements. -
Page 18: Functions
After you have connected the camera to the screen (12V, 1A power connection) and switched it on, the start screen appears as shown in 3.2. 3.2 User interface As a user, you can edit the user interface according to your preferences "3.3.5 Advanced settings" (the controls themselves cannot be changed). OIV-2-SW-BA-e-2010... -
Page 19: Controls - Auxiliary Tools
The desired brightness level can be adjusted as described in "3.3.5 Advanced settings - Video settings". By clicking on the symbol again, the automatic exposure compensation can be terminated. OIV-2-SW-BA-e-2010... -
Page 20: Advanced Settings
3.3.5 Advanced Settings OIV-2-SW-BA-e-2010... - Page 21 Display of the calibration: Under the item "Scale" the current scale can be shown or hidden. 3.3.5.3 Restore factory settings To reset the unit to factory settings, click on the "Restore" button. 3.3.5.4 Languages The languages English and Chinese (traditional / simplified) are supported. OIV-2-SW-BA-e-2010...
- Page 22 1) Measuring tool display: The left side shows the measuring instruments displayed on the user interface. The right side shows instruments that are not currently displayed. By marking two elements and clicking on the middle button, they can be exchanged. Click on "Apply" to apply the changes. OIV-2-SW-BA-e-2010...
- Page 23 2) Measurement data display: By ticking, you can determine which measurement data are to be included in the "Measure Data" table. Click on "Apply" to apply the applications. 3) Display options of the user interface By marking, you can determine which menu item is displayed on the user interface. OIV-2-SW-BA-e-2010...
-
Page 24: Document Management
Right-click to open the submenu for the selected file. The file can be deleted (DEL), compared with the current screen display (D/S Compare), copied and cut. A new folder can be created on an empty space. OIV-2-SW-BA-e-2010... -
Page 25: Data Display
You can view and adjust the range of automatic edge finding in the "Advanced Settings" user interface, adjusting the range in 5-25 pixels; this function can significantly improve measurement accuracy. OIV-2-SW-BA-e-2010... -
Page 26: Measurement Functions
By selecting the symbol, free lines can be drawn. These cannot be changed or moved later. 3.4.3 Comments By pressing the symbol, you can create comments. After marking the symbol, a comment can be added anywhere on the screen. OIV-2-SW-BA-e-2010... -
Page 27: Calibration
The following window opens in which you can enter the calibration details and confirm with "OK". 3.5.2 Calibration settings The user can create, delete and set units and accuracies. OIV-2-SW-BA-e-2010... -
Page 28: Custom Template (Template)
To import DXF files, they must be stored under "DXF" on an external storage medium. After the external storage medium has been recognized, the file can be found via the "File Manager" "External Storage" and opened with a double click. OIV-2-SW-BA-e-2010... -
Page 29: Scale
3.8 Logo display The display of a logo can be set in the main menu. The position and the display status (display/hidden) can be set under "Advanced Settings - Interface Editing". Other settings are set as explained in chapter 3.3.5. OIV-2-SW-BA-e-2010...
Need help?
Do you have a question about the OIV-2 and is the answer not in the manual?
Questions and answers