Table of Contents

Related Manuals for KERN Optics OIV-6


Summary of Contents for KERN Optics OIV-6
- Page 1 KERN & Sohn GmbH Ziegelei 1 Tel: +49-[0]7433- 9933-0 D-72336 Balingen Fax: +49-[0]7433-9933-149 E-mail: info@kern-sohn.com Internet: www.kern-sohn.com User instructions Video microscope KERN OIV-6 OIV 656 Version 1.1 06/2022 OIV-6-BA-e-2211...
-
Page 2: Table Of Contents
KERN OIV-6 Version 1.1 06/2022 Operating instructions Video microscope Table of contents Before use ...................... 3 General notes ............................3 Notes on the electrical system ....................... 3 Storage ..............................4 Maintenance and cleaning ........................5 Nomenclature ....................6 Basic data ....................... 8 Assembly and operation ................ -
Page 3: Before Use
If you use an extension cable, the mains cable used must be grounded. All handling of the units that involves contact with the electrics, such as changing lamps, may only be carried out when the power supply is disconnected. OIV-6-BA-e-2211... -
Page 4: Storage
Dust or dirt inside the optics of a microscope can in many cases cause irreversible malfunctions or damage. The best way to store accessories which consist of optical elements, such as, for example, additional objectives, is in a dry box with desiccant. OIV-6-BA-e-2211... -
Page 5: Maintenance And Cleaning
Special cleaner for optical lenses Special optical cleaning cloths Bellows Brush If handled correctly and checked regularly, the microscope will function smoothly for many years. Should a repair still be necessary, contact your KERN dealer or our Technical Service. OIV-6-BA-e-2211... -
Page 6: Nomenclature
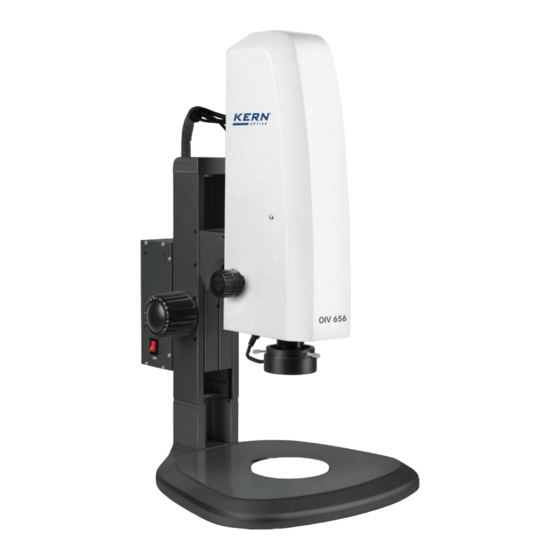
2 Nomenclature Housing Frame Microscope head Microscope holder Dimmer Zoom wheel Focusing knob Light source AC inlet Stand inlay Ständerbasis OIV-6-BA-e-2211... - Page 7 Rear USB port HDMI port DC 5V USB port DC 12V Bottom USB port HDMI port OIV-6-BA-e-2211...
-
Page 8: Basic Data
Dimension packing WxDxH 420x350x630 mm Standard configuration Model Standard - configuration Resolution Interface Sensor Field of view Objective Software functions KERN camera Zoom OIV 656 2 MP HDMI (30 FPS) CMOS 1/2,8" Ø 12,64-2,65 0,7x - 4,5x Images and videos, documentation OIV-6-BA-e-2211... -
Page 9: Assembly And Operation
Place the specimen to the platform, and check the ring light Focusing Turn the focus handwheel to adjust the image sharpness properly Dimming Adjust the brightness of the light source properly Zooming Adjust the magnification Observing the specimen (photo, video) OIV-6-BA-e-2211... -
Page 10: Focus, Magnification And Illumination
The zoom wheel has a snap in function for several key magnification levels: 0.7x, 1.0x, 2.0x, 3.0x, 4.0x, 4.5x Please don’t try to turn the zoom wheel any further when set to 0.7x or 4.5x magnification, otherwise it could be damaged irreversibly. OIV-6-BA-e-2211... -
Page 11: Software Functions
5 Software functions 5.1 Control interface OIV-6-BA-e-2211... -
Page 12: Lock Menu
Confirm and set focus by clicking “Click F” again. Click "MF": Manual Focus. Turn the focusing knob on the microscope and pull the focus progress bar with the mouse in the menu to adjust the focal length and set the right focus. OIV-6-BA-e-2211... -
Page 13: Af Roi (Auto Focus Region Of Interest / Focusing Frame)
Click "AE": Set the automatic brightness target by dragging the "Bright" progress bar. Click “ME”: Set the optimum exposure by dragging the “Gain” progress bar and “Shutter” / "Exposure time" progress bar You can go back to default auto exposure settings by clicking “Default” on the bottom of the menu. OIV-6-BA-e-2211... -
Page 14: White Balance
Click “MWB”: You can pull the "Red / Green / Blue" progress bar to adjust the red, green, and blue color value. 5.1.6 Function Contrast \ Sharpness \ Saturation \ Zoom There are four more image adjustment tools. Drag the progress bars to achieve the right settings. OIV-6-BA-e-2211... -
Page 15: Crosshair Tool
After the setting is complete, select "display" to the set the lines on the screen, and select "delete" to hide previously set lines. Set crosshair lines: Double click of the horizontal and vertical lines to get to the settings of each line. Note: ROI has to be deactivated OIV-6-BA-e-2211... - Page 16 4. Click on the set crosshair color tool . Pull down to set the crosshair color. After the color is set, draw the crosshair again to take effect. The color of the crosshair drawn before does not change. OIV-6-BA-e-2211...
-
Page 17: Photograph
Click on the photo format drop-down to select the photo format. There are two formats to choose: .jpg / .bmp. 5.1.8.4 Photo Naming Rules Select "Auto" to name the photo according to the time, select "custom" to enter a name to save. OIV-6-BA-e-2211... -
Page 18: Recording
U disk with the format of H264. The maximum length of a single recording is about 2 hours, and the size is about 4 GB. If it exceeds 2 hours, it will automatically stop recording. OIV-6-BA-e-2211... -
Page 19: Open Picture
5.1.10 Open Picture Click on the “open” icon, the interface pops up to select the picture interface: Select the picture you want and pop up the picture interface (Double click). OIV-6-BA-e-2211... -
Page 20: Compare Pictures
Select the picture you want to compare and pop up the comparison picture interface (Double click). The left side of the screen is the real-time video interface, and the right side is the selected picture. OIV-6-BA-e-2211... -
Page 21: Time Setting
By clicking on the “Freeze” icon, the current image interface can be frozen, and the image window remains static, which makes it easy to observe the measured object. After freezing, the icon becomes , click icon again to restore the real-time display interface. OIV-6-BA-e-2211... -
Page 22: Save Graphics
5.1.19 Anti screen flicker Anti-screen flicker effect is achieved after checking. 5.1.20 Black and White mode Check the “B&W” for black and white mode, default is color mode. 5.1.21 Default Click “Default” to restore various parameters to factory settings. OIV-6-BA-e-2211... -
Page 23: Measurement Interface
To open the measurement interface, click “Measurement” to carry out the measurement operations. If you want to display the menu again after a measurement operation is completed, click the right mouse button in the image area and move the mouse to the menu area. OIV-6-BA-e-2211... -
Page 24: Assist Tool
It will automatically jump to the edge. 5.2.2 Measurement Tool Straight line Horizontal line Vertical line Rectangle Parallel lines Perpendicular Angle Polygon Circle Concentric circles Double circle Line and circle Perpendicular circle Text OIV-6-BA-e-2211... -
Page 25: Scan Data
Click the “save” icon again to save the modified template. Click the “save as” icon to create a (modified) copy under another name. If clicking the “back” icon it will not save the modified template. OIV-6-BA-e-2211... -
Page 26: Measurement Operation
Delete calibration: Click the drop down calibration list, select the calibration to be deleted, and click the delete icon to delete this calibration. Click the delete icon to delete this calibration OIV-6-BA-e-2211... - Page 27 USB flash drive. The user can input the file name. Delete measurement data: In the measurement data list, select the data you want to delete with a right-click, you will be prompted to delete one item of the data list, or the whole data list. OIV-6-BA-e-2211...
- Page 28 Double-click the data in the measurement data list with the left mouse button and the selected item data will pop up in a dialog box. You can modify the color and line width of the item and lock it. The locked item can no longer be operated in the image display area. OIV-6-BA-e-2211...
- Page 29 5.2.5.6 Mark Tool Click “Text” icon. Draw an arrow at the position to be marked in the image area, enter the comment content in the pop-up window, and click "OK" to complete the marking. OIV-6-BA-e-2211...
-
Page 30: Equipment
Check the HDMI cable HDMI cable monitor connection Set the appropriate Incorrect image Monitor resolution resolution in the monitor zoom settings menu Appropriately adjust Focus adjustment is Focusing knob is too tension of the focusing too coarse tight knob OIV-6-BA-e-2211... -
Page 31: Service
The illustrations may differ slightly from the product. The descriptions and illustrations in these operating instructions are subject to change without notice. Further developments to the unit may entail such changes. All language versions include a non-binding translation. The original German document is binding. OIV-6-BA-e-2211... - Page 32 NOTES OIV-6-BA-e-2211...
Need help?
Do you have a question about the OIV-6 and is the answer not in the manual?
Questions and answers