Invacare Softform Active 2 Rx Service Manual
Powered hybrid support surface
Hide thumbs
Also See for Softform Active 2 Rx:
- User manual (24 pages) ,
- Service manual (18 pages) ,
- User manual (160 pages)

Related Manuals for Invacare Softform Active 2 Rx


Summary of Contents for Invacare Softform Active 2 Rx
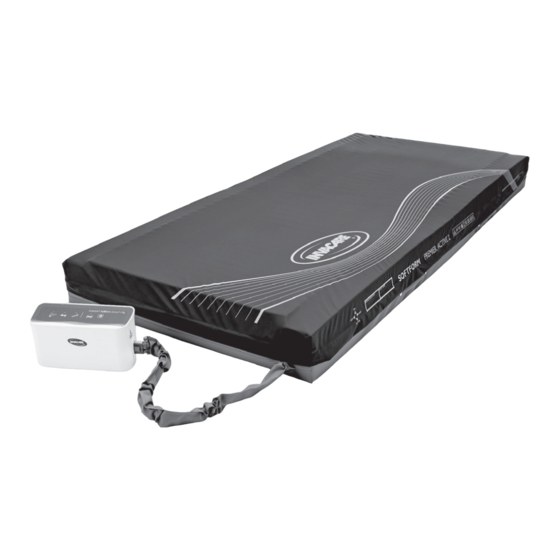
- Page 1 Invacare Softform Active 2 Rx ® ® Powered Hybrid Support Surface Service Manual PROVIDER: Keep this manual. The procedures in this manual MUST be performed by a qualified technician.
- Page 2 All rights reserved. Republication, duplication or modification in whole or in part is prohibited without prior written permission from Invacare. Trademarks are identified by ™ and ®. All trademarks are owned by or licensed to Invacare Corporation or its subsidiaries unless otherwise noted.
-
Page 3: Table Of Contents
Contents 1 General . . . . . . . . . . . . . . . . . . . . . . . . . . . . . . . . . . 4 Introduction. -
Page 4: General
Confirm the mains cable is firmly attached and the Find the user manual on Invacare’s website or contact system is connected to a working power source. your Invacare representative. See addresses at the end of this document. -
Page 5: Safety
- are only available as a kit. Always use the complete new kit when replacing a part. – Spare parts kits can be ordered from Invacare. Refer to your local Invacare website to access the electronic spare parts catalogue (ESPC). -
Page 6: Digital Control Unit
Invacare ® Softform Active ® 2 Rx 3 Digital Control Unit 3.1 Components' Overview 3.2 Circuit Board (PCB) Overview Fig. 3-1 Fig. 3-3 User's interface Fig. 3-3 Power switch connector Micro switch connector 6-pin user's interface connector Compressor connector Motor connector Fuses connector Fig. -
Page 7: Service | Digital Control Unit
Invacare ® Softform Active ® 2 Rx 4 Service | Digital Control Unit 4.1 Replacing the Front Housing efers to spare parts kit SP1633237 Risk of damaging the PCB by electro- static discharge Handle PCB's only in Electrostatic Protected Areas... - Page 8 Discard the defective front housing. 14. Place the User's interface in the new front housing. Position and tighten the provided screws. Fig. 4-6 15. Place the unit with the Invacare logo facing forward and install the new digital control's stick-on label as illustrated.
-
Page 9: Replacing The Mains Cable Socket
Invacare ® Softform Active ® 2 Rx 4.2 Replacing the Mains Cable Socket efers to spare parts kit SP1633111 Risk of damaging the PCB by electro- static discharge Handle PCB's only in Electrostatic Protected Areas PH1 Phillips key Switch off the control unit and disconnect from mains supply. -
Page 10: Replacing The Compressor
9. Plug wires A, silicon tube B, and wires C into the new UIPCB. 10. Reinstall the bottom housing (see 4.1). 11. Place the unit with the Invacare logo facing forward and install the new digital control's stick-on label as illustrated. -
Page 11: Replacing The Pcb
Invacare ® Softform Active ® 2 Rx 4. Carefully unplug the silicon tube B and cut the cable tie C using the wire clippers. Fig. 4-14 5. Unplug the compressor wire D from the PCB. 6. Remove the non-functioning compressor from the housing and install the new one. - Page 12 Invacare ® Softform Active ® 2 Rx 5. Unplug the black and green wires D from the microswitch. 6. Loosen and remove the four screws fixing the PCB to the front housing. Fig. 4-17 7. Unplug the yellow motor wire E from the PCB.
- Page 13 Invacare ® Softform Active ® 2 Rx 15. Pick the longer tube connected to the CPR connector B, put it around the motor, clockwise, and plug it back to the connector, threading it under the microswitch wires D. Fig. 4-21 16.
-
Page 14: Replacing The Cpr Connector
Invacare ® Softform Active ® 2 Rx 4.6 Replacing the CPR Connector efers to spare parts kit SP1633238 Risk of damaging the PCB by electro- static discharge Handle PCB's only in Electrostatic Protected Areas PH1 Phillips key Switch off the control unit and disconnect from mains supply. -
Page 15: Replacing The Motor
Invacare ® Softform Active ® 2 Rx 4.8 Replacing the Motor efers to spare parts kit SP1633126 Risk of damaging the PCB by electro- static discharge Handle PCB's only in Electrostatic Protected Areas PH1 Phillips key Switch off the control unit and disconnect from mains supply. -
Page 16: Replacing The Power Switch
Invacare ® Softform Active ® 2 Rx 4.9 Replacing the Power Switch efers to spare parts kit SP1633123 Risk of damaging the PCB by electro- static discharge Handle PCB's only in Electrostatic Protected Areas PH1 Phillips key Switch off the control unit and disconnect from mains supply. -
Page 17: Replacing The Bottom Housing
Invacare ® Softform Active ® 2 Rx 4.10 Replacing the Bottom Housing efers to spare parts kit SP1633246 Risk of damaging the PCB by electro- static discharge Handle PCB's only in Electrostatic Protected Areas PH1 Phillips key Switch off the control unit and disconnect from mains supply. -
Page 18: Service | Mattress
Invacare ® Softform Active ® 2 Rx 5 Service | Mattress 5.1 Replacing the CPR Connector efers to spare parts kit SP1633708 Switch off the control unit and disconnect from mains supply. 2. Open the zipper of the mattress and remove the top cover. - Page 19 Invacare ® Softform Active ® 2 Rx (page left intentionally blank) 60129676-A...
- Page 20 Norge: Portugal: Italia: Ireland: Invacare Mecc San s.r.l., Invacare Ireland Ltd, Invacare AS Invacare Lda Via dei Pini 62, Unit 5 Seatown Business Campus Grensesvingen 9, Postboks 6230, Rua Estrada Velha, 949 I-36016 Thiene (VI)
Need help?
Do you have a question about the Softform Active 2 Rx and is the answer not in the manual?
Questions and answers