Lenovo ThinkSystem Heavy Duty Full Depth 42U Rack Cabinet User Manual
Hide thumbs
Also See for ThinkSystem Heavy Duty Full Depth 42U Rack Cabinet:
- User manual (380 pages)
Table of Contents
Advertisement
Quick Links
Advertisement
Table of Contents

Related Manuals for Lenovo ThinkSystem Heavy Duty Full Depth 42U Rack Cabinet


Summary of Contents for Lenovo ThinkSystem Heavy Duty Full Depth 42U Rack Cabinet
- Page 1 ThinkSystem Heavy Duty Full Depth 42U Rack Cabinet User Guide Machine Type: 7D6D...
- Page 2 First Edition (July 2021) © Copyright Lenovo 2021. LIMITED AND RESTRICTED RIGHTS NOTICE: If data or software is delivered pursuant to a General Services Administration (GSA) contract, use, reproduction, or disclosure is subject to restrictions set forth in Contract No.
-
Page 3: Table Of Contents
Index ....147 Raised-floor environment ..Raised-floor and non-raised-floor environments ....© Copyright Lenovo 2021... - Page 4 ThinkSystem Heavy Duty Full Depth 42U Rack Cabinet User Guide...
-
Page 5: Chapter 1. Introduction
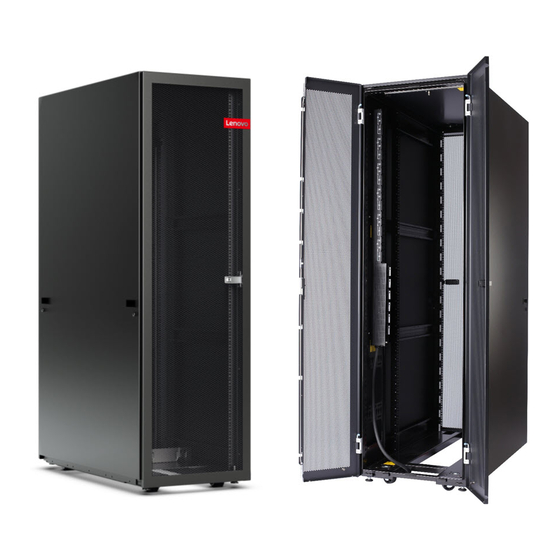
See this topic for information about ThinkSystem Heavy Duty Full Depth 42U Rack Cabinet. Figure 1. ThinkSystem Heavy Duty Full Depth 42U Rack Cabinet Features and specifications See this topic for features and specifications of ThinkSystem Heavy Duty Full Depth 42U Rack Cabinet. Features Optional •... - Page 6 Maximal loaded shipping weight 2086 4599 Rear Door Heat eXchanger V2 (empty) One unit of extension Maximal empty rack cabinet weight Rear Door Heat eXchanger V2 (filled) Maximal deployed weight 1845 4068 ThinkSystem Heavy Duty Full Depth 42U Rack Cabinet User Guide...
-
Page 7: Chapter 2. Rack Cabinet Components
See this topic for components of ThinkSystem Heavy Duty Full Depth 42U Rack Cabinet. Parts listing See this topic to learn about parts of ThinkSystem Heavy Duty Full Depth 42U Rack Cabinet. Figure 2. Parts listing Table 3. Heavy Duty Full Depth 42U Rack Cabinet components... -
Page 8: Rack Cabinet Options
See this topic to learn about optional components that are supported by ThinkSystem Heavy Duty Full Depth 42U Rack Cabinet. Rear Door Heat eXchanger V2 See this topic to learn about parts of ThinkSystem Rear Door Heat eXchanger V2. ThinkSystem Heavy Duty Full Depth 42U Rack Cabinet User Guide... - Page 9 Figure 4. ThinkSystem Rear Door Heat eXchanger V2 components Table 4. Rear Door Heat eXchanger components Rear Door Heat eXchanger assembly Hinge kit Air-purging valve Lift handles Air-purging tool Lift handle Door latch Serial number Latch plate Lift handle Drain valve Lower air baffle Return manifold coupling Upper air baffle...
- Page 10 100% indicates that the heat exchanger not only removed all of the heat generated by the devices but further cooled the air so that the average air temperature leaving the rack is actually lower than that entering the rack. ThinkSystem Heavy Duty Full Depth 42U Rack Cabinet User Guide...
-
Page 11: 42U Heavy Duty Rack Extension
Figure 5. Typical performance of the heat exchanger, 30 kW heat load As described in “Water specifications for the secondary cooling loop” on page 52, a given water temperature may be used only if the system that is supplying the water is able to measure the room dew point and automatically adjust the water temperature accordingly. - Page 12 There are four 89 (width) x 178 (height) mm openings on each extension panel: • U7 to U11 • U13 to U17 • U25 to U29 • U32 to U36 ThinkSystem Heavy Duty Full Depth 42U Rack Cabinet User Guide...
-
Page 13: Cable Management Brackets
Figure 8. Openings on a extension panel For installation procedure, see “Install 42U Heavy Duty Rack Extension” on page 27. Cable management brackets See this topic to learn about the cable management brackets. Chapter 2 Rack cabinet components... - Page 14 Six screws Rear cable management bracket Figure 10. Rear cable management bracket components Four screws Rear cable management bracket For installation procedure, see “Install a cable management bracket” on page 139. ThinkSystem Heavy Duty Full Depth 42U Rack Cabinet User Guide...
-
Page 15: Power Distribution Units And Console Switches
Power distribution units and console switches See this topic to learn about the power distribution units and console switches that are supported by the rack cabinet. This cabinet supports the following PDUs/switches: • 0U PDU: – Without rack extension: Four units –... - Page 16 ThinkSystem Heavy Duty Full Depth 42U Rack Cabinet User Guide...
-
Page 17: Chapter 3. Rack Cabinet Setup
Follow the guidelines in this topic to make plans for the space that will contain the rack cabinet. See the following illustration for distances between various components on the bottom of the rack cabinet, and make plans accordingly. © Copyright Lenovo 2021... -
Page 18: Unpack The Rack Cabinet
• Space requirement: You will need minimum of 2885 mm (113.6 inch) on the rear side of the pallet to unpack the rack cabinet. • Tool requirement: You will need one sharp tool. • Forklift requirements: Note: Only the front side of the pallet is available for the forklift. ThinkSystem Heavy Duty Full Depth 42U Rack Cabinet User Guide... - Page 19 Figure 12. Forklift – must be longer than 350 mm. – must be shorter than 700 mm. – must be between 1450 to 1650 mm. – Loading capacity must be larger than 3000 kg. Step 1. Cut the four straps with a sharp tool. Figure 13.
- Page 20 Remove the top bars and side boxes. Note: One of the side cartons contains the ramps and is quite heavy. Lifting it requires two people. Figure 15. Removing the top bars and side boxes ThinkSystem Heavy Duty Full Depth 42U Rack Cabinet User Guide...
- Page 21 Step 4. Release and remove the side frames. Figure 16. Removing the side frames Slightly lift and slide the six horizontal bars left to disengage their right ends from the slots on the right frame. Remove the right frame along with the three horizontal bars. Remove the left frame along with the nine horizontal bars.
- Page 22 Figure 18. Removing the rear shipping bracket Step 7. Rise each of the four leveling pads with wrench in turns until they no long bear the weight of the rack cabinet. ThinkSystem Heavy Duty Full Depth 42U Rack Cabinet User Guide...
- Page 23 Figure 19. Rising the leveling pads Chapter 3 Rack cabinet setup...
-
Page 24: Install The Baying Kit
More than one rack cabinets could be connected into a suite. See this topic to learn how to attach rack cabinets into a suite with the baying kit. About this task ThinkSystem Heavy Duty Full Depth 42U Rack Cabinet User Guide... - Page 25 Note: To maintain balance of the rack cabinet, do not remove the outriggers except when installing the baying kit. R002 DANGER • Always lower the leveling pads on the rack cabinet. • Always install stabilizer brackets on the rack cabinet. •...
- Page 26 Remove the four screws that secure each of the outriggers, and remove the outriggers. Figure 24. Removing the outriggers Step 4. Remove the front and rear doors of every rack cabinet that is to be part of the suite. ThinkSystem Heavy Duty Full Depth 42U Rack Cabinet User Guide...
- Page 27 Figure 25. Removing a door Hold the door in place, and lift both hinge pins until they lock in the open position so that the door is disengaged. Remove the door from the rack cabinet frame. Step 5. (Optional) Remove all the sides covers that will contact each other in the suite. Chapter 3 Rack cabinet setup...
- Page 28 Align the four screw holes of two attachment brackets with the holes in the neighboring racks, and secure each bracket to the racks with four screws. Note: Do not fully tighten the screws on the first bracket until securing the second bracket. ThinkSystem Heavy Duty Full Depth 42U Rack Cabinet User Guide...
- Page 29 Figure 27. Installing attachment brackets Step 8. Reinstall all the doors that have been removed. Chapter 3 Rack cabinet setup...
-
Page 30: Install The Front Stabilizer
Procedure Step 1. Unlock and open the front door. Step 2. Secure the stabilizer to the front of the rack cabinet with four screws. Figure 29. Installing the front stabilizer ThinkSystem Heavy Duty Full Depth 42U Rack Cabinet User Guide... -
Page 31: Install 42U Heavy Duty Rack Extension
Step 3. Secure the stabilizer to the floor with two screws. Figure 30. Securing the stabilizer to the floor Install 42U Heavy Duty Rack Extension See this topic to learn how to install 42U Heavy Duty Rack Extension. Notes: • Each unit of extension module comes with additional capacity of one unit 0U PDU to each side of the rack. •... - Page 32 Hold the door in place, and lift both hinge pins until they lock in the open position so that the door is disengaged. Remove the door from the rack cabinet frame. Step 2. Remove the two hinges and the two doorstops. ThinkSystem Heavy Duty Full Depth 42U Rack Cabinet User Guide...
- Page 33 Figure 32. Removing the door hinges and doorstops Step 3. Remove the door latch. Figure 33. Removing the door latch Step 4. Secure an extension panel to the side of the rack with seven screws, and repeat the step on the other extension panel.
- Page 34 Figure 34. Installing an extension panel Step 5. Align the top cover with the screw holes on the front of the rack, and secure each side with two screws. ThinkSystem Heavy Duty Full Depth 42U Rack Cabinet User Guide...
- Page 35 Figure 35. Installing the extension top cover Step 6. Secure each of the two front panels to the extension panels with four screws. If the extension panel screws have not been fully tightened, tighten them now. Chapter 3 Rack cabinet setup...
- Page 36 Figure 36. Installing the extension front panels Step 7. Install the two hinges, two doorstops, and the door latch to the rack. ThinkSystem Heavy Duty Full Depth 42U Rack Cabinet User Guide...
- Page 37 Figure 37. Install the hinges, doorstops, and door latch Step 8. Install the door back to the rack. Chapter 3 Rack cabinet setup...
-
Page 38: Install Nuts On The Mounting Flanges
See this topic to learn how to adjust mounting flange holes with various types of nuts. Install clip nuts Procedure Step 1. Locate the flange hole to install the nut in. Step 2. Slide the nut over the target mounting hole. ThinkSystem Heavy Duty Full Depth 42U Rack Cabinet User Guide... -
Page 39: Install Cage Nuts With A Flat-Blade Screwdriver
Figure 39. Installing a clip nut Install cage nuts with a flat-blade screwdriver Watch the procedure. A video of this procedure is available from the following links: • YouTube: https://www.youtube.com/playlist?list=PLYV5R7hVcs-DOG7dnH9Zxy67Q3dez4ZsM • Youku: https://list.youku.com/albumlist/show/id_59715555 Procedure Step 1. Locate the flange hole to install the nut in. Step 2. -
Page 40: Install Cage Nuts With Insertion Tool
Secure each of the two the two grounding plates to the bottom of the cabinet door and the flange with a screw, and connect the ends of the grounding jumper wire to the two plates. ThinkSystem Heavy Duty Full Depth 42U Rack Cabinet User Guide... - Page 41 Figure 42. Installing the rack grounding kit Step 2. Remove the side cover. Figure 43. Removing a side cover Unlock the side cover with the key. Press on the two latches on both sides of the cover to disengage it from the rack. Rotate the top of the side cover away from the rack, and remove it.
- Page 42 Figure 44. Installing the grounding jumper wire Step 4. Secure the side cover to the rack cabinet. ThinkSystem Heavy Duty Full Depth 42U Rack Cabinet User Guide...
-
Page 43: Set Up Rear Door Heat Exchanger V2
Figure 45. Securing the side cover Note: This procedure is best executed by two people. Press and hold the latch of one side, and firmly press the upper corner in. Repeat the previous step on the other side. Lock the side cover with the key. Step 5. - Page 44 R004 CAUTION: See the instructions in the rack documentation before you install devices, remove devices, or relocate the rack. S038 ThinkSystem Heavy Duty Full Depth 42U Rack Cabinet User Guide...
-
Page 45: Complete Setup Of Rear Door Heat Exchanger V2 That Comes With The Rack
CAUTION: Eye protection should be worn for this procedure. Complete setup of Rear Door Heat eXchanger V2 that comes with the rack See this topic to learn how to complete setup of ThinkSystem Rear Door Heat eXchanger V2 when it comes already installed to the rack. -
Page 46: Replace A Regular Door With Rear Door Heat Exchanger V2
Extend each of the four leveling pads in turns until they firmly contact the floor and support the rack cabinet. Make sure the cabinet is balanced by gently pushing the cabinet. If it tilts, adjust the length of the leveling pads until the cabinet is well balanced. ThinkSystem Heavy Duty Full Depth 42U Rack Cabinet User Guide... - Page 47 Figure 48. Lowering the leveling pads Step 2. Remove the rear door from the rack cabinet. Chapter 3 Rack cabinet setup...
- Page 48 Figure 49. Removing a door Step 3. Remove the two door hinges and the two doorstops. ThinkSystem Heavy Duty Full Depth 42U Rack Cabinet User Guide...
- Page 49 Figure 50. Removing the door hinges and doorstops Step 4. Remove the door latch. Figure 51. Removing the door latch Step 5. Align the holes in the latch plate with those in the two clip nuts; then, secure the latch plate in place with two M6 screws.
- Page 50 Figure 53. Installing the upper air baffle Remove the two screws that secure the rear cable access cover, and remove the cover. Align the upper air baffle with the slot, and secure it with three screws. ThinkSystem Heavy Duty Full Depth 42U Rack Cabinet User Guide...
- Page 51 Step 7. Remove the four screws that secure the cable access bar, and remove the bar. Figure 54. Removing the cable access bar Step 8. Align the lower air baffle to the bottom cable slot, and secure it with four screws as illustrated. Figure 55.
- Page 52 Step 10. Face the bottom side of the carton, remove the carton top, and slit the two carton corners on your right-hand side with a knife. Then, fold the right carton panel down to the ground, and rotate the threes carton inserts down. ThinkSystem Heavy Duty Full Depth 42U Rack Cabinet User Guide...
- Page 53 Bottom Figure 57. Unpacking the heat exchanger Step 11. With three people, rotate the heat exchanger to vertical on the three carton inserts. Then, remove the inner and outer hose access panels while one person hold the heat exchanger. Chapter 3 Rack cabinet setup...
- Page 54 Figure 59. Lifting the heat exchanger with three people Handles that the first person hold on to Spots that the third person hold on to Handles that the second person hold on to ThinkSystem Heavy Duty Full Depth 42U Rack Cabinet User Guide...
- Page 55 Step 13. Carry the heat exchanger with three people to the cabinet frame. Align the bottom corner with the bottom hinge pin on the rack cabinet; then, lower the heat exchanger to fit the pin in. Figure 60. Installing the heat exchanger to the rack cabinet Step 14.
-
Page 56: Water Specifications For The Secondary Cooling Loop
The water that is used to fill, refill, and supply the heat exchanger must be particle-free deionized water or particle-free distilled water with appropriate controls for avoiding the following issues: • Metal corrosion • Bacterial fouling • Scaling ThinkSystem Heavy Duty Full Depth 42U Rack Cabinet User Guide... - Page 57 The water cannot originate from the primary chilled-water system for the building, but must be supplied as part of a secondary closed-loop system. Important: Do not use glycol solutions, because they can adversely affect the cooling performance of the heat exchanger. Materials to use in secondary loops Use any of the following materials in supply lines, connectors, manifolds, pumps and any other hardware that makes up the closed-loop water-supply system:...
- Page 58 Figure 5 on page 16 through Figure 8 on page ThinkSystem Heavy Duty Full Depth 42U Rack Cabinet User Guide...
- Page 59 19 illustrate the use of circuit setters to adjust the flow rate to each heat exchanger. Other methods, such as inline or external flowmeters, can provide a more accurate method for setting the flow rate through the individual shutoff valves. •...
- Page 60 This figure shows a typical cooling solution and identifies the components of the primary cooling loop and the secondary cooling loop. • Coolant distribution unit with a fabricated facilities solution ThinkSystem Heavy Duty Full Depth 42U Rack Cabinet User Guide...
- Page 61 Figure 63. Coolant distribution unit with a fabricated facilities solution This figure shows an example of a facilities fabricated solution. The actual number of heat exchangers that are connected to a secondary loop depends on the capacity of the coolant distribution unit that is running the secondary loop.
- Page 62 • Coolant distribution unit with a water chiller unit to provide conditioned water ThinkSystem Heavy Duty Full Depth 42U Rack Cabinet User Guide...
- Page 63 Figure 65. Coolant distribution unit that uses off-the-shelf supplier solutions Notes: Supplier-built water chiller unit required features: – Temperature and flow metering (monitoring) – Leak detection or water level sensing and shutdown – Local and remote monitoring and control – Access port for filling and water treatment This figure shows an example of a water chiller unit that supplies conditioned water to one or more heat exchangers.
- Page 64 Figure 66 “The following figure” on page 60 shows another layout for multiple water circuits. Figure 66. Typical central manifold (at a central location for multiple water circuits) Figure 67 “The following figure” on page 61 shows an extended manifold layout. ThinkSystem Heavy Duty Full Depth 42U Rack Cabinet User Guide...
- Page 65 Figure 67. Typical extended manifold (along aisles between racks) Flexible hoses and connections to manifolds and heat exchangers Pipe and hose configurations can vary. You can determine the best configuration for your installation by analyzing the needs of your facilities, or a site preparation representative can provide this analysis. Flexible hoses are needed to supply and return water between your hard plumbing (manifolds and coolant distribution units) and the heat exchanger (allowing needed movement for opening and closing the rack rear door).
-
Page 66: Fill The Heat Exchanger With Water
Procedure Step 1. If the inner hose access panel is installed, lift and remove it from the heat exchanger. Figure 68. Removing the inner hose access panel ThinkSystem Heavy Duty Full Depth 42U Rack Cabinet User Guide... - Page 67 Step 2. If the outer hose access panel is installed, remove the screw that secures the panel (if applicable), then lift and remove the panel from the heat exchanger. Figure 69. Removing the outer hose access panel Step 3. Purge the nitrogen that has been filled in the hose from the hose. Figure 70.
- Page 68 Attach the air-purging tool to the air-purging valve at the top of the heat exchanger, and place the drain end into a 2-liter (or larger) container to catch the water and air bubbles that escape during the filling procedure. ThinkSystem Heavy Duty Full Depth 42U Rack Cabinet User Guide...
- Page 69 Figure 72. Installing the air-purging tool Step 7. When there is a steady stream of liquid into the container from the air-purging tool, disconnect the tool from the heat exchanger. Attention: If water drips from the air-purging valve after you remove the air-purging tool, reattach the tool and disconnect it again to seal the valve.
- Page 70 Figure 73. Removing the air-purging tool Step 8. Install the valve cap back to the air-purging valve. Figure 74. Installing the valve cap ThinkSystem Heavy Duty Full Depth 42U Rack Cabinet User Guide...
-
Page 71: Instal A 0/1U Device Into The Rack
Step 9. Align the hooks on the inner hose access panel with the slots on the inner side of the heat exchanger, and lower the panel to secure it. Figure 75. Installing the inner hose access panel Step 10. Align the slots on the outer hose access panel with the hooks on the outer side of the heat exchanger, and lower the panel to attach it to the heat exchanger. - Page 72 S014 CAUTION: Hazardous voltage, current, and energy levels might be present. Only a qualified service technician is authorized to remove the covers where the label is attached. R009 ThinkSystem Heavy Duty Full Depth 42U Rack Cabinet User Guide...
-
Page 73: Instal A 0U Device
CAUTION: Removing components from the upper positions in the Enterprise Rack cabinet improves rack stability during relocation. Follow these general guidelines whenever you relocate a populated rack cabinet within a room or building: • Reduce the weight of the rack cabinet by removing equipment starting at the top of the rack cabinet. -
Page 74: Install A 1U Pdu Or Console Switch To The Rack Side
Refer to the document that comes with the device, and install the mounting brackets if necessary. Step 2. Align the mounting brackets with the holes in the rack flange, and secure it with four sets of screw and nut. ThinkSystem Heavy Duty Full Depth 42U Rack Cabinet User Guide... -
Page 75: Instal A 1U Device Into The Side Pocket
Figure 78. Installing a 1U device into the rack side Instal a 1U device into the side pocket Procedure Step 1. Refer to the document that comes with the device, and install the mounting brackets if necessary. Step 2. Remove the side cover next to the side pocket (see “Remove a side cover” on page 81 ). Step 3. - Page 76 • It is advised to complete all the cable connection and setup task for the device before installing the side cover back. Step 5. Install the side cover back (see “Install a side cover” on page 82). ThinkSystem Heavy Duty Full Depth 42U Rack Cabinet User Guide...
-
Page 77: Chapter 4. Managing Cables And Hoses
Cable access bar on the bottom of the rack cabinet When managing cables near the bottom of the rack cabinet, route the cables in the open space after removing the cable access bar, and install the bar to contain the cables. © Copyright Lenovo 2021... - Page 78 Cable access openings on the top of the rack cabinet Front cable access cover Rear cable access cover Figure 82. Cable access openings on the top of the cabinet Front cable access cover ThinkSystem Heavy Duty Full Depth 42U Rack Cabinet User Guide...
- Page 79 Slide the cover as far forward as possible to close off the open area, thus prevent hot exhaust air from recirculating back through the rack. Rear cable access cover Slide the cover all the way open or closed, or in any intermediate position. Leaving the cover open provides extra exhaust area for components near the top and bottom of the rack;...
- Page 80 Cable strap module Figure 84. Cable strap module Two lines of built-in cable straps along the front door frame are available for cable management. ThinkSystem Heavy Duty Full Depth 42U Rack Cabinet User Guide...
-
Page 81: Routing Cables/Hoses For Water-Cooled System
Cable access openings on extension panel Figure 85. Cable access openings on extension panel There are four 89 (width) x 178 (height) mm openings on each extension panel: • U7 to U11 • U13 to U17 • U25 to U29 •... -
Page 82: Raised-Floor Environment
Raised-floor environment The following illustrations show routing and securing the hoses in a raised-floor environment for individual racks and adjacent racks. ThinkSystem Heavy Duty Full Depth 42U Rack Cabinet User Guide... - Page 83 Figure 88. Routing and securing the hoses in a raised-floor environment for individual racks (from the top, looking down) In the following illustration, the numbers represent the suggested placement of racks that share one hole in the floor. For example, if three racks will share one hole in the floor, place the racks as shown by the numbers 1, 2, and 3.
-
Page 84: Raised-Floor And Non-Raised-Floor Environments
7 on page 52 through step 10 on page 52 in Filling the heat exchanger with water. Step 3. Check the heat exchanger for air in the manifolds again after one month of operation, to ensure that the heat exchanger is filled correctly. ThinkSystem Heavy Duty Full Depth 42U Rack Cabinet User Guide... -
Page 85: Chapter 5. Hardware Removal, Installation And Reversion
A video of this procedure is available from the following links: • YouTube: https://www.youtube.com/playlist?list=PLYV5R7hVcs-DOG7dnH9Zxy67Q3dez4ZsM • Youku: https://list.youku.com/albumlist/show/id_59715555 Procedure Step 1. Remove the side cover. Figure 91. Removing a side cover Unlock the side cover with the key. © Copyright Lenovo 2021... -
Page 86: Install A Side Cover
Align the bottom of the side cover with the slot on the rack cabinet. Rotate the top of the cover towards the rack. Step 2. Secure the side cover to the rack cabinet. ThinkSystem Heavy Duty Full Depth 42U Rack Cabinet User Guide... -
Page 87: Installing, Removing, And Converting The Door
Figure 93. Securing the side cover Note: This procedure is best executed by two people. Press and hold the latch of one side, and firmly press the upper corner in. Repeat the previous step on the other side. Lock the side cover with the key. Installing, removing, and converting the door See this topic to learn how to remove, install and convert the door Remove and install a door... - Page 88 Remove the door from the rack cabinet frame. Install a door Watch the procedure. A video of this procedure is available from the following links: • YouTube: https://www.youtube.com/playlist?list=PLYV5R7hVcs-DOG7dnH9Zxy67Q3dez4ZsM • Youku: https://list.youku.com/albumlist/show/id_59715555 Procedure Step 1. Install the door. ThinkSystem Heavy Duty Full Depth 42U Rack Cabinet User Guide...
-
Page 89: Reverse A Door
Figure 95. Installing a door Align the door with the hinges, and hold the door in place. Push the hinge pins down to the closed position so that the door is secured. Reverse a door See this topic to learn how to reverse a door. Watch the procedure. - Page 90 Hold the door in place, and lift both hinge pins until they lock in the open position so that the door is disengaged. Remove the door from the rack cabinet frame. Step 2. Remove the two hinges and the two doorstops. ThinkSystem Heavy Duty Full Depth 42U Rack Cabinet User Guide...
- Page 91 Figure 97. Removing the hinges and the doorstops Step 3. Reverse the door latch. Chapter 5 Hardware removal, installation and reversion...
- Page 92 Remove the two screws that secure the latch to the rack. Rotate the latch 180 degree, and secure it to the opposite side on the rack cabinet with two screws. Step 4. Reverse the hinge orientation ThinkSystem Heavy Duty Full Depth 42U Rack Cabinet User Guide...
- Page 93 Figure 99. Reversing the hinge orientation Pull the retainer spring out to release the hinge pin from the hinge. Pull and remove the pin from the hinge. Rotate the hinge 180 degree. Insert the pin from the top of the hinge. Step 5.
- Page 94 Figure 100. Installing hinges and doorstops Step 7. Reverse the door handle. ThinkSystem Heavy Duty Full Depth 42U Rack Cabinet User Guide...
- Page 95 Figure 101. Reversing the door handle Rotate the door 180 degree. Remove the screw that secures the handle to the door. Rotate the door handle 180 degree, and secure it to the door with a screw. Step 8. Install the door. Chapter 5 Hardware removal, installation and reversion...
-
Page 96: Rear Door Heat Exchanger V2 Replacement
See this topic to learn how to drain the heat exchanger of water. Watch the procedure. A video of this procedure is available from the following links: • YouTube: https://www.youtube.com/playlist?list=PLYV5R7hVcs-DOG7dnH9Zxy67Q3dez4ZsM • Youku: https://list.youku.com/albumlist/show/id_59715555 About this task S038 ThinkSystem Heavy Duty Full Depth 42U Rack Cabinet User Guide... - Page 97 CAUTION: Eye protection should be worn for this procedure. Attention: Wear safety goggles or other eye protection whenever you fill, drain, or purge air or nitrogen from the heat exchanger. Procedure Step 1. Lift and remove the inner hose access panel from the heat exchanger. Figure 103.
- Page 98 ) from the supply manifold-coupling ( • Remove the return hose assembly ( ) from the return manifold-coupling ( Step 4. Remove the caps from the air-purging and drain valve. ThinkSystem Heavy Duty Full Depth 42U Rack Cabinet User Guide...
- Page 99 Figure 106. Removing valve caps Step 5. Remove the extension hose from the air-purging tool. Figure 107. Removing the extension hose Step 6. Insert one end of the air-purging tool extension hose into the center of air-purging valve stem at the top of the heat exchanger to allow air to enter the manifolds.
- Page 100 2-liter (or larger) container to catch the water. Figure 109. Draining water Step 8. When the water is drained completely, Remove the air-purging-tool extension hose from the valve. ThinkSystem Heavy Duty Full Depth 42U Rack Cabinet User Guide...
- Page 101 Figure 110. Removing the air-purging tool extension hose Step 9. Remove the air-purging tool from the drain valve. Figure 111. Removing the air-purging tool Step 10. Install the two caps back to the air-purging and drain valve. Chapter 5 Hardware removal, installation and reversion...
-
Page 102: Remove Rear Door Heat Exchanger V2
Remove Rear Door Heat eXchanger V2 About this task S036 18 - 32 kg (39 - 70 lb) 32 - 55 kg (70 - 121 lb) CAUTION: Use safe practices when lifting. S010 ThinkSystem Heavy Duty Full Depth 42U Rack Cabinet User Guide... - Page 103 CAUTION: Do not place any object weighing more than 82 kg (180 lb) on top of rack-mounted devices. S019 CAUTION: The power-control button on the device does not turn off the electrical current supplied to the device. The device also might have more than one connection to dc power. To remove all electrical current from the device, ensure that all connections to dc power are disconnected at the dc power input terminals.
- Page 104 Hold the heat exchanger in place with two people, and remove the three screws that secure the top hinge bracket to the heat exchanger. Figure 113. Removing the top hinge bracket Step 3. Hold the heat exchanger with three people on the handles/spots as illustrated. ThinkSystem Heavy Duty Full Depth 42U Rack Cabinet User Guide...
- Page 105 Figure 114. Lifting the heat exchanger with three people Handles that the first person hold on to Spots that the third person hold on to Handles that the second person hold on to Step 4. Lift the heat exchanger with three people as described in the previous step, and remove it from the rack cabinet.
-
Page 106: Install Rear Door Heat Exchanger V2
See this topic to learn how to install ThinkSystem Rear Door Heat eXchanger V2. About this task S036 18 - 32 kg (39 - 70 lb) 32 - 55 kg (70 - 121 lb) CAUTION: Use safe practices when lifting. S010 ThinkSystem Heavy Duty Full Depth 42U Rack Cabinet User Guide... - Page 107 CAUTION: Do not place any object weighing more than 82 kg (180 lb) on top of rack-mounted devices. S019 CAUTION: The power-control button on the device does not turn off the electrical current supplied to the device. The device also might have more than one connection to dc power. To remove all electrical current from the device, ensure that all connections to dc power are disconnected at the dc power input terminals.
- Page 108 Face the bottom side of the carton, remove the carton top, and slit the two carton corners on your right-hand side with a knife. Then, fold the right carton panel down to the ground, and rotate the threes carton inserts down. ThinkSystem Heavy Duty Full Depth 42U Rack Cabinet User Guide...
- Page 109 Bottom Figure 116. Unpacking the heat exchanger Step 2. With three people, rotate the heat exchanger to vertical on the three carton inserts. Then, remove the inner and outer hose access panels while one person hold the heat exchanger. Chapter 5 Hardware removal, installation and reversion...
- Page 110 Figure 118. Lifting the heat exchanger with three people Handles that the first person hold on to Spots that the third person hold on to Handles that the second person hold on to ThinkSystem Heavy Duty Full Depth 42U Rack Cabinet User Guide...
- Page 111 Step 4. Carry the heat exchanger with three people to the cabinet frame. Align the bottom corner with the bottom hinge pin on the rack cabinet; then, lower the heat exchanger to fit the pin in. Figure 119. Installing the heat exchanger to the rack cabinet Step 5.
-
Page 112: Fill The Heat Exchanger With Water
Attention: Wear safety goggles or other eye protection whenever you fill, drain, or purge air or nitrogen from the heat exchanger. Procedure Step 1. If the inner hose access panel is installed, lift and remove it from the heat exchanger. ThinkSystem Heavy Duty Full Depth 42U Rack Cabinet User Guide... - Page 113 Figure 121. Removing the inner hose access panel Step 2. If the outer hose access panel is installed, remove the screw that secures the panel (if applicable), then lift and remove the panel from the heat exchanger. Figure 122. Removing the outer hose access panel Step 3.
- Page 114 Align the supply hose coupling with the supply manifold, push it in and pull the collar backward until it locks in place with an audible click. Then, repeat the same procedure on the return hose and manifold. Figure 124. Supply and return hoses and manifold couplings ThinkSystem Heavy Duty Full Depth 42U Rack Cabinet User Guide...
- Page 115 • Connect the supply hose assembly ( ) to the supply manifold-coupling ( • Connect the return hose assembly ( ) to the return manifold-coupling ( Step 5. Turn on the flow of water to the heat exchanger, and let it run for several minutes. Step 6.
- Page 116 Figure 126. Removing the air-purging tool Step 8. Install the valve cap back to the air-purging valve. Figure 127. Installing the valve cap ThinkSystem Heavy Duty Full Depth 42U Rack Cabinet User Guide...
-
Page 117: Replace The Door Latch
Step 9. Align the hooks on the inner hose access panel with the slots on the inner side of the heat exchanger, and lower the panel to secure it. Figure 128. Installing the inner hose access panel Step 10. Align the slots on the outer hose access panel with the hooks on the outer side of the heat exchanger, and lower the panel to attach it to the heat exchanger. -
Page 118: Installing And Removing 42U Heavy Duty Rack Extension
However, if the rear side has been installed with the Rear Door Heat Exchanger, the rack extension cannot be installed. Watch the procedure. A video of this procedure is available from the following links: • YouTube: https://www.youtube.com/playlist?list=PLYV5R7hVcs-DOG7dnH9Zxy67Q3dez4ZsM • Youku: https://list.youku.com/albumlist/show/id_59715555 Procedure ThinkSystem Heavy Duty Full Depth 42U Rack Cabinet User Guide... - Page 119 Step 1. Secure an extension panel to the side of the rack with seven screws, and repeat the step on the other extension panel. Note: It is advised not to fully tighten the screws in this step. Figure 131. Installing an extension panel Step 2.
- Page 120 Figure 132. Installing the extension top cover Step 3. Secure each of the two front panels to the extension panels with four screws. If the extension panel screws have not been fully tightened, tighten them now. ThinkSystem Heavy Duty Full Depth 42U Rack Cabinet User Guide...
- Page 121 Figure 133. Installing the extension front panels Step 4. Install the two hinges, two doorstops, and the door latch to the rack. Chapter 5 Hardware removal, installation and reversion...
- Page 122 Figure 134. Install the hinges, doorstops, and door latch Step 5. Install the door back to the rack. ThinkSystem Heavy Duty Full Depth 42U Rack Cabinet User Guide...
-
Page 123: Remove 42U Heavy Duty Rack Extension
Figure 135. Installing the door Align the door with the hinges, and hold the door in place. Push the hinge pins down to the closed position so that the door is secured. Remove 42U Heavy Duty Rack Extension See this topic to learn how to remove 42U Heavy Duty Rack Extension. Watch the procedure. - Page 124 Remove the two hinges, two door stops, and the door latch if necessary. Figure 136. Removing the door hinges, doorstops and latch Step 4. Remove the four screws that secure each of the two front covers, and remove the covers. ThinkSystem Heavy Duty Full Depth 42U Rack Cabinet User Guide...
- Page 125 Figure 137. Removing the extension front covers Step 5. Remove the four screws that secure the top cover, and remove the cover. Chapter 5 Hardware removal, installation and reversion...
- Page 126 Figure 138. Removing the extension top cover Step 6. Remove the seven screws that secure the extension panel, and repeat the step on the other extension panel. ThinkSystem Heavy Duty Full Depth 42U Rack Cabinet User Guide...
- Page 127 Figure 139. Installing an extension panel After this task is completed Complete the following steps to install the door back to the rack if necessary. 1. Install the door latch. Chapter 5 Hardware removal, installation and reversion...
- Page 128 Figure 140. Installing the door latch 2. Install the two hinges and the two doorstops. Figure 141. Installing the hinges and doorstops 3. Install the door. ThinkSystem Heavy Duty Full Depth 42U Rack Cabinet User Guide...
-
Page 129: Installing And Removing Power Distribution Units Or Switches
Figure 142. Installing the door Align the door with the hinges, and hold the door in place. Push the hinge pins down to the closed position so that the door is secured. Installing and removing power distribution units or switches See this topic to learn how to remove and install power distribution units or switches. - Page 130 Figure 143. Installing a 0U PDU Remove a 0U PDU Procedure Step 1. Lift the PDU to detach it from the rack, and remove it. ThinkSystem Heavy Duty Full Depth 42U Rack Cabinet User Guide...
-
Page 131: Install Or Remove A 1U Device Into Or From The Rack Side
Figure 144. Removing a 0U PDU Install or remove a 1U device into or from the rack side See this topic to learn how to install or remove a 1U device into or from the rack side. About this task S001 Chapter 5 Hardware removal, installation and reversion... - Page 132 Removing components from the upper positions in the Enterprise Rack cabinet improves rack stability during relocation. Follow these general guidelines whenever you relocate a populated rack cabinet within a room or building: ThinkSystem Heavy Duty Full Depth 42U Rack Cabinet User Guide...
- Page 133 • Reduce the weight of the rack cabinet by removing equipment starting at the top of the rack cabinet. When possible, restore the rack cabinet to the configuration of the rack cabinet as you received it. If this configuration is not known, you must do the following: –...
- Page 134 Figure 145. Installing a 1U device into the rack side Remove a 1U PDU or console switch from the rack side Procedure Step 1. Remove the four screws and nuts that secure the device, and remove the device. ThinkSystem Heavy Duty Full Depth 42U Rack Cabinet User Guide...
-
Page 135: Installing And Removing A 1U Device In/From The Side Pocket
Figure 146. Removing a 1U device from the rack side Installing and removing a 1U device in/from the side pocket See this topic to learn how to install or remove a 1U PDU or console switch in the side pocket. About this task Make sure to complete all the required cable connection and device setup before installing baying kits to the cabinets, as these tasks will be hard to operate afterwards. - Page 136 Step 5. Install the side cover back (see “Install a side cover” on page 82). Remove a 1U device from the side pocket Procedure Step 1. Remove the device. ThinkSystem Heavy Duty Full Depth 42U Rack Cabinet User Guide...
-
Page 137: Install And Remove The Outriggers
Figure 148. Removing a 1U PDU or console switch Remove the four M6 screws. Slide the device all the way out from the side pocket. Install and remove the outriggers Outriggers enhance stability of a single unit of rack cabinet. See this topic to learn how to install and remove the outriggers. - Page 138 Step 2. Remove the outrigger stabilizing bars, and remove them. Figure 150. Removing the outrigger stabilizing bars Remove the eight screws that secure the two bars to the rack cabinet. ThinkSystem Heavy Duty Full Depth 42U Rack Cabinet User Guide...
-
Page 139: Install The Outriggers
Place the two stabilizing bars on the ground, and remove the bars. Step 3. Remove the four screws that secure each of the outriggers, and remove the outriggers. Figure 151. Removing the outriggers Install the outriggers Watch the procedure. A video of this procedure is available from the following links: •... - Page 140 Figure 152. Lowering the leveling pads Step 2. Secure each of the outriggers with four screws. Figure 153. Installing the outriggers Step 3. Install the outrigger stabilizing bars. ThinkSystem Heavy Duty Full Depth 42U Rack Cabinet User Guide...
-
Page 141: Installing And Removing Cable Management Brackets
Figure 154. Installing the outrigger stabilizing bars Align the two stabilizing bars with the bottom of the rack cabinet. Secure the two stabilizing bars with eight screws. Step 4. If you intend to move the rack cabinet, shorten the leveling pads until the cabinet weight is solely on the outriggers. - Page 142 Open the rear door, and release all the cables that are secured by the cable straps on the bracket. Step 2. Remove the four screws that secure the rear cable management bracket to the side pocket, and remove the bracket. ThinkSystem Heavy Duty Full Depth 42U Rack Cabinet User Guide...
-
Page 143: Install A Cable Management Bracket
Figure 157. Removing a rear cable management bracket Install a cable management bracket See this topic to learn how to install cable management brackets. Install a 21U front cable management bracket Procedure Step 1. Install six clip nuts, and secure the front cable management bracket with six screws. Chapter 5 Hardware removal, installation and reversion... - Page 144 Figure 158. Installing a 21U front cable management bracket Install a rear cable management bracket Procedure Step 1. Secure the rear cable management bracket to the side pocket with four screws. ThinkSystem Heavy Duty Full Depth 42U Rack Cabinet User Guide...
- Page 145 Figure 159. Installing a rear cable management bracket Chapter 5 Hardware removal, installation and reversion...
- Page 146 ThinkSystem Heavy Duty Full Depth 42U Rack Cabinet User Guide...
-
Page 147: Appendix A. Getting Help And Technical Assistance
Gathering information needed to call Support If you believe that you require warranty service for your Lenovo product, the service technicians will be able to assist you more efficiently if you prepare before you call. You can also see http:// datacentersupport.lenovo.com/warrantylookup... -
Page 148: Contacting Support
Electronic Service Request. Submitting an Electronic Service Request will start the process of determining a solution to your problem by making the pertinent information available to the service technicians. The Lenovo service technicians can start working on your solution as soon as you have completed and submitted an Electronic Service Request. -
Page 149: Appendix B. Notices
Lenovo representative for information on the products and services currently available in your area. Any reference to a Lenovo product, program, or service is not intended to state or imply that only that Lenovo product, program, or service may be used. Any functionally equivalent product, program, or service that does not infringe any Lenovo intellectual property right may be used instead. -
Page 150: Trademarks
Trademarks Lenovo, the Lenovo logo, ThinkSystem, Flex System, System x, NeXtScale System, and x Architecture are trademarks of Lenovo in the United States, other countries, or both. Intel and Intel Xeon are trademarks of Intel Corporation in the United States, other countries, or both. -
Page 151: Index
Getting help telephone numbers hardware service and support telephone numbers ThinkSystem Rear Door Heat eXchanger V2 help trademarks notices Water specifications © Copyright Lenovo 2021... - Page 152 ThinkSystem Heavy Duty Full Depth 42U Rack Cabinet User Guide...
Need help?
Do you have a question about the ThinkSystem Heavy Duty Full Depth 42U Rack Cabinet and is the answer not in the manual?
Questions and answers