Advertisement
Available languages
Available languages
Quick Links
H-1393
π
H-3639
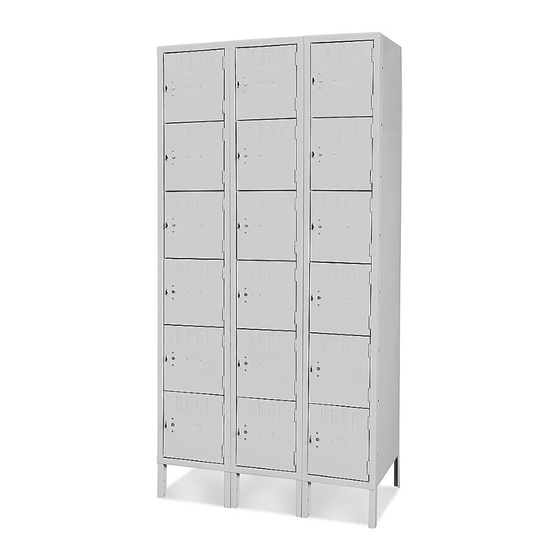
SIX TIER
LOCKER
PAGE 1 OF 8
1-800-295-5510
uline.com
TOOLS NEEDED
CAUTION! Some parts may have sharp
edges. Take care when handling various
pieces to avoid injury. For your safety, wear
work gloves when assembling.
Para Español, vea páginas 5-8.
11/32" Nut Driver
(included)
0713 IH-1393
Advertisement

Related Manuals for U-Line H-1393


Summary of Contents for U-Line H-1393
- Page 1 Para Español, vea páginas 5-8. H-1393 π 1-800-295-5510 H-3639 uline.com SIX TIER LOCKER TOOLS NEEDED 11/32" Nut Driver (included) CAUTION! Some parts may have sharp edges. Take care when handling various pieces to avoid injury. For your safety, wear work gloves when assembling.
- Page 2 pArTS PRImARy ASSEmBLy NO ASSEmBLy REquIRED DESCrIpTION QTy. DESCrIpTION QTy. Back Locker Door Left Side Number Plate & Clear Label Cover Push Plug Rear Leg Finger Pull Shelf Top/Bottom Shelves Right Side Door Frame Assembly PAGE 2 OF 8 0713 IH-1393...
- Page 3 ASSEmbLy INSTrUCTIONS NOTE: Do not tighten bolts until Figure 2 unit is completely assembled. 1. Locate and separate the left and righthand sides. Identify the top of each panel. The top of each panel has three holes instead of one. 2.
- Page 4 ASSEmbLy CONTINUED Figure 4 Figure 6 JOINING uNITS TOGETHER 1. If joining a 3-wide unit beside another unit, temporarily install a bolt and nut into the third and sixth holes down from the top of the outer frame(s) that will be joined to the adjacent locker frame(s). (See Figure 6) The center locker frame can be bolted complete.
- Page 5 H-1393 π 01-800-295-5510 H-3639 uline.mx LOCKER DE SEIS PUERTAS rEQUIErE HErrAmIENTAS Desarmador para Tuercas de 11/32" (inluido) ¡prECAUCIÓN! Algunas partes pueden tener bordes filosos. Debe tener cuidado cuando manipule varias piezas para evitar lesiones. por su seguridad, utilice guantes de trabajo cuando ensamble.
- Page 6 pArTES ENSAmBLE PRINCIPAL NO REquIERE ENSAmBLE DESCrIpCIÓN CANT. DESCrIpCIÓN CANT. Parte Posterior Puerta del Locker Lateral Izquierdo Placa del Número y Cubierta Transparente de Etiqueta Pata Posterior Tapa a Presión Repisa Jaladera Repisas Superiores/Inferiores Lateral Derecho Ensamble del marco de Puerta PAGE 6 OF 8 0713 IH-1393...
-
Page 7: Instrucciones De Ensamble
INSTrUCCIONES DE ENSAmbLE NOTA: No apriete los pernos hasta que la Diagrama 2 unidad esté completamente ensamblada. 1. Localice y separe los laterales izquierdo y derecho. Identifique la parte superior de cada panel. La parte superior de cada panel tiene 3 orificios en vez de uno. - Page 8 CONTINUACIÓN DE ENSAmbLE Diagrama 4 Diagrama 6 JuNTANDO uNIDADES ENTRE SÍ 1. Si junta una unidad de 3 de ancho al lado de otra unidad, instale temporalmente un perno y una tuerca en los orificios tercero y sexto abajo de la parte superior del marco(s) exterior(s) que se juntarán al marco(s) del locker adyacente.
Need help?
Do you have a question about the H-1393 and is the answer not in the manual?
Questions and answers