Advertisement
Quick Links
Advertisement

Related Manuals for ChimneyFree CFI-470-12-01


Summary of Contents for ChimneyFree CFI-470-12-01
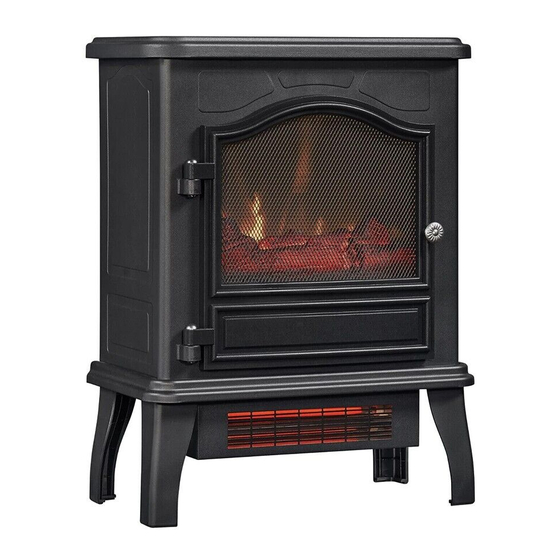
- Page 1 CFI-470-12-01,CFI-470-12-02,CFI-470-12-04...
-
Page 2: Getting Started
GETTING STARTED PARA EMPEZAR PRÉPARATION 1. The serial number is 1. El número de serie se 1. Le numéro de série encuentra en la parte est situé à l’arrière du located on the back of posterior de la chimenea, chauffage et le numéro the unit. - Page 3 REGISTER YOUR NEW PURCHASE online! I NSCRIRE VOTRE NOUVEL ACHAT • REGISTRAR SU NUEVA COMPRA Thank you for purchasing our product. Please take a moment to visit tsicustomerservice.com to register your new purchase: Merci d’avoir acheté ce produit. Veuillez prendre un court instant pour vous rendre sur tsicustomerservice.com et enregistrer votre nouvel achat : Gracias por adquirir nuestro producto.
- Page 4 IMPORTANT INSTRUCCIONES INSTRUCCIONES INSTRUCTIONS IMPORTANTE IMPORTANTE When using electrical Cuando utilice Lors de l’utilisation appliances, basic electrodomésticos, d’appareils électriques, precautions should always siempre tome medidas de pour éviter les be followed to reduce precaución básicas para risques d’incendie, the risk of fire, electrical evitar incendios, descargas d’électrocution et de shock, and injury to persons...
- Page 5 instruction. con capacidades les personnes n’ayant físicas, sensoriales o pas l’expérience et 5. Always unplug this mentales reducidas les connaissances appliance when not in o sin experiencia nécessaires, à moins use. ni conocimientos, qu’une personne ne a menos que una les supervise ou leur 6.
- Page 6 los controles a la posición 11. Pour débrancher other blade). To reduce de apagado y luego cet appareil, tournez the risk of electrical les commandes en retire el enchufe del shock, this plug will fit tomacorriente. position d’arrêt, puis into a polarized outlet retirez la fiche de la 12.Este producto está...
- Page 7 15. This appliance has hot aberturas se puedan quelque façon que bloquear. ce soit. Ne placez and arcing or sparking pas l’appareil sur une parts inside. Do not use it 15. Este electrodoméstico surface molle, comme in areas where gasoline, tiene en su interior piezas un lit, car les ouvertures calientes y piezas que...
- Page 8 INSTALLATION INSTRUCTIONS INSTRUCCIONES DE INSTALACIÓN / INSTRUCTIONS POUR L’INSTALLATION Tools Required for Assembly / Herramientas requeridas para el ensamblado / instructions pour l’installation Phillips Head Screwdriver / Destornillador de cabezal Phillips / Tournevis phillips Leg Assembly / Leg Asamblea / Assemblée jambe Align the mounting tab into Slide the leg downward Fasten the leg to the base...
- Page 9 OPERATION INSTRUCTIONS INSTRUCCIONES DE INSTALACIÓN / INSTRUCTIONS POUR L’INSTALLATION Control Panel Location Localización del panel de control Emplacement du panneau de commande B200...
- Page 10 Power Switch Flame Brightness Dimmer 1. Turning the dial clockwise will increase the 1. This switch turns on and off the main brightness of the flame effect. power. 2. Turning the dial counter clockwise will 2. The switch will be illuminated when the decrease the brightness of the flame heater is on.
- Page 11 1. Fije la perilla del termostato al darle vuelta altas temperaturas. en el sentido de las agujas del reloj hasta De calor las altas --1000W((ENCENDER) permita que el Calentador caliente la +1500W((ENCENDER) habitación. De calor bajo-----1000W((ENCENDER) 2. Cuando se alcance el nivel de +1500W(APAGAR) comodidad deseado, disminuya el termostato hasta que se apague la...
- Page 12 BULB REPLACEMENT CUIDADO Y MANTENIMIENTO / CUIDADO Y MANTENIMIENTO Tools Required for Assembly / Herramientas requeridas para el ensamblado / instructions pour l’installation Phillips Head Screwdriver Clear, 40 Watt, E12 socket base light bulb (candelabra base, B bulb). Destornillador de cabezal Phillips transparentes, 40-watt, socket E12 base de la Tournevis phillips bombilla de luz (candelabros de base, bombilla B).
-
Page 13: Troubleshooting
Remove light bulb and replace. Reverse steps 2 and 1. Replace spindle and reinstall stove back panel into position; be careful to not overtighten the screws. Quite el foco y reemplácelo. Invierta los pasos 2 y 1; Sustituir cabezal y vuelva a instalar el panel estufa en su posición, tengan cuidado de no apretar demasiado los tornillos. - Page 14 Vérifier les disjoncteurs ou les Pas d’alimentation dans Poêle ne s’allume pas fusibles et déplacer l’unité vers la prise de courant ou manuellement. une autre prise de courant. en provenance de son interrupteur mural. Manually press main power Improper operation. button from front of unit.
- Page 15 Burnt out light bulb. Replace 40 Watt candelabra Flames are not visible. bulb. Se quemaron las bombillas/ Las llamas no son LED de la tarjeta Vuelva a colocar candelabros de visibles. 40 vatios bombillas bordo. Les lumières sont défectueux. Les flammes ne sont pas Remplacer l’ampoule candélabre visibles.
- Page 16 Defective heater blower Replace heater/blower assembly. motor. Reemplace el Conjunto del Motor del ventilador del Calentador / Soplador. calenta dor defectuoso Remplacer le moteur de Le moteur de soufflante est soufflante de chauffage défectueux Power strip/surge protector/ Not producing enough Plug unit directly into the wall.
- Page 17 Defective heater blower Replace heater/blower assembly. motor. Motor del ventilador del Reemplace el Conjunto del calentador defectuoso Calentador / Soplador. Le moteur de soufflante est Remplacer le moteur de défectueux. soufflante de chauffage. Noise with flames on Defective flame generator Replace flame generator drive and heater off.
- Page 18 determine if your plug outlet or faceplate is HOT! If so, discontinue use of the heater and have a qualified electrician check and/or replace the faulty outlet(s). Toma de corriente defectuosa conexiones o enchufes sueltos pueden hacer que la toma de corriente o el enchufe se recaliente.
- Page 19 Is it safe to place unit on Product Inquiry. It is safe to place unit on carpet? carpet, but make sure any flammable items are at least 3 feet away from front and sides of the unit. ¿Es seguro colocar la unidad producto Inquiry.
- Page 20 Heater doesn’t work, but The thermal protector has Turn all switches to the “OFF” Power and Heater switches tripped. position and unplug the are in the “ON” position unit from the wall outlet for and thermostat is set on the 5 minutes.
- Page 21 REPLACEMENT PARTS PIÈCES DE REMPLACEMENT / PIEZAS DE REPUESTO INSTALADAS PART PART NAME PART NUMBER/NÚMERO DE PIEZA / PIEZA / PIÈCE NOMBRE DE LA PIEZA / NOM DE LA PIÈCE NUMÉRO DE PIÈCE Power Switch Interruptor de Alimentación P06-S Interrupteur Thermostat Termostato P03-S...
- Page 22 CARE AND MAINTENANCE CUIDADO Y MANTENIMIENTO / CUIDADO Y MANTENIMIENTO • Clean the trim using a soft cloth, slightly dampened with citrus oil based product and buff with a clean soft cloth. Limpie la moldura metálica con un paño suave humedecido con un producto a base de aceite cítrico y púlalo con un paño suave y limpio.
- Page 23 1-YEAR LIMITED WARRANTY GARANTÍA LIMITADA DE 1 AÑO / GARANTIE LIMITÉE DE 1 AN The manufacturer warrants El fabricante garantiza que Le fabricant garantit that your new Electric su nueva estufa eléctrica que votre nouveau foyer Fireplace is free from no presentará...
- Page 24 not be covered by this cubre·ningún costo des pièces défectueuses, warranty, nor shall the de instalación, mano de la réparation, du manufacturer assume de obra, fabricación, remplacement ou responsibility for same. transporte o de otro d’une intervention du tipo que surja de la même type, ne sont pas 6.
- Page 25 alteración no b. Le produit a fait l’objet autorizada, abuso d’une modification non deliberado, accidente autorisée, d’un abus o uso inadecuado del volontaire ou d’une producto. mauvaise utilisation, ou a subi c. Usted no tiene el recibo un accident. original de compra. c.
Need help?
Do you have a question about the CFI-470-12-01 and is the answer not in the manual?
Questions and answers
how do you change the light bulb
To change the light bulb in a ChimneyFree CFI-470-12-01:
1. Remove the light bulb.
2. Replace it with a new one.
3. Reverse steps 2 and 1.
4. Replace the spindle.
5. Reinstall the stove back panel into position.
6. Be careful not to overtighten the screws.
This answer is automatically generated