Maico ER-UP/G Installation And Operating Instructions Manual
Flush-mounted exhaust air systems according
Hide thumbs
Also See for ER-UP/G:
- Mounting and operating instructions (50 pages) ,
- Mounting and operating instructions (62 pages) ,
- Mounting and operating instructions (62 pages)

Related Manuals for Maico ER-UP/G


Summary of Contents for Maico ER-UP/G
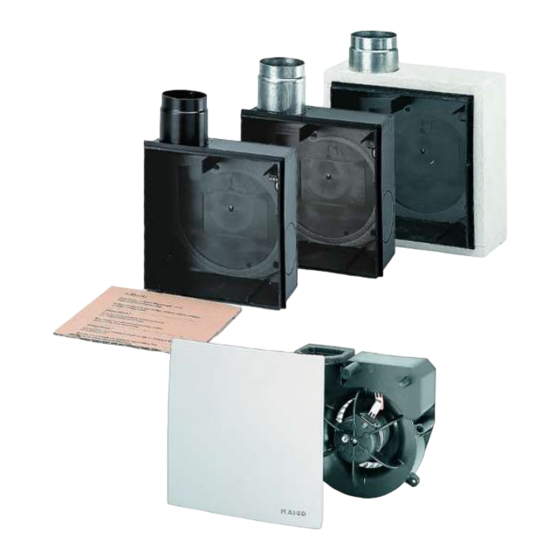
- Page 1 Installation and operating instructions Flush-mounted exhaust air systems according to DIN 18017-3 ER-UP/G ER-UPD ER-UPB ER 60 ER 100 Centro-M Centro-E Centro-H...
- Page 2 Overview of UPG system ..... 7.3 Important information about plas- Scope of delivery ........tering ..........Intended use.......... 7.4 ER-UP/G wall installation, single room ..........Safety instructions ....... 7.5 ER-UP/G ceiling installation, single 3.1 General safety instructions ..... room ..........
- Page 3 Table of contents 15 Spare parts ..........16 Removal ..........17 Environmentally responsible disposal 18 Wiring diagrams........
- Page 4 Follow the in- structions. Pass these instructions on to the owner for safekeeping. ER-UP/G with plastic shutter without fire pro- tection equipment 1 Plastic backflow preventer (Fig. of installation position with air outlet dir-...
- Page 5 1 Scope of delivery ER-UPD with fire protection shut-off device Specialist installer qualifications and ER-UPB with fire protection shut-off Installation may only be carried out by trained device and fire protection cover specialists who have the necessary knowledge and experience in ventilation engineering. The 3 Metal shut-off shutter with release mechan- unit must be connected in accordance with the national technical approval.
- Page 6 3 Safety instructions WARNING Risk to health from chemicals DANGER Danger of electric shock from or aggressive gases/vapours. operating the unit when not fully mounted. Chemicals or aggressive gases/vapours may Electric components are a potential source of harm health, especially if they are distributed electric shock.
- Page 7 3 Safety instructions DANGER Danger due to fire transmission WARNING Risk of injury when working at if an incorrect connection duct is connected to the heights. ER housing. Always use the correct duct material Use appropriate climbing aids (ladders). for the respective ER housing. Stability should be ensured, if necessary have if incorrect ceiling compound is used for exhaust the ladders steadied by a 2nd person.
- Page 8 4.1 Certificates of approval * ER-UP/G can be used inside and outside the Certificates of approval on request. shaft, connection duct made from flexible alu- 4.2 Installation conditions minium duct, second room connection made from flexible aluminium duct.
- Page 9 ER 60 units are not permitted for the metal backflow preventer with soldered strut. second room connection. 4.4.5 Fan insert For ER radio fans and Maico smart, see 100 RC instructions. • Fan insert with cover and exhaust air filter for installation in ER-UP/G, ER-UPD or ER-PB 4.4.1 ER-UP housing types...
- Page 10 100 I • RC model with radio electronics: Use in radio- ER 60 5 x 1.5 controlled ventilation system MAICO smart. H, ER board Based on EnOcean technology. Network-com- 100 H patible (master-slave) → separate ER 100 RC Stand- 5 x 1.5...
- Page 11 (L, C or RC modules, protection diodes, varis- room. Ambient temperature – 10 °C to + 60 °C. tors) are required. Maico accepts no liability for corrosion damage • Take the risk of draughts into account when caused by improper storage, e.g. storage in a planning by selecting a suitable installation loc- damp environment.
- Page 12 6 Mounting preparations Approval provision ER-UP/G + ER ER-UPD + ER ER-UPB + ER ER-UPB + ER 60/100/second 60/100/second 60/100/ second room room room Number of units per floor, Max. 3 fans or Max. 3 fans or 3 Max. 3 fans or 3 Max.
- Page 13 6.2 Preparations for wall installation non-flammable materials that are resistant to 9 Suction duct for second room connection on deformation (e.g. concrete, cement mortar, fire ER-UP/G: Flexible aluminium duct AFR 75/ protection filler). AFR 80 ER-UPD: Flexible aluminium duct AFR 75/...
- Page 14 6.3 Ceiling installation preparations Be sure to note the approval and installa- 9 Suction duct for second room connection on ER-UP/G: Flexible aluminium duct AFR 75/ tion information: Preparations for wall installa- AFR 80 tion. ER-UPD: Flexible aluminium duct AFR 75/...
- Page 15 6 Mounting preparations Main duct (steel folded spiral-seams Duct attachment with duct clamp, alternatively duct) duct attachment with clamping band ER GH connection duct: Flexible alu- minium duct Floor ceiling Steel threaded rod / stair bolt Duct attachment Duct clamp / clamping band Spigot Ceiling compound Shaft wall...
- Page 16 Only secure connection duct to ceiling with per- Before mounting the housing, always mitted mounting material (duct clamp or clamping • ER-UP/G: check the position of the plastic shut- band). ter. Ensure that the shutter is fully functional. 4. Connect permitted connection duct to main •...
- Page 17 ER-UPB housing 1. Check and ensure that shut-off shutter is fully functional. 7 Housing installation 7.1 Installing ER-UP/G housing The following are not permitted: • Second room connection with an ER 60 fan in- sert (all models). • Second room connection in combination with Centro exhaust air elements.
- Page 18 (also Requirements in line with approval [} 11] Use ER-MO expanded rubber for acoustic insula- and approval) tion of thin ceilings capable of resonance (System ER-UP/G are equipped with a plastic housing and accessory components). without fire protection equipment. The ER-UP/G 7.3 Important information about...
- Page 19 7 Housing installation 2 Exhaust socket with plastic shutter DANGER Danger of short-circuits and 18 Main duct, steel folded spiral-seams duct damage to the unit. 19 Connection duct, AFR 80 DN 75/80 flexible If the cable grommet is not installed correctly, wa- aluminium duct ter may penetrate the housing.
- Page 20 7 Housing installation 9. Plaster in housing flush with front edge, note 7.5 ER-UP/G ceiling installation, tile thickness if necessary: Important informa- single room tion about plastering. 3. Mark fixing holes for mounting support/hous- 6 Protective grille ing on ceiling, produce holes and insert dow- 7 Filter mat, filter class G2 els.
- Page 21 9. Plaster in housing flush with front edge. 7. Provide unit with electrical connection: Elec- 7.6 ER-UP/G wall installation, second trically connecting the unit. room 2. Place installation socket in housing. The edge Protective grille...
- Page 22 3. Mount ER-ZR second room connection set on The ER-UPD housing must be inserted ceiling as described in: ER-UP/G wall installa- without any distortion. Failure to do so will tion, second room [} 21]. mean that the fan insert cannot engage correctly...
- Page 23 7 Housing installation 5 Metal exhaust socket with shut-off shutter DANGER Danger of short-circuits and 18 Main duct, steel folded spiral-seams duct damage to the unit. 19 Connection duct, steel folded spiral-seams If the cable grommet is not installed correctly, wa- duct DN 75/80 ter may penetrate the housing.
- Page 24 7 Housing installation 9. Plaster in housing flush with front edge, note 7.12 ER-UP/D installation, second tile thickness if necessary: Important informa- room tion about plastering. 2. Place installation socket in housing. The edge Protective grille of the socket must click into place on the wall Filter mat, filter class G2 of the housing.
- Page 25 7 Housing installation • Second room connection in combination with A second room connection is only permitted with Centro exhaust air elements. ER-UPB/R, ER-UPB/L or ER-UPB/U. • Connecting a WC odour extraction unit in com- 7.15 Important information about bination with Centro exhaust elements. plastering •...
- Page 26 7 Housing installation 7.16 ER-UP/B installation, single room Metal exhaust socket with shut-off shutter Main duct, steel folded spiral-seams duct Connection duct, flexible aluminium duct AFR DN75/80 Power cable UPM 60/100 mounting support Plaster protective cover Cable grommet 1. Remove the plaster protective cover from the DANGER Danger of short-circuits and housing.
- Page 27 7 Housing installation 7. Produce electrical connection. DANGER Fire may spread if connection 8. Insert the plaster protective cover in the hous- duct is incorrectly installed. ing. Only use permitted duct material (Requirements 9. Plaster in housing flush with front edge, note in line with approval [} 11]).
- Page 28 8 Electrical connection 3. Produce fixing holes for adapter and insert 5.1 Steel connection socket DN 75/80 for dowels. second room extraction on ER-UPB 4. Connect adapter fully sealed to suction duct, Protective grille e.g. with cold-shrink tape. Filter mat filter class G2 5.
- Page 29 9 Installation of fan insert and cover 5. Wire power cable to the terminal box accord- DANGER Danger from electric shock/The ing to the wiring diagram. unit will be damaged if installed incorrectly with too long a power cable. If the cable feed is too long inside the housing, the fan insert cannot be installed correctly.
- Page 30 9 Installation of fan insert and cover 9.2 Electronic circuit boards ER 60 I 9.3 Electronic circuit boards ER 60 and ER 100 I VZC and ER 100 VZC Potentiometer Tv start delay (seconds) Potentiometer Tn overrun time (minutes) Potentiometer Ti: Service life. In far left position, interval control off.
- Page 31 If installing on a wall, ensure that the Note wiring diagrams in box base. Maico name is in the bottom right. Cables must not prevent the unit from being slid • If the housing edge is flush with the plaster, use...
- Page 32 10 Commissioning 7. Affix time strip (supplied with the cover) and Control model RC push the activation button [A] all the way. In- Radio-controlled fan system with up to 3 ER 100 stallation location of time strip, e.g. near the RC fans.
- Page 33 12 Cleaning, maintenance 1. Fold up cover. 12.2 Removing fan insert 2. Take out filter mat and replace it. 3. Remove used TimeStrip. 4. Affix new time strip and push the activation button [A] all the way. The red dye in the interior of the bar [B] is released.
- Page 34 Lift up the housing floor seal before inserting the ER-AS extraction socket and then reposition it correctly afterwards. 3. Install ER-UP/G or ER-UPD housing unit in accordance with these instructions. Note the descriptions relating to the second room con- nection.
- Page 35 15 Spare parts Fault Cause → Measure Fault Cause → Measure Fan performance inad- Dirty filter. → Replace up time of 15 minutes equate. filter. and resets the refer- ence value. Locking hook not en- Additional consumers Damage to the unit if gaged.
- Page 36 16 Removal Designation Article no. Spare parts can be ordered at Shutter VM ER-UP/G E093.0608.0000 www.shop.maico-ventilatoren.com. Exhaust socket ER-UP/ 0059.0884.0001 Filter mat ZRF: 5 items, 0093.0923 filter class G2 according to EN 779 Circuit boards 16 Removal ER-60 F101.1012.9002 Dismantling may only be undertaken by a ER-60 VZ F101.1014.9004...
- Page 37 18 Wiring diagrams S1 = Switch On/Off 18 Wiring diagrams (ON after approx. 50 18.1 Wiring diagrams seconds) ER 60 and ER 100, Centro E, Centro-H ➀ = Main room ➁ = Second room Standard switching: The fan starts up approximately 50 seconds after the room lighting is switched on.
- Page 38 18 Wiring diagrams If the relative humidity falls below the reference ER 60 F, ER 100 F value during operation, the newly established ref- erence value is saved. ER ... H fans can optionally be operated by light switch. With "Light on" the fan starts at nominal load.
- Page 39 18 Wiring diagrams The fan is running in base load operation. Humid- The fan is switched manually to base load with ity control is active, see Standard Switching. switch “S1”. Humidity control is active, see Stand- Switch "S1" is used to switch manually to full load ard Switching.
- Page 40 18 Wiring diagrams ER 60 G, ER 100 G The ER 60 G and/or the ER 100 G can be oper- ated in base or full load operation as required. S1 Switch for base load operation: Continuous operation at a lower speed with lower air volume. The fan is switched manually to full load operation with switch "S1".
- Page 41 18 Wiring diagrams When the room is in use (S1=On), the fan ER 100 RC switches automatically to full load after approx. 50 seconds. Base load operation can be switched off manually with switch S2. ER 60 I, ER 100 I Interval switching automatically controls the switching-on of the fan after the defined interval time, if the fan has not been switched on during...
- Page 44 Maico Elektroapparate-Fabrik GmbH Steinbeisstr. 20 78056 Villingen-Schwenningen Deutschland Service +49 7720 6940 info@maico.de D07.21_EN_DSW-AV...
Need help?
Do you have a question about the ER-UP/G and is the answer not in the manual?
Questions and answers