
Related Manuals for Shure GLXD4RA


Summary of Contents for Shure GLXD4RA
- Page 1 GLXD4R Half-Rack Wireless Receiver Complete user guide for the GLXD4R wireless system. Includes installation instructions, best practices, specifications, and troubleshooting. Version: 4.2 (2021-E)
-
Page 2: Table Of Contents
Shure Incorporated Table of Contents Important Tips for Care and Storage of Shure Recharge- able Batteries GLXD4R Half-Rack Wireless Receiver 2.4 GHz Spectrum Overview IMPORTANT SAFETY INSTRUCTIONS Overcoming the Challenges of 2.4 GHz WARNING Coexisting with Wi-Fi Note: Challenging Wireless Environments... - Page 3 Shure Incorporated Pin Assignments Certifications GLXD2 Information to the user Receiver Output Connectors 3/33...
-
Page 4: Glxd4R Half-Rack Wireless Receiver
Shure Incorporated GLXD4R Half-Rack Wireless Receiver IMPORTANT SAFETY INSTRUCTIONS READ these instructions. KEEP these instructions. HEED all warnings. FOLLOW all instructions. DO NOT use this apparatus near water. CLEAN ONLY with dry cloth. DO NOT block any ventilation openings. Allow sufficient distances for adequate ventilation and install in accordance with the manufacturer’s instructions. -
Page 5: Warning
EMC performance. • Use this battery charger only with the Shure charging modules and battery packs for which it is designed. Use with other than the specified modules and battery packs may increase the risk of fire or explosion. -
Page 6: Features
UA802-RSMA Power Supply PS43 UA8-2.4 GHz 1/2 Wave Antenna 95B13528 Rack-mounting hardware kit 90AZ8100 Shure Lithium-Ion Rechargeable Battery SB902A USB Cable, Type A to Micro-B 95A21651 * Only included with GLXD14 or GLXD24 systems. Optional Accessories GLX-D Frequency Manager UA846Z2-LC Passive Directional Antenna 2.4 GHz... -
Page 7: Quick Start For Single Receiver
Shure Incorporated 7.6 m (25 ft.) Reverse SMA Cable UA825-RSMA 15.2 m (50 ft.) Reverse SMA Cable UA850-RSMA 30.4 m (100 ft.) Reverse SMA Cable UA8100-RSMA Reverse SMA Bulkhead Adapters 95A32436 Quick Start for Single Receiver To reduce set-up time, the transmitter and receiver automatically link to form an audio channel the first time they are powered on and never have to be linked again. -
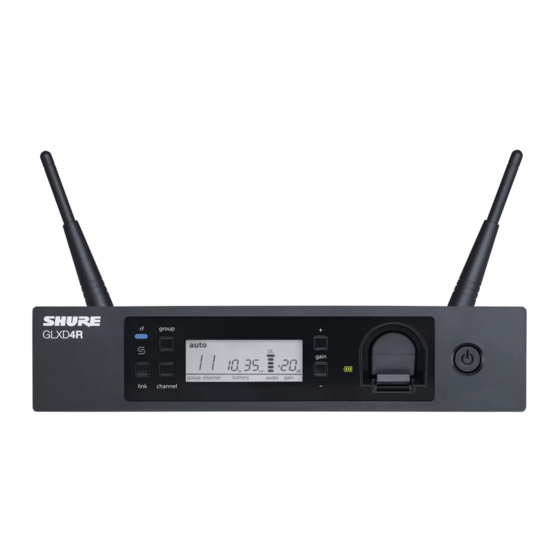
Page 8: Receiver Controls And Connectors
Shure Incorporated Check the audio and adjust the gain if necessary. Step ④ Receiver Controls and Connectors 8/33... - Page 9 Shure Incorporated ① RF Status LED ◦ ON = Linked transmitter is on. ◦ Flashing = Searching for transmitter. ◦ OFF = Linked transmitter off or transmitter unlinked. ② Group Button Press and hold for two seconds to enable manual group edit.
-
Page 10: Receiver Screen
Shure Incorporated ⑬ Firmware Update Connect to computer to download firmware updates. ⑭ Mic/Line Switch Sets XLR output level to microphone or line level. ⑮ XLR Audio Output Supplies microphone-level or line-level audio output. ⑯ Inst/Aux Out TRS ¼" (6.35mm) audio output. Connect to mixers, recorders, and amplifiers. -
Page 11: Transmitters
Press and hold within 5 seconds of power-on to manually link with receiver ◦ Press momentarily to activate Remote ID function ⑦ Battery Compartment Holds 1 Shure rechargeable battery. ⑧ Microphone Cartridge GLXD-2 transmitter models are available with the following cartridge types: SM58, Beta 58, SM86, Beta 87A. 11/33... -
Page 12: Transmitter Status Led
Shure Incorporated Transmitter Status LED LED is green during normal operation. LED color or flashing indicates a change in transmitter status as shown in the following table: Color State Status Flashing (slow) transmitter attempting relink with receiver Green Flashing (fast) -
Page 13: Wearing The Headworn Microphone
Do not cover grille with hand. Batteries and Charging GLX-D transmitters are powered by Shure SB902A lithium-ion rechargeable batteries. Advanced battery chemistry maximizes runtimes with zero memory effects, eliminating the need to discharge batteries prior to charging. When not in use, recommended battery storage temperature is 10°C (50°F) to 25°C (77°F). -
Page 14: Receiver Charging Bay
Shure Incorporated Note: The transmitter will not pass RF or audio signals when connected to the charging cable. The following battery charging options are available: Receiver Charging Bay The receiver's built-in charging bay will charge transmitter batteries when receiver is plugged in to power outlet. -
Page 15: Led Status During Charging
Shure Incorporated LED Status During Charging The following LED states indicate battery status when the transmitter is connected to a charger: • Green = charging complete • Green Flashing = battery charge > 90% • Red = battery charging •... -
Page 16: Charging Times And Transmitter Runtimes
Note: If receiver is powered off and remains plugged in, battery will continue charging. Important Tips for Care and Storage of Shure Recharge- able Batteries Proper care and storage of Shure batteries results in reliable performance and ensures a long lifetime. • Always store batteries and transmitters at room temperature •... -
Page 17: 2.4 Ghz Spectrum Overview
2.4 GHz spectrum compared to the UHF spectrum. The simplest solution in many cases is to reduce transmittertoreceiver distance by placing receivers on the stage with a clear line of sight. You can also mount antennas re motely using Shure directional antennas to reduce transmitter-to-antenna distance. Challenging environments include: •... -
Page 18: Additional Tips
Shure Incorporated Reduce transmitter-to-receiver distance by placing receivers on stage or above the audience with a clear line of sight to the transmitter. ◦ Move receiver to the top of the equipment rack for a clear line of sight. ◦... -
Page 19: Remote Antenna Placement
Shure Incorporated ◦ Wi-Fi 6: Group 3/Channel 7, Group 3/Channel 5 ◦ Wi-Fi 11: Group 3/Channel 2, Group 3/Channel 1 Remote Antenna Placement Follow these guidelines when mounting antennas remotely: • Reduce distance between transmitter and antenna. • Mount antennas farther from each other to improve performance. -
Page 20: Manually Linking A Transmitter To A Receiver
Shure Incorporated Repeat steps 1-3 for each additional receiver and transmitter. Remember to set each receiver to the same group. See GLX-D Frequency Manager guide for setting up receivers and transmitters when connected to the frequency manager. Note: Dashes appearing on the group and channel display during a channel scan indicate that frequencies are not available in the selected group. Choose a group that supports more receivers and repeat set-up steps. -
Page 21: Locking And Unlocking The Controls
Shure Incorporated Locking and Unlocking the Controls The controls of the receiver and transmitter can be locked to prevent accidental or unauthorized changes to settings. Note: Locks are not affected by power cycles. Locking the Receiver Controls Simultaneously press and hold the group and channel buttons until LK appears on the LCD. Repeat to unlock. -
Page 22: Manually Selecting A Group And Channel
Firmware is embedded software in each component that controls functionality. Periodically, new versions of firmware are devel oped to incorporate additional features and enhancements. To take advantage of design improvements, new versions of the firmware can be downloaded and installed using the Shure Update Utility tool. Software is available for download from http://www.shure.com/update-utility. -
Page 23: Rack-Mounting Instructions
Shure Incorporated Rack-Mounting Instructions Use the supplied mounting hardware to install the receiver in a standard 19 inch audio equipment rack. 23/33... -
Page 24: Troubleshooting
Shure Incorporated Troubleshooting Indicator Sta- Issue Solution Verify all sound system connections or adjust gain as needed (see Receiver RF Adjusting Gain). LED on Verify that the receiver is connected to mixer/amplifier. Turn on transmitter. Receiver RF Make sure the batteries are installed correctly. - Page 25 Update both components to firmware version 2.0 or greater. Down unsuccessful that linking start load the Shure Update Utility application and follow the instructions. ed, but the link fails Sound level variations when Adjust transmitter gain as necessary (see Gain Adjustment).
-
Page 26: Resetting Components
Shure Incorporated Indicator Sta- Issue Solution Second frequency manager Verify that antenna A and antenna B ports on second frequency Data sync LED does not send RF signal to re- manager are connected to cascade A and cascade B ports on first ceivers frequency manager. - Page 27 Shure Incorporated Up to 20 m ( 65 ft) typical, Up to 50 m ( 165 ft) Outdoor maximum Transmit Mode Shure GLX-D proprietary digital Audio Frequency Response 20 Hz– 20 kHz Dynamic Range 120 dB, Aweighted RF Sensitivity 88 dBm, typical Total Harmonic Distortion 0.2%, typical...
- Page 28 Shure Incorporated Rechargeable Li-Ion Housing Cast Metal, Black Powdercoat Input Impedance 900 kΩ RF Output Power 10 mW E.I.R.P. max Transmitter Input Connector 4-Pin male mini connector (TA4M) Configuration Unbalanced Maximum Input Level 1 kHz at 1% THD +8.4 dBV (7.5 Vpp)
- Page 29 Shure Incorporated GLXD2 Dimensions Model SM58 51 mm, (2.0 in.) 252 mm, (9.9 in.) 37 mm, (1.5 in.) BETA 58 51 mm, (2.0 in.) 252 mm, (9.9 in.) 37 mm, (1.5 in.) SM86 49 mm, (1.9 in.) 252 mm, (9.9 in.) 37 mm, (1.5 in.)
- Page 30 Shure Incorporated Maximum Input Level SM58 146 dB SPL BETA 58 147 dB SPL SM86 143 dB SPL BETA 87A 147 dB SPL Dimensions 42 x 197 x 163 mm (1.7 x 7.8 x 6.4 in.), H x W x D Weight 907.2 g (32 oz.) without batteries...
- Page 31 Shure Incorporated Pin Assignments XLR Output 1=ground, 2=hot, 3=cold 6.35 mm (1/4") connector Tip=audio, Ring=no audio, Sleeve=ground Receiver Antenna Input Impedance 50 Ω Antenna Type ½ Wave Sleeve Dipole Maximum Input Level −20 dBm Receiver Output Connectors Certifications This device complies with part 15 of the FCC Rules. Operation is subject to the following two conditions: (1) This device may not cause harmful interference, and (2) this device must accept any interference received, including interference that may cause undesired operation.
- Page 32 Note: Please follow your regional recycling scheme for batteries and electronic waste Hereby, Shure Incorporated declares that the radio equipment is in compliance with Directive 2014/53/EU. The full text of the EU declaration of conformity is available at the following internet address: http://www.shure.com/europe/compliance...
- Page 33 Shure Incorporated Information to the user This device complies with part 15 of the FCC Rules. Operation is subject to the following two conditions: This device may not cause harmful interference. This device must accept any interference received, including interference that may cause undesired operation.
Need help?
Do you have a question about the GLXD4RA and is the answer not in the manual?
Questions and answers