Advertisement
Quick Links
INSTALLATION INSTRUCTIONS
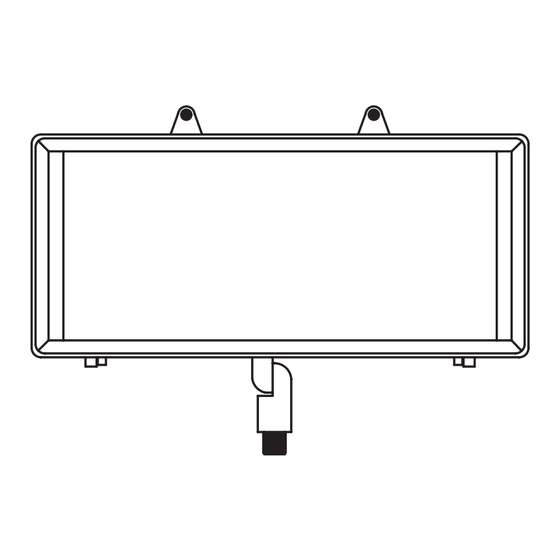
Shroud screw
Housing
Shroud
Heavy-duty two-piece
swivel assembly
1/2" NPT
WARNING: Luminaire must be installed and grounded in accordance with the National Electrical Code (NEC)
and local codes. For portable stake or surface mount using a cord and plug, the luminaire must be plugged into
a receptacle protected by a ground fault circuit interrupter (GFI). Failure to do so may result in serious injury and/
or damage to the luminaire.
MAINTENANCE: To assure proper operation and efficiency and to prevent luminaire overheating, lens must be
kept clean and free of dirt, dust, leaves, trash and mineral deposits from water. A regular schedule maintenance
program is recommended.
SAFETY WARNING: Luminaire can become very hot depending on the lamp wattage used. Lens and housing
around the lamp can become hot enough to blister hands. Particular care should be taken not to locate
luminaires where small children can reach them if high wattage lamps are used.
NOTE: Always use UL recognized wire connectors for connections.
NOTE: Save these instructions for future reference.
IN GROUND LUMINAIRE IS UL LISTED FOR ABOVE GRADE INSTALLATION ONLY.
LUMINAIRE MOUNTING:
1. Make sure electrical supply is off at circuit breaker before starting luminaire installation or servicing luminaire.
2. Thread luminaire onto junction box or other mounting device until it is at desired direction using thread sealant. Tighten
jam nut (provided) to ensure the luminaire is locked to adjusted position.
3. Attach luminaire leads to line in leads observing polarity, black to black, white to white and green to ground using
silicone filled safety connectors (provided).
4. Attach junction box cover with luminaire to junction box (by others). Make sure not to pinch wires that may be
sandwiched between cover and box.
5. Coat exposed luminaire threads with thread sealant to keep moisture from entering junction box or other mounting
device.
6. To adjust luminaire aiming angle, untighten adjustable knuckle screw. Do not disengage totally. Hold luminaire at
selected angle and tighten knuckle screw firmly. If equiped with an HD- heavy-duty two piece swivel assembly,
loosen bolts with a crescent or adjustable wrench.
7. Install lamp.
9. Supply power to the luminaire and check for proper operation.
1625 Surveyor Avenue • Simi Valley, CA 93063 • (805) 527-0987 • (800) 766-VISTA (8478)
FAX: (888) 670-VISTA (8478) • email@vistapro.com • www.vistapro.com
Cat No
Lens
1039
Shroud hinge
Swivel screw
1039
120V SERIES
Up and Accent Lights
Lamp Information
Lamp Type
Flat Quad Compact
Fluorescent
TOOLS REQUIRED FOR
INSTALLATION:
●Wire strippers
●Philips head screwdriver
●Thread sealant
●Adjustable wrench
(for models with HD
assembly)
Max Watts
36
Advertisement

Related Manuals for Vista 1039


Summary of Contents for Vista 1039
- Page 1 7. Install lamp. 9. Supply power to the luminaire and check for proper operation. 1625 Surveyor Avenue • Simi Valley, CA 93063 • (805) 527-0987 • (800) 766-VISTA (8478) FAX: (888) 670-VISTA (8478) • email@vistapro.com • www.vistapro.com...
- Page 2 NOTE: DO NOT touch lamp with bare hands. Always use soft cloth or the plastic wrapping (if available) from lamp to handle the lamp. 5. Re-install shroud and gasket and tighten shroud screws. 1625 Surveyor Avenue • Simi Valley, CA 93063 • (805) 527-0987 • (800) 766-VISTA (8478) FAX: (888) 670-VISTA (8478) • email@vistapro.com • www.vistapro.com...
Need help?
Do you have a question about the 1039 and is the answer not in the manual?
Questions and answers