Table of Contents
Advertisement
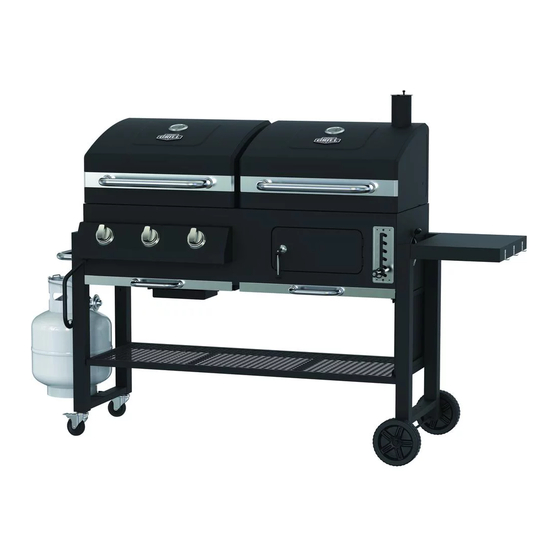
2 IN 1 GRILL GAS & CHARCOAL
INSTRUCTION MANUAL
PLEASE READ INSTRUCTIONS CAREFULLY BEFORE ASSEMBLY
RETAIN THIS MANUAL FOR FUTURE REFERENCE.
If you have any
service at
4:30pm eastern
DO NOT RETURN TO THE PLACE OF PURCHASE.
FOR OUTDOOR USE ONLY.
or problems, you can
, Monday through Friday for assistance.
V01
Vendor Stock NO
Model NO.: DH122213-W
our customer
from 8:00am to
.: XG1136207827001
Advertisement
Table of Contents

Related Manuals for EXPERT GRILL DH122213-W


Summary of Contents for EXPERT GRILL DH122213-W
- Page 1 Vendor Stock NO .: XG1136207827001 Model NO.: DH122213-W 2 IN 1 GRILL GAS & CHARCOAL INSTRUCTION MANUAL FOR OUTDOOR USE ONLY. PLEASE READ INSTRUCTIONS CAREFULLY BEFORE ASSEMBLY RETAIN THIS MANUAL FOR FUTURE REFERENCE. If you have any or problems, you can...
-
Page 2: Table Of Contents
Table of Contents Safety Instruction ..... Component Identification ....Charcoal End Operating Instructions . -
Page 3: Safety Instruction
SAFETY INSTRUCTION – READ CAREFULLY Before assembling or using your new grill -- carefully read the inst manual and all safety warnings! Use c on and common sense when opera g grill to protect persons and property. Failure to follow safety warnings could result in bodily injury or property damage. If you have any regarding the product, please call our customer service at from 8:00am to 4:30pm... - Page 4 DANGER 1. Never operate this appliance unattended. 2. Never operate this appliance within 3.05 m / 10 ft. of any structure, combustible material or other gas cylinder. 3. Never operate this appliance within 7.62 m / 25 ft. of any flammable liquid. 4.
- Page 5 WARNING CAUTION: Beware of Flashback Do not try lighting this appliance without reading the CAUTION: Spiders and small insects occasionally spin webs or make nests in the grill TESTED IN ACCORDANCE WITH ANSI Z21.58-2018 burner tubes during transit and CSA 1.6-2018 STANDARD FOR OUTDOOR COOKING warehousing.
- Page 6 LP- Gas Supply System • • If the information is not followedexactly, a DO NOT use this appliance under overhead combustible fire resulting in death or serious injury surfaces. This outdoors cooking appliance is not intend to be installed in or on recreational vehicles and/or boats. could occur.
- Page 7 When using the grill, do not touch the grill rack, burner grate or WARNING immediate surroundings as these areas become extremely hot Keep a spray bottle of soapy water near the gas supply valve and and could cause burns. Use only dry potholders. Moist or damp check the connections before each use.
-
Page 8: Exploded View
EXPLODED VIEW... -
Page 9: Parts List With Graphic
Parts List with graphic Part Image Part# chimney cover 12221301 chimney assembly 12221302 ※charcoal grill 12221303 hood assembly ※charcoal grill lid 12221304 decorative plate ※spacers 4pcs 12221305 ※hood handle 2pcs 12221306 charcoal grill 12221307 warming rack charcoal grill 2pcs 12221308 cooking grid charcoal tray 12221309... - Page 10 Part Image Part# ※upper hood hinge 4pcs 12221311 ※lower hood hinge 4pcs 12221312 ※fire box assembly 12221313 butterfly damper 12221314 12221315 ※charcoal door ※charcoal door 2pcs 12221316 hinge ※left shaft support 12221317 bracket right shaft 12221318 support bracket door locking lever 12221319 1 pc 12221320...
- Page 11 Part Image Part# charcoal door 12221321 handle ※handle locking 12221322 bracket crank handle 12221323 side shelf 12221324 ash pan 12221325 ※ash pan 12221326 decorative plate spacers 4pcs 12221327 ash pan handle 2pcs 12221328 ※large pipe plug 4pcs 12221329 right rear leg 1 pc 12221330...
- Page 12 Part Image Part# right front leg 12221331 cart crossbeam 2pcs 12221332 wheel 2pcs 12221333 axle 12221334 bottom shelf 12221335 ※gas tank support 12221336 leg end cap 2pcs 12221337 left rear leg 12221338 left front leg 12221339 lighting rod 12221340...
- Page 13 Part Image Part# hose hook 12221341 gas tank hook 12221342 grease cup 12221343 grease cup support 2pcs 12221344 cart handle 12221345 ※grease tray 12221346 decorative plate grease tray 12221347 ※regulator & hose 12221348 ※control panel 12221349 knob 3pcs 12221350...
- Page 14 Part Image Part# ※knob spacers 3pcs 12221351 ※valve assembly 12221352 ※fire box 12221353 clapboard top ※burner 3pcs 12221354 flame tamer 3pcs 12221355 gas grill cooking 2pcs 12221356 grid gas grill warming 12221357 rack ※gas grill lid 12221358 decorative plate ※gas grill hood 12221359 assembly ※badge...
- Page 15 HARDWARE KIT Part Image M4*12 screw 4pcs M5*18 screw 4pcs M6*12 SUS screw M6*12 screw 30pcs M6*18 shoulder 5pcs screw spring M6 SUS nut M6 lock nut 3pcs M6 cap nut M8 SUS lock nut M10 lock nut 2pcs M6 SUS spring washer M8 SUS spring washer...
- Page 16 ASSEMBLY PREPARATION Before beginning assembly of product, make sure all are parts present. Inspect contents of box to make sure all parts are included and not damaged. If any part is missing or damaged, do not attempt to assemble the product. NOTE: Some parts with screws pre-installed.
-
Page 17: Assembly Instructions
ASSEMBLY INSTRUCTIONS IMPORTANT: ASSEMBLE ON FLAT AND SOFT SURFACE TO AVOID SCRATCHING. 1. Put leg end cap (37) into left front leg (39) and left rear leg (38). Make sure the leg end cap is locked into the square hole on the legs. 2. - Page 18 3. Use 4 pcs of (D) screw to attach bottom shelf (35) to the 4 legs. (Don’t forget to tighten the 8 pcs of screw of step 2 after bottom sheft fix well) M6*12 screw 4. Use 4 pcs of (D) screw to attach cart crossbeam (32) to left legs. M6*12 screw...
- Page 19 5. Use 4 pcs of (D) screw to attach cart crossbeam (32) to right legs. M6*12 screw 6. Thread axle (34) through the wheels (33), right rear leg and right front leg, and then fasten with (K) nut as shown. M10 lock nut...
- Page 20 7. Assembly charcoal door handle (21) to charcoal door with trim (20) and door locking lever (19) according to the diagram as shown. M8 SUS lock nut M8 SUS spring washer 8. Thread the chimney assembly (2) from inner to outside of charcoal grill hood, and then use 3 pcs of (D) screw and( H)nut to attach chimney to hood, use (F) spring and (I) cap nut to fasten chimney cover (1) to chimney according to the diagram as shown.
- Page 21 9. Use 1 pcs of (C) screw and (G) nut and (L) spring washer to attach butterfly damper (14) to fire box right side panel accordingly to the diagram as shown. M6*12 SUS screw M6 SUS nut M6 SUS spring washer Remove the pre-assembled Self-Tapping Bolt from the tip of Crank Handle and loosen the 10-1.
- Page 22 11-1. Put the Bolts of the shaft assembly(10) into the slot of the left & right fire box side panel. Fit the shaft onto the slot of the bracket of the fire box front panel. 11-1...
- Page 23 11-2. Align the holes of the charcoal pan (9) with the holes on Shaft Assembly brackets, and install the charcoal pan (9) onto the brackets by tightening 4pcs (D) crews as shown. 11-2 M6*12 screw 12. Insert the knobs(50) to control panel as shown.
- Page 24 13. Use 4 pcs of( A) screw to attach grease cup support (44) to grease tray. M4*12 screw 14. Fasten the handles (28) and spacers (27) to ash pan(25) and grease tray (47)with 2 pcs of (B) screw on each side. And then insert ash pan and grease tray to bottom of fire box as shown.
- Page 25 15. Insert grease cup (43) to bottom of grease tray as shown. 16. Insert 2 pcs of (E )screw into upper hole of each right leg as shown. Tighten screws to leave the screws head protruding approximately 1/5 inch. Hang the side shelf brackets onto the protruding bolt heads, and then fully tighten screws as shown.
- Page 26 17. Insert flame tamer (55) inside fire box as shown below. 18. Insert cart handle (45) to left legs hole as shown below.
- Page 27 19. Place cooking grid (8)&(56) inside fire box as shown below. 20. Install the warming rack (57)& (7) as shown.
- Page 28 21. Fasten lighting rod (40) to left front leg with 1 pcs of (E) screw. M6*18 shoulder screw 22. Thread hose through hose hook (41) , then fasten it to left front leg with 1 pcs of (D) screw. M6*12 screw...
- Page 29 23. Install gas tank hook (42) as shown below.
- Page 30 24. Assembly is completed.
-
Page 31: Gas Hook-Up
Gas Hook-Up L.P. TANK REQUIREMENT 3. Make sure all burner valves are in their off position. A dented or rusty L.P. tank may be hazardous and should be 4. Inspect valve connections, port, and regulator assembly. Look checked by your L.P. supplier. Never use a cylinder with a for any damage or debris. -
Page 32: Leak Testing
Leak Testing GENERAL ALWAYS CHECK FOR LEAKS AFTER EVERY L.P. Although all gas connections on the grill are leak tested at the TANK CHANGE factory prior to shipment, a complete gas leak test check must be performed at the installation site due to possible mishandling in shipment, or excessive pressure unknowingly being applied to the Check all gas supply fittings for leaks before each use. -
Page 33: Gas End Operating Instructions
Gas End Operating Instructions NOTE: The hot grill sears the food, sealing in the juices. The more GENERAL USE OF THE GRILL thoroughly the grill is preheated, the faster the meat browns and Each main burner is rated at 8,000 BTU/HR. The main grill burners the darker the grill marks. -
Page 34: Component Identification
Match Light Main burner If the burner will not light after several attempts then the burner can be match lit, before using the match allow 5 minutes for any accumulated gas to dissipate. Clip a match on one end of the lighting rod. Light match. -
Page 35: Charcoal End Operating Instructions
Charcoal End Operating Instructions LIGHTING A FIRE ASH DISPOSAL AND CLEAN UP It is imperative that you clean out the ashes from your grill after Do not use gasoline, kerosene, or alcohol to light charcoal. Using any of these products (or similar products) could cause a flare up, both grill and ashes have completely cooled –... - Page 36 GRILL TOUCH-UP CONTROLLING THE FIRE After time, surface rust can be removed with a wire brush and Allow enough time for properly building the fire and getting the touched up with high temperature black paint. Never apply paint grill up to desired temperature before attempting to cook. You to the interior surface.
- Page 37 ADDING ADDITIONAL CHARCOAL USING CHARCOAL AND WOOD To achieve the extended cooking times needed for barbecuing or CHARCOAL Your charcoal grill is made to burn either charcoal briquettes or slow smoking (or if you’re using your CHARCOAL GRILL to make enough hot dogs and hamburgers to feed an army), additional natural wood lump charcoal –...
-
Page 38: Care And Maintenance
Care And Maintenance STAINLESS STEEL There are many different stainless steel cleaners available. Always Warning: If you wish to replace main burner, we strongly use the mildest cleaning procedure first, scrubbing in the direc- recommend that you hire a professionally trained technician to tion of the grain. -
Page 39: Troubleshooting
Troubleshooting SPIDER AND INSECT WARNING COOKING TEMPERATURES High setting - Use this setting for fast warm-up, for searing steaks Checking and cleaning burner/ venturi tubes for insects and insect nests. A clogged tube can lead to a fire beneath the grill. Although and chops, and grilling. -
Page 40: Ordering Parts
PROBLEM SOLUTION Gas grill only heats to 93-149°C / 200 -300°F. Check to see if the fuel hose is bent or kinked. Make sure the grill area is clear of dust. Make sure the burner and orifices are clean. Check for spiders and insects. Gas grill takes a long time to preheat. -
Page 41: Limited Warranty
2-YEAR LIMITED WARRANTY This warranty is non-transferable and does not cover failures due to misuse of improper installation or maintenance. This warranty is for replacement of defective parts only. We are not responsible for incidental or consequential damages or labor costs. This warranty does not cover corrosion or discoloration after the grill is used, or lack of maintenance, hostile environment, accidents, alterations, abuse or neglect.
Need help?
Do you have a question about the DH122213-W and is the answer not in the manual?
Questions and answers