Table of Contents

Related Manuals for Pkm GK 225.4 A+EB


Summary of Contents for Pkm GK 225.4 A+EB
- Page 1 TECHNOLOGIE FÜR DEN HAUSHALT TECHNOLOGY FOR DOMESTIC USE Bedienungsanleitung Instruction Manual Kühl/Gefrierkombination Fridge-Freezer GK 225.4 A+EB Deutsch Seite English Page www.pkm-online.de...
-
Page 2: Table Of Contents
Sehr geehrter Kunde! Sehr geehrte Kundin! Wir möchten Ihnen herzlich danken, dass Sie sich zum Erwerb eines Produkts aus unserem reichhaltigen Angebot entschieden haben. Lesen Sie die gesamte Bedienungsanleitung, bevor Sie das Gerät zum ersten Mal benutzen. Verwahren Sie diese Bedienungsanleitung zur zukünftigen Verwendung an einem sicheren Ort. Falls Sie das Gerät weitergeben, müssen Sie diese Bedienungsanleitung ebenfalls mit übergeben. -
Page 3: Sicherheitshinweise
EG - Konformitätserklärung Die in dieser Bedienungsanleitung beschriebenen Produkte entsprechen sämtlichen harmonisierten Anforderungen. Die relevanten Unterlagen können durch die zuständigen Behörden über den Produktverkäufer angefordert werden. Die in dieser Bedienungsanleitung enthaltenen Abbildungen können in einigen Details von dem tatsächlichen Design Ihres Geräts abweichen. Folgen Sie in einem solchen Fall dennoch den beschriebenen Sachverhalten. - Page 4 (Elektrotechniker/-in) eine Überprüfung bereits vorhandener wie auch neuer Anschlüsse erfolgen. Sämtliche Arbeiten, die zum Anschluss des Geräts an die Stromversorgung notwendig sind, dürfen nur von einer qualifizierten Fachkraft (Elektrotechniker/-in) durchgeführt werden. Das Gerät ist ausschließlich zur privaten Nutzung bestimmt sowie zur Nutzung (1) in Personalküchen von Geschäften, Büros und ähnlichen Arbeitsumgebungen;...
- Page 5 3. Falls es im Aufstellungsraum zum Austritt eines brennbaren Gases kommen sollte: a) Öffnen Sie alle Fenster zur Belüftung. b) Ziehen Sie nicht den Stecker aus der Steckdose und benutzen Sie nicht die Bedienelemente des Geräts. c) Berühren Sie nicht das Gerät, bis sämtliches Gas abgezogen ist. d) Bei Missachtung dieser Anweisungen können Funken entstehen, die das Gas entflammen.
- Page 6 Ihres Geräts kann ansonsten durch verschüttetes oder überkochendes Wasser nachhaltig beschädigt werden. 21. Benutzen Sie kein Dampfreinigungsgerät, um Ihr Gerät abzutauen oder zu reinigen. Der Dampf kann in Kontakt mit elektrischen Teilen kommen und so einen Kurzschluss auslösen. STROMSCHLAGGEFAHR! 22. Benutzen Sie niemals mechanische Gegenstände, ein Messer oder andere scharfe Gegenstände, um Eisablagerungen zu entfernen.
-
Page 7: Klimaklassen
10. Stellen oder legen Sie keine heißen Flüssigkeiten und heißen Lebensmittel in das Gerät. 11. Die Belüftungsöffnungen des Geräts oder dessen Einbauvorrichtung (falls Ihr Gerät für einen Einbau geeignet ist) müssen immer frei und unbedeckt sein. 2. Klimaklassen 1. Der ordnungsgemäße Betrieb Ihres Geräts ist nicht gewährleistet, wenn es über einen längeren Zeitraum hinaus nicht im Rahmen seiner Klimaklasse(n) betrieben wird. -
Page 8: Platz- Und Belüftungsbedarf
Reinigungsmittel, um Reste der Transportsicherungen zu entfernen. 4. Bauen Sie das Gerät an einer geeigneten Stelle mit einem angemessenen Abstand zu extremen Hitze- oder Kältequellen auf. 5. Überprüfen Sie vor dem Anschluss des Geräts, ob das Netzanschlusskabel oder das Gerät selbst keine Beschädigungen aufweisen. -
Page 9: Einbau Des Gerätes
ÜCKANSICHT DES ERÄTES ANDABSTANDSHALTER 3.2.2. Einbau des Gerätes Die Abmessungen ihres Gerätes finden Sie im Kapitel Technische Daten. Beachten Sie die Angaben Zusätzliche Seitenbefestigung am Ende dieses Abschnitts. Führen Sie den Einbau mit mindestens zwei Personen durch. Installationsmaterialien 1. Schleppscharniere 2. - Page 10 1. Stellen Sie das Gerät in den Einbauschrank. 2. Im Einbauschrank muss der Abstand der Seitenwand auf der Griffseite des Geräts zur Schrankwand 5mm betragen. 3. An der Außenkante der Gerätetür befinden sich drei Ausbohrungen (jeweils zwei Löcher), in denen der Schleppscharnierbügel befestigt wird. Entfernen Sie zuerst die Abdeckkappen.
- Page 11 6. Bringen Sie die Scharnierführung A auf der Möbeltür an. Beachten Sie hierbei die Höhe der Ausbohrungen auf der Gerätetür. 7. Befestigen Sie die Abdeckung C auf der Führung, sodass sie an der richtigen Stelle einrastet. 8. Öffnen Sie nun die Gerätetür und die Schranktür um 90 .
- Page 12 ➢ Schwergängigkeit der Tür. ➢ Geräuschen während des Öffnens und Schließens der Tür. ➢ zum Teil erheblichen Schäden am Gerät und/oder Einbaumöbel. In einem solchen Fall übernimmt die Firma PKM ausdrücklich keine Haftung für eventuell entstandene Schäden. Zusätzliche Seitenbefestigung Im Lieferumfang sind zwei Winkelstücke enthalten, die zur Stabilisierung des Geräts im eingebauten Zustand dienen.
-
Page 13: Wechsel Des Türanschlags
indem sie es in der Schraubenöffnung nach links bzw. rechts an die Seitenwand des Einbaumöbels schieben 3.3 Wechsel des Türanschlags Wichtiger Hinweis: Der Wechsel des Türanschlags darf nur von einer qualifizierten Fachkraft durchgeführt werden nachfolgenden Anweisungen sind nicht für eine in solchen Dingen unerfahrene Person bestimmt. WARNUNG! Trennen Sie das Gerät vor dem Wechsel des Türanschlags von der Stromversorgung. - Page 14 1: Oberes Scharnier 2: Unteres Scharnier 1. Lösen Sie die oberen drei Schrauben. 2. Bewegen Sie die obere Tür oben vorsichtig ein wenig vom Gerät weg. Die Tür löst sich nun aus dem oberen Scharnier. Nehmen Sie die Tür aus dem mittleren Scharnier heraus und stellen Sie sie an einer sicheren Stelle ab.
-
Page 15: Bedienung
4. Schrauben Sie das untere Scharnier 5. Nehmen gegenüberliegenden Seite Abdeckkappen ab. Bringen Sie das untere Scharnier ebenda an, aber ziehen Sie es noch nicht fest. Lassen Sie dem Scharnier etwas Raum, sodass Sie es nach vorne und hinten bewegen können. 6. -
Page 16: Beschreibung Des Gerätes
Lassen Sie das Gerät mindestens 4 bis 6 Stunden aufrecht stehen, bevor Sie es an NOTICE! das Stromnetz anschließen, um sicherzustellen, dass das Öl in den Kompressor zurückgeflossen ist. Wenn Sie das Gerät zum ersten Mal verwenden oder das Gerät längere Zeit vom NOTICE! Stromnetz getrennt war, lassen Sie das Gerät bei mittlerer Temperatureinstellung 3 bis 4 Stunden abkühlen (s. -
Page 17: Temperaturregelung
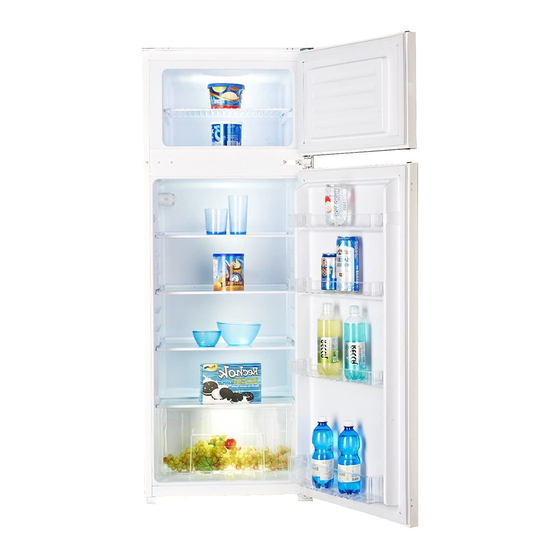
Drahtablage Gefrierbereich Gemüseschublade Thermostat / Innenbeleuchtung Türablagen Glasablage Kühlbereich Flaschenfach Abdeckung Gemüseschublade Warten Sie nach der Installation 4-6 Stunden, bevor Sie Ihr Gerät an das Stromnetz anschließen! Die Glasböden und der Crisper können entfernt und eingesetzt werden, um Lebensmittel je nach Gerät zu reinigen und zu lagern. Bei dem von Ihnen gekauften Gerät handelt es sich möglicherweise um eine erweiterte Version des Geräts, für das dieses Handbuch gedruckt wurde. -
Page 18: Ordnungsgemäße Verwendung Des Gefrierschranks
bilden, so ist zu empfehlen, die Temperatur auf eine niedrigere Stufe zurück zustellen. 4. Stellen Sie den Thermostat auf Position 7. 5. Lassen Sie das leere Gerät nun 2 Stunden lang in Betrieb. 6. Stellen Sie dann den Thermostat auf Position 4 NORMAL. Sie können jetzt Lebensmittel im Gerät aufbewahren. - Page 19 1. Wickeln Sie frische Lebensmittel, die Sie einfrieren möchten, in Aluminiumfolie, Frischhaltefolie, luft- und wasserdichte Plastiktüten, Polyethylenbehälter oder andere geeignete Kunststoffbehälter mit Deckel. 2. Lassen Sie zwischen den einzelnen Tiefkühlkoststücken etwas Platz, da eine ordnungsgemäße Luftzirkulation erforderlich ist. 3. Das Lebensmittel ist nach 24 Stunden vollständig gefroren (die relevanten Informationen zur maximalen Gefrierkapazität innerhalb von 24 Stunden finden Sie im Kapitel TECHNISCHE DATEN).
- Page 20 Lebensmittel sollten immer abgedeckt oder verpackt in den Lagerraum gelangen, wodurch es zu keiner Geschmacks- oder Geruchsdiffusion kommen kann. Zum richtigen Verpacken Ihrer Lebensmittel eignen sich: ❖ Für Lebensmittel geeignete Frischhaltebeutel/Frischhaltefolien sowie Aluminiumfolie. ❖ Spezielle Abdeckhauben für Lebensmittel. ❖ Für Lebensmittel geeignete Behälter aus Kunststoff/Glas/Keramik. Der Kühlbereich eignet sich zur Lagerung von frischen Lebensmitteln sowie von Getränken.
-
Page 21: Umweltschutz
5. Umweltschutz 5.1 Energiesparen Stellen Sie das Gerät an einem trockenen und gut belüfteten Ort auf. ❖ Stellen Sie das Gerät an einem geeigneten Ort mit ausreichendem Abstand zu Wärme- und Kältequellen auf. ❖ Schützen Sie das Gerät vor direkter Sonneneinstrahlung. ❖... -
Page 22: Bedeutung Der *-Kennzeichnung Von Gefriergeräten
5.2 Bedeutung der *-Kennzeichnung von Gefriergeräten 1- (*), 2- (**), und 3-Sterne (***) Gefrierschränke sind nicht zum einfrieren frischer Lebensmittel geeignet 2-Sterne (**) und 3-Sterne (***) Gefrierschränke eigen sich zur Lagerung von Tielfkühlfrost und Eis oder zur Herstellung von EIs und EIswürfeln TERNE GERÄTE EMPERATUR... - Page 23 Lebensmittel dürfen nicht alle Oberflächen im Gerät direkt berühren. Es muss separat in Aluminiumblech oder Zellophanblech oder in luftdichte Kunststoffboxen eingewickelt werden. Lebensmittel im Kühlschrank aufbewahren Das Kühl- und Gefrierfach verlängert die Lagerzeiten von frisch verderblichen Lebensmitteln. Frische Lebensmittelpflege für beste Ergebnisse: Lagern Sie Lebensmittel, die sehr frisch und von guter Qualität sind.
- Page 24 Schmutz zu entfernen, und dann mit Papiertüchern trocken getupft werden. Legen Sie ganze Fische oder Filets in eine versiegelte Plastiktüte. Halten Sie Schalentiere immer gekühlt. Innerhalb von 1 - 2 Tagen verbrauchen. Vorgekochte Lebensmittel und Reste Diese sollten in geeigneten abgedeckten Behältern aufbewahrt werden, damit die Lebensmittel nicht austrocknen.
-
Page 25: Betriebsparameter
Kuchen und Gebäck, Fisch und Meeresfrüchte, Fleisch, Wild, Geflügel, Gemüse, Obst, Kräuter, Eier ohne Schalen, Milchprodukte wie Käse und Butter, Fertiggerichte und Reste wie Suppen, Eintöpfe, gekochtes Fleisch und Fisch, Kartoffelgerichte, Soufflés und Desserts. Die folgenden Lebensmittel sind nicht zum Einfrieren geeignet: Gemüsesorten, die normalerweise roh verzehrt werden, wie Salat oder Radieschen, Eier in Muscheln, Trauben, ganze Äpfel, Birnen und Pfirsiche, hartgekochte Eier, Joghurt, Sauermilch, Sauerrahm und Mayonnaise. -
Page 26: Reinigung Und Pflege
a. Die Umgebungstemperatur entspricht der Klimaklasse. b. Die Türen schließen richtig. c. Sie öffnen die Türen nicht zu oft oder zu lange. d. Die Türdichtungen sind in einwandfreiem Zustand. e. Das Gerät ist richtig positioniert. f. Sie haben das Gerät nicht überfüllt. g. -
Page 27: Abtauen
Außen 1. Benutzen Sie ein feuchtes, in einem milden Reinigungsmittel getränktes Tuch. Verwenden geeignetes Reinigungsmittel für hartnäckige Verunreinigungen. 2. Wischen Sie anschließend mit klarem Wasser nach. 3. Wischen Sie die gereinigte Fläche trocken. Innen 1. Reinigen Sie das herausnehmbare Zubehör und die Innenseiten mit warmem Wasser und einem milden Reinigungsmittel 2. -
Page 28: Austausch Des Leuchtmittels
6.2 Austausch des Leuchtmittels WARNUNG! Schalten Sie das Gerät ab und ziehen Sie den Stromstecker aus der Steckdose. Ansonsten besteht Stromschlaggefahr. 2. Entfernen Sie die oberen Ablagen, indem Sie diese aus der Halteführung ziehen. 3. Entfernen Sie nun die Plastikabdeckung der Glühbirne und schrauben Sie die Glühbirne heraus. - Page 29 ➢ Das Gerät ist mit dem Netzstecker ➢ Überprüfen fragliche nicht Steckdose Steckdose, indem Sie ein anderes angeschlossen. Gerät ebenda anschließen. ➢ Der Netzstecker ist locker. ➢ Überprüfen Sie die Haussicherung. ➢ Die Steckdose wird nicht mit Strom ➢ Vergleichen Sie die Angaben auf versorgt.
-
Page 30: Außerbetriebnahme
Die folgenden Betriebsvorgänge sind normal und kein Anzeichen einer Fehlfunktion ➢ Die Kühlflüssigkeit erzeugt ein Geräusch ähnlich fließenden Wassers. ➢ Gelegentlich sind Geräusche zu hören, die durch den Einspritzvorgang in das Kühlsystem verursacht werden. ➢ Es ist normal, dass die Seitenwände des Geräts aufgrund des Betriebs des Kühlkreislaufs warm werden. -
Page 31: Technische Daten
1. Sichern Sie alle herausnehmbaren Teile und den Inhalt des Geräts. Verpacken Sie diese getrennt, falls nötig. 2. Transportieren Sie das Gerät ausschließlich in einer aufrechten Position. In jeder anderen Position kann der Kompressor beschädigt werden. 3. Beschädigen Sie die Standfüße nicht. Endgültige Außerbetriebnahme 1. -
Page 32: Entsorgung
10. Entsorgung 1. Bitte entsorgen Sie das Gerät unter Beachtung der jeweiligen Gesetzgebung hinsichtlich explosiver Gase. Kühlgeräte enthalten in den Kühlsystemen und Isolierungen Kältemittel und Gase, die fachgerecht entsorgt werden müssen. Beschädigen Sie an einem zur fachgerechten Entsorgung vorgesehenen Kühlgerät nicht die Kühlrippen und Rohre. Bei Austritt von Kältemittel besteht Brandgefahr. -
Page 33: Garantiebedingungen
5. Schäden am Produkt, die durch nicht fachgerechte Installation oder Transport verursacht wurden; 6. Schäden infolge nicht geräteüblicher Nutzung; 7. Schäden, die außerhalb des Geräts durch ein PKM-Produkt entstanden sind - soweit eine Haftung nicht zwingend gesetzlich angeordnet ist. Die Gültigkeit der Garantie endet bei: 1. - Page 34 for the first time. Retain this instruction manual in a safe place for future reference. If you transfer the appliance to a third party, also hand over this instruction manual. Index Index ................................34 1. Safety information ..........................37 1.1 Signal words ............................ 38 1.2 Safety instructions..........................
- Page 35 and persons with reduced physical, sensory or mental capabilities or lack of experience and knowledge if they have been given supervision or instruction concerning use of the appliance in a safe way and understand the hazards involved. Children aged from 3 to 8 years are allowed to load and unload refrigerating appliances.
- Page 36 applications such as – staff kitchen areas in shops, offices and other working environments; – farm houses and by clients in hotels, motels and other residential type environments; – bed and breakfast type environments; – catering and similar non-retail applications. WARNING: When positioning the appliance, ensure the supply cord is not trapped or damaged.
- Page 37 Do not dispose of this appliance together with your domestic waste. The appliance must be disposed of at a collecting centre for recyclable electric and electronic appliances. Do not remove the symbol from the appliance. The figures in this instruction manual may differ in some details from the current design of your appliance.
- Page 38 Store this manual in a safe place so you can use it whenever it is needed. Strictly observe the instructions to avoid damage to persons and property. Check the technical periphery of the appliance! Do all wires and connections to the appliance work properly? Or are they time-worn and do not match the technical requirements of the appliance? A check-up of existing and newly- made connections must be done by an authorized professional.
- Page 39 CAUTION! indicates a hazardous NOTICE! indicates possible damage situation which, if not avoided, may to the appliance. result in minor or moderate injury. 1.2 Safety instructions DANGER! To reduce the risk of electrocution: 1. Non-compliance of the orders of this instruction manual will endanger the life and health of the operator and/or can result in damages to the appliance.
- Page 40 1. This appliance is equipped with the environmental-friendly refrigerant R600a. The refrigerant R600a is inflammable. The components of the cooling circuit must neither be damaged during transport nor use. 2. If any part of the cooling circuit is damaged, the appliance must not stand near a fire, naked light or spark-generating devices.
- Page 41 Always check that the power cord is not placed under the appliance or damaged by moving the appliance. The technical data of your energy supplier must meet the data on the model plate of the appliance. Your domestic circuit must be equipped with an automatic circuit breaker.
- Page 42 Do not eat food which is still frozen. The coldness can cause injuries in the mouth. Contact with frozen food, ice and metal components in the freezer compartment can cause injuries similar to burns. Children must never play with the appliance. If you decommission your appliance (even temporarily), ensure that children cannot get into the appliance.
- Page 43 compressor. 7. If you use the appliance for the first time or the appliance has been disconnected from the mains for a longer period of time, allow the appliance to cool down for 3 until 4 hours on medium temperature setting before you place any fresh or frozen food in the appliance.
- Page 44 2. Climatic classes Look at chap. T for information about the climatic class of your ECHNICAL appliance. Your appliance can be operated in rooms with relevant room temperatures as named below. LIMATIC CLASS MBIENT TEMPERATURE →+32 e.g. unheated cellar →+32 inner home temperature →+38 inner home temperature...
- Page 45 3. The accessories of your appliance can be protected from damage due to transportation (adhesive tapes etc.). Remove such tapes very carefully. Remove remains of such tapes with a damp cloth using lukewarm water and a mild detergent (see also chapter ).
- Page 46 ACK OF THE APPLIANCE ALL SPACERS 3.2.2 Installation The dimensions of the appliance are registered in chap.9 Technical Data. Please note the information given in Additional side-attachment at the end of this section. Installation materials LIDING HINGES IXING SCREWS APPLIANCE IXING SCREWS HINGES EALING TAPE OVER CAPS...
- Page 47 ECURITY ANGLE Installation materials 1. Place the appliance in the built-in unit. 2. The distance of the wall at the handle-side of the appliance and the wall of the built-in unit must be 5 mm. 3. There are three drillings (two holes each) on the outer edge of the door of the appliance where the sliding hinge brackets have to be fixed.
- Page 48 6. Fix hinge bracket A on the door of the built-in unit. Notice the height of the holes on the door. 7. Fix cover C so that it snaps. 8. Open the doors of the appliance and the built-in unit (900). Insert the small square B in the guide A.
- Page 49 In this particular case, PKM is not liable for any damage. Additional side-attachment Two security angles are included in delivery to stabilize the appliance when being built-in.
- Page 50 WARNING! Unplug the appliance before you change the hinge position. Empty the appliance. Carry out the change with at least 2 persons. CAUTION! The change of the position must be carried out by at least two persons; otherwise you may hurt yourself or damage the appliance. NOTICE! You should contact a qualified technician if you want to have the door swing reversed.
- Page 51 4. Move the top door carefully a bit away from the appliance. Now the door disengages from the hinge. Take the door out of the middle hinge. Keep the door at safe place. 5. Remove the middle hinge. Take out the bottom door and keep it at a safe place. 6.
- Page 52 8. Place the door on the bottom hinge. Adjust the door in such a way that it closes properly. Now tighten the screws of the bottom hinge. 9. Fix the middle hinge on the opposite side. Put the top door on the hinge. Fix the top hinge on the opposite side.
- Page 53 NOTICE! Adjust the door properly before you finally tighten the screws of the hinge. The seal must close properly. 4. Operation WARNING! To disconnect the appliance from the mains, you must unplug the appliance or use a cut-off device. 4.1 Before initial operation WARNING! While unpacking, the packaging materials (polythene bags, polystyrene pieces, etc.) should be kept away from children and pets.
- Page 54 NOTICE! If you use the appliance for the first time or the appliance has been disconnected from the mains for a longer period of time, allow the appliance to cool down for 3 until 4 hours on medium temperature setting (s. chapter 4.3 SETTING OF THE ) before you place any fresh or frozen food in the TEMPERATURE...
- Page 55 4.2 Description of the appliance Fig. similar: modifications are possible. HELF FREEZING COMPARTMENT HERMOSTAT INTERNAL LIGHT LASS SHELVES LASS COVER OF CRISPER RISPER OOR TRAYS OTTLE POCKET AFTER INSTALLATION WAIT 4-6 HOURS BEFORE YOU CONNECT YOUR APPLIANCE TO THE MAINS! The glass shelves and the crisper can be removed and inserted for cleaning and storing of food according to the appliance.
- Page 56 operating conditions are identical. This manual is therefore still valid. 4.3 Setting of the temperature ➢ The settings of the temperature of the fridge can be adjusted manually by turning the thermostat of the temperature setting to the desired setting. ➢...
- Page 57 1. Set the thermostat to position 7. 2. Now let the empty appliance operate for 2 hours. 3. Then set the thermostat to position 4 NORMAL. You can store food in the appliance now. 4. In case of high outdoor temperatures (e.g. hot summer days) select position 5-7 or higher to set a lower temperature.
- Page 58 4.4 Proper use of the freezer 1. Wrap fresh food you want to freeze in aluminium foil, cling film, air and water tight plastic bags, polyethylene containers or other suitable plastic containers with a lid. 2. Leave some free space between the single pieces of frozen food as proper air circulation is required.
- Page 59 5. Environmental protection 5.1 Energy saving ❖ Install the appliance in a dry and well-ventilated place. ❖ Install the appliance in a suitable position with an adequate distance from sources of heat and cold. ❖ Protect the appliance from direct sunlight. ❖...
- Page 60 ✓ in a microwave ❖ Try opening the door as little as possible, especially when the weather is warm and humid. If you open the door, close it as fast as possible. ❖ Permanently check, that the a168ppliance is well-ventilated. The appliance has to be well-ventilated from all sides.
- Page 61 Not suitable for freezing fresh food. ➢ Suitable for fresh meat products (pork, beef, chicken, etc.) and processed food consumed or processed within the same 0* - day or within the next three days after C - 0 storage (max.). COMPARTMENT Not suitable for freezing food or for storing frozen food.
- Page 62 Store cooked and raw meat on separate plates. This will prevent any juice lost from the raw meat from contaminating the cooked product. Poultry Fresh whole birds should be rinsed inside and out with cold running water, dried and placed on a plate. Cover loosely with plastic wrap or foil. Poultry pieces should also be stored this way.
- Page 63 Storing frozen food Store at -18°C or colder. Avoid opening the freezer compartment door unnecessarily. Freezing fresh food Freeze fresh and undamaged food only. To retain the best possible nutritional value, flavour and colour, vegetables should be blanched before freezing. Aubergines, peppers, zucchini and asparagus do not require blanching.
- Page 64 Butter, vegetables (blanched), eggs whole and yolks, cooked crayfish, 6 months minced meat (raw), pork (raw) Fruit (dry or in syrup), egg whites, beef (raw), whole chicken, lamb 12 months (raw), fruit cakes Never forget: When you freeze fresh foods with a ‘use by /best before/best by/’ date, you must freeze them before this date expires.
- Page 65 6. Cleaning and maintenance DANGER! Never touch the power plug, the power switch or other electrical components with wet or damp hands. RISK OF ELECTRIC SHOCK! WARNING! Disconnect the appliance from the mains before you clean or maintain it. RISK OF ELECTRIC SHOCK! WARNING! To disconnect the appliance from the mains, you must unplug the appliance or use a cut-off device.
- Page 66 3. Dry the cleaned surfaces with a cloth. NTERNAL CLEANING Clean the shelves and the inside with warm water and a mild detergent. Use clear water to rinse. Dry the cleaned surfaces with a cloth. 4. Check the water drain and clean it if needed. OOR SEALS ➢...
- Page 67 5. Remove the big pieces of ice first. 6. Afterwards remove the small pieces of ice. 7. Wipe and dry the appliance and door seals with dry and soft cloths. 8. After cleaning leave the door open for some time to ventilate the appliance.
- Page 68 6.2 Replacing of the illuminant WARNUNG! The lamp on this device must only be changed by a qualified technician! 1. Switch off the appliance and draw the plug out of the socket. Risk of electrical shock! 2. The illuminant is on the top of the cooling compartment.
- Page 69 MALFUNCTION POSSIBLE CAUSE MEASURE HE APPLIANCE DOES NOT WORK AT ALL The plug of the appliance is not Connect the appliance to the connected to the socket. mains properly. The plug has become loose. Check the plug. The socket is not supplied with Check the corresponding socket energy.
- Page 70 3. Items have dropped behind the 3. Remove the items. appliance. ATER DRIPS ON THE FLOOR 1. The water pan (located at the 1. You may need to pull the rear bottom of the cabinet) may refrigerator away from the wall not be properly levelled, or the to check the pan and spout.
- Page 71 NOCKING SNAPPING may be generated by sequential expansion and shrinkage of the components of the cooling system. It is caused by variation of temperature before and after the compressor is activated or deactivated. 8. Decommissioning ECOMMISSIONING TEMPORARILY F THE APPLIANCE IS NOT USED FOR A LONGER PERIOD OF TIME Disconnect the appliance from the mains.
- Page 72 Completely remove every door of the appliance. Leave the shelves in their position so that children are not able to get into the appliance. Follow the advice for the disposal of the appliance in chapter WASTE MANAGEMENT 9. Technical data Model Fridge Freezer Climatic class...
- Page 73 properly. Do not damage the cooling fins and tubes. If refrigerants escape there is FIRE HAZARD! 2. While unpacking, the packaging materials (polythene bags, polystyrene pieces, etc.) should be kept away from children and pets. CHOKING HAZARD! RISK OF INJURY! 3.
- Page 74 11. Guarantee conditions for large electric appliances; PKM GmbH & Co. KG, Neuer Wall 2, 47441 Moers This appliance includes a 24-month guarantee for the consumer given by the manufacturer, dated from the day of purchase, referring to its flawless material- components and its faultless fabrication.
- Page 76 Bitte kontaktieren Sie das Geschäft, in dem Sie das Gerät erworben haben. Please contact the shop you purchased the appliance at. Änderungen vorbehalten Subject to alterations TAND PDATED 29.12.2020 12/29/2020 © PKM GmbH & Co. KG, Neuer Wall 2, 47441 Moers...
Need help?
Do you have a question about the GK 225.4 A+EB and is the answer not in the manual?
Questions and answers