
Subscribe to Our Youtube Channel
Related Manuals for Tucker Barbecues Horizon


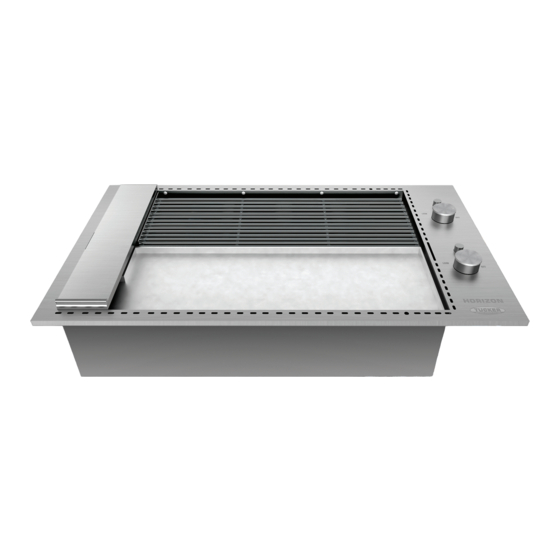
Summary of Contents for Tucker Barbecues Horizon
- Page 1 ASSEMBLY , INSTALLATION AND OPERATING INSTRUCTIONS FOR HORIZON BARBECUE IMPORTANT – PLEASE READ ALL INSTRUCTIONS BEFORE YOU ASSEMBLE, INSTALL OR OPERATE THIS APPLIANCE. V10.08.2021...
-
Page 2: Table Of Contents
CONTENTS IMPORTANT SAFETY INSTRUCTIONS BARBECUE ASSEMBLY INSTRUCTIONS INSTALLATION INSTRUCTIONS & WARNINGS SPECIFICATIONS DIMENSIONS GAS INSTALLATION AND LEAK TEST PROCEDURE OPERATING INSTRUCTIONS COOKING HINTS TROUBLESHOOTING SERVICE & MAINTENANCE WARRANTY V10.08.2021... -
Page 3: Important Safety Instructions
IMPORTANT SAFETY INSTRUCTIONS • • Tucker Horizon Barbecues are approved for Do not use or store flammable liquids in or near outdoor use only. this appliance. • • Remove all plastic protection film from stainless Always leak test /check hose connections after steel components before assembly. -
Page 4: Barbecue Assembly Instructions
Cut away any packaging or cable ties that may be holding components in place. • Check you have all the correct components as listed below. BARBECUE PARTS Horizon Barbecue Body Grill Plate Heat Diffuser Hose & Regulator Grease Storage Tray... - Page 5 BARBECUE ASSEMBLY 1. Place the heat diffuser above the rear burner, it locates into the slots provided in the BBQ body. Check that you have the correct gas type Barbecue i.e. L.P.GAS (red sticker) NAT GAS (black sticker). The label is located on the right hand side of the Barbecue body next to the gas inlet.
- Page 6 3. Open the flap on the left hand side of the BBQ and slide the grease tray into place under the lip of the cooking plate as shown in the photo below then close the flap. Once you have assembled the barbecue wipe it over to remove greasy fingerprints with stainless steel polish or a little baby oil on a soft cloth, works well and also protects the...
-
Page 7: Installation Instructions & Warnings
INSTALLATION INSTRUCTIONS & WARNINGS BARBECUE INSTALLATION INSTRUCTIONS INSTALLATION WARNINGS READ THE IMPORTANT INFORMATION Do not use this appliance indoors or on marine craft. ON THE FRONT OF THE BARBECUE This appliance shall only be used in an above ground, open-air situation with natural ventilation, This barbecue is designed and approved for outdoor without stagnant areas where gas leakage and use only. - Page 8 DIAGRAMMATICAL REPRESENTATIONS OF FIGURE 4 OUTDOOR AREA –EXAMPLE 4 OUTDOOR AREAS The following figures are diagrammatical representations of outdoor areas. The areas used in the figures below are examples – the same principles apply to any other shaped area. FIGURE F1 – OUTDOOR AREA – EXAMPLE 1 Open side at least 25% 30% or more in total of total wall area...
-
Page 9: Specifications
48mj/h 52mj/h Natural Gas injector size 2.4mm Pressure 1KPA Propane Gas injector size 1.5mm Pressure 2.75 KPA TUCKER HORIZON BARBECUES ARE MADE AND APPROVED TO AUSTRALIAN STANDARDS A.G.A. Certificate Number 7932 For LP Gas connections, an approved 2.75 KPA regulator and hose assembly connection to the appliance is fitted by the manufacturer. -
Page 10: Dimensions
DIMENSIONS HORIZON BBQ DIMENSIONS 924mm 213mm 796.5mm 768mm Gas Manifold 48.5mm 468mm 67.8mm 26.2mm 477.6mm 822.5mm 518mm 69mm 924mm 761.8mm 776mm 35mm Gas Manifold 251.8mm 238.8mm 26.2mm 477.6mm 822.5mm 518mm 69mm The manifold is factory fitted at the back on the right-hand side. Manifold diameter is 20mm square tube. - Page 11 BRICKWORK CUT OUT SIZES 850mm 495mm 50mm Min 100mm Min 280mm 90mm Min Allow fresh air to circulate into BBQ from underneath BBQ. Minimum air ventilation required underneath is 200 square centimeters. CLEARANCES TO COMBUSTIBLES ARE AS FOLLOWS Minimum Top Clearance Allow 800mm Minimum Side Clearance Allow 50mm...
-
Page 12: Gas Installation And Leak Test Procedure
GAS INSTALLATION AND LEAK TEST PROCEDURE CONNECTION OF A GAS CYLINDER TO THE BARBECUE IS AS FOLLOWS You must have the control knobs in the off position and have the gas supply on at the The hose assembly connection to the appliance is cylinder valve to leak test. - Page 13 GAS INSTALLATION FOR PERMANENT CONNECTIONS to natural gas or a fixed propane supply, an authorized person, in accordance with these instructions, local gas fitting regulations, municipal building codes, the AGA installation code AS5601 and any other relevant statutory regulations, must be employed. Note the installer must test the BBQ when the installation is completed before leaving to make sure the appliance operates correctly and is safe for the...
- Page 14 • Turn the gas on and test for leaks, repair if necessary. • Now light both burners on the BBQ and adjust the regulator pressure to 1 KPA with both the burners on the high setting. • To set the low/ simmer position correctly, turn the control knobs down to the low setting whilst the burners are on.
-
Page 15: Operating Instructions
OPERATING INSTRUCTIONS BARBECUE OPERATING INSTRUCTIONS If the Burner does not light within 10 seconds, 1. Remove the lid or open the hood before lighting turn the Burner off and wait 1 minute and repeat the BBQ. the procedure. 2. Turn all the gas controls to the OFF position. Light only one Burner at a time in this manner. -
Page 16: Cooking Hints
COOKING HINTS COOKING TIPS HANDY HINTS If flare ups occur turn the BBQ down and the flare will • Too much flare up is generally the result of too subside as the temperature will decrease. much heat. Always turn the meat with tongs, a fork will pierce the You are better off cooking slower and longer •... -
Page 17: Troubleshooting
TROUBLE SHOOTING TROUBLE SHOOTING SOLUTIONS Barbecue won’t light? Check all gas connections and that the gas bottle has gas. Ignition is not working? Check the leads and adjust the spark gap by bending the metal pole toward the burner igniting port hole and maintaining a gap about 8mm. - Page 18 Barbecue is flaring all the time? Too much heat so turn the barbecue down. Control knobs are stiff? Remove the knobs with an Allen key and oil the shafts of control valves. If you have trouble operating your BBQ controls or the flame patterns of the burners seem to be flaring up see your local dealer or contact TUCKER AUSTRALIA for service.
-
Page 19: Service & Maintenance
SERVICE & MAINTENANCE TAKE CARE OF THE APPLIANCE 11. Stainless Steel barbecues can be affected by high temperatures of which can cause discoloration on the BBQ frame. 1. Before each use remove any accumulated 12. Check and tighten nuts and bolts on the grease and other cooking residue. -
Page 20: Warranty
WARRANTY TUCKER HORIZON BARBECUE WARRANTY 3. Installation must conform to the standards laid down by the local codes or, in the absence of local codes, with AGA code AG:601 WARRANTY PERIOD AS:5601:2002 4. No alterations or repairs are to be carried out...
Need help?
Do you have a question about the Horizon and is the answer not in the manual?
Questions and answers