
Related Manuals for HOZAN C-371


Summary of Contents for HOZAN C-371
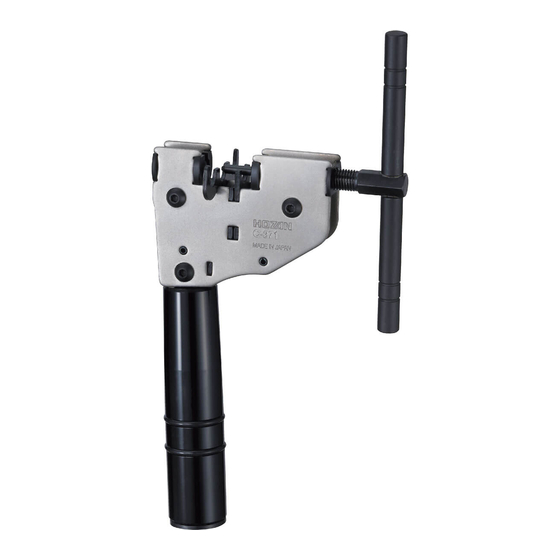
- Page 1 取扱説明書 取扱説明書 取扱説明書 取扱説明書 C-371 チェーン チェーン切 切 切 切 り り り り チェーン チェーン 各部の の の の 名称 各部 名称と と と と 入組明細 入組明細 各部 各部 名称 名称 入組明細 入組明細 ピン ハンドル ガイド 付属品 付属品 付属品...
- Page 2 注意文 注意文の の の の 警告 警告マークについて マークについて 注意文 注意文 警告 警告 マークについて マークについて 警告 警告 警告 警告 注意 注意 注意 注意 注意 注意 注意 注意 ご ご ご ご 使用上 使用上の の の の 注意 注意 使用上 使用上 注意 注意...
- Page 3 ご ご ご ご 使用方法 使用方法 使用方法 使用方法 3 3 3 3 ピン 4 4 4 4 5 5 5 5 6 6 6 6 バ 絡 除 バ 絡 抜きバリ 続け ● ● ● ● チェーンをつなぐ チェーンをつなぐ チェーンをつなぐ チェーンをつなぐ 【...
- Page 4 ご ご ご ご 使用方法 使用方法 使用方法 使用方法 4 4 4 4 目 見 5 5 5 5 ゆ 圧入 6 6 6 6 圧入 7 7 7 7 接続 8 8 8 8 ( ) 穴 挿入 持 捩じ 折...
- Page 5 ご ご ご ご 使用方法 使用方法 使用方法 使用方法 3 3 3 3 目 見 4 4 4 4 ゆ 圧入 5 5 5 5 圧入 6 6 6 6 接続 要 じ “ 調整” ム ズ ( ペ 参照) ● ● ● ● チェーンをつなぐ チェーンをつなぐ...
- Page 6 ご ご ご ご 使用方法 使用方法 使用方法 使用方法 10 10 10 10 11 11 11 11 線 設 (図 設 ) 12 12 12 12 13 13 13 13 実 目 見 14 14 14 14 接続 問題 け ば 終了...
- Page 7 ご ご ご ご 使用方法 使用方法 使用方法 使用方法 ● ● ● ● チェーンの チェーンの“ “ “ “ しぶり しぶり” ” ” ” を を を を 調整 調整する する チェーンの チェーンの しぶり しぶり 調整 調整 する する 圧入 各 同士 け...
- Page 8 矢 矢 矢 矢 の の の の 交換方法 交換方法 交換方法 交換方法 ● ● ● ● 矢 矢 矢 矢 の の の の 交換方法 交換方法 交換方法 交換方法 消耗 矢 交換 1 1 1 1 キャ 矢 ょ 収納 小 品 9...
-
Page 9: Specifications
C-371 CHAIN TOOL Thank you for purchasing the HOZAN C-371 CHAIN TOOL. With proper care and handling this fine instrument will provide years of trouble-free operation. Please read this entire in- struction manual carefully before attempting to place this instrument in service. Please keep this instruction manual available for reference. -
Page 10: Operation
Warning and caution symbols These symbols are used throughout the instruction manual to alert the user to potential safety hazards as follows : Warning … Notice when incorrect handling could cause the user's death or serious injury. Caution … Notice when incorrect handling could cause injury to the user or material damage. - Page 11 Operation 3 3 3 3 Turn the handle furthermore to advance the Needle Fig.3 needle of this tool, checking to make sure it contacts the center of the connecting pin to be extracted. (Fig.3) Advance the needle, frequently checking the state of the connecting pin being extracted when leave the connecting pin in the link plate.
- Page 12 Operation 4 4 4 4 Turn the handle clockwise to apply the tip of the needle to the center of the reinforced connecting pin end. (Fig.7) 5 5 5 5 Turn the handle to press the connecting Fig.8 pin while being careful, paying attention that the chain does not drop out from the guide.
- Page 13 Operation Fig.11 3 3 3 3 Turn the handle clockwise to apply the tip of the needle to the center of the connecting pin end. (Fig.11) 4 4 4 4 Turn the handle to press the connecting pin carefully, paying attention that the chain does not drop out from the guide.
- Page 14 Operation 10 10 10 10 Turn the handle counterclockwise to reverse the needle to create a space between the chain and the needle. 11 11 11 11 Assemble the chain temporarily, then Fig.11 set this tool under the chain to align the needle of this tool and the reinforced connecting pin (hold the tool in the op- posite direction than before).
- Page 15 Operation ● ● ● ● Releasing stiffness The chain after connecting work can not run smoothly since the link plates are in condi- tion of being pressed each other in the area where the connecting pin is inserted. There- fore this procedure is necessary according to types of chains. NOTE: It is not necessary to release stiffness with almost all narrow chains (chains for outer type multiple speed derailleur).
-
Page 16: Replacement Part
Use screw lock agent again to tighten. 5 5 5 5 Apply grease on the thread when install the pin to the tool. Replacement part C-371-1 Replacement pin for C-371 1-2-12 Saiwaicho, Naniwa-ku, Osaka 556-0021, Japan Tel : 81-6-6567-3111 F a x : 81-6-6562-0024 14.12...
Need help?
Do you have a question about the C-371 and is the answer not in the manual?
Questions and answers