Table of Contents
Advertisement
Quick Links
C-700-13
各部の の の の 名称
各部
各部
各部
名称
名称
名称
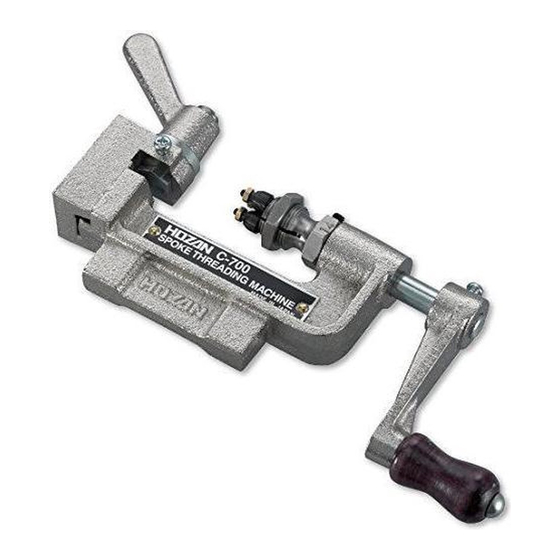
ローラー
ローラー取り付けナット
スポークホルダー
スポークガイド
六角ナット
スライドプレート
仕 仕 仕 仕
様 様 様 様
※
#14・#15スポークには別売のC-706替駒をお
求めください。
#13スポークに#14のネジ、
※
#12スポークに#13のネジ
を立てることはできません。
スポークネジ
スポークネジ切 切 切 切 り り り り 器 器 器 器
スポークネジ
スポークネジ
交換ダイス
交換
交換
交換
ダイス適応表
ダイス
適応表
ダイス
ダイス
適応表
適応表
スポーク
スポーク
番手
外径 mm
#15
#14
#13
1 1 1 1
取扱説明書
取扱説明書
取扱説明書
取扱説明書
アジャストナット
ダイス(駒)
ダイス(駒)
シャフト
固定ネジ
ハンドル
バイス固定部
ダイス
ダイス
ダイス
ネジ
適応ダイス
呼び寸
1.8
BC 1.8
C-706
2.0
BC 2
2.3
BC 2.3
C-707-13
Advertisement
Table of Contents

Related Manuals for HOZAN C-700-13


Summary of Contents for HOZAN C-700-13
- Page 1 取扱説明書 取扱説明書 取扱説明書 取扱説明書 C-700-13 スポークネジ スポークネジ切 切 切 切 り り り り 器 器 器 器 スポークネジ スポークネジ 各部 各部の の の の 名称 各部 各部 名称 名称 名称 アジャストナット ローラー ダイス(駒) ローラー取り付けナット ダイス(駒) シャフト 固定ネジ スポークホルダー ハンドル...
- Page 2 注意文 注意文の の の の 警告 警告マークについて マークについて 注意文 注意文 警告 警告 マークについて マークについて 警告 警告 警告 警告 注意 注意 注意 注意 注意 注意 注意 注意 ご ご ご ご 使用上 使用上の の の の 注意 注意 使用上 使用上 注意 注意...
- Page 3 ご ご ご ご 使用方法 使用方法 使用方法 使用方法 ローラー軸の先端とスポーク 3 3 3 3 最 限引 の先端がそろうように。 体 間 セ ダイスと本体にすき間が スポーク 1 1 1 1 軸 ないようにセットします。 そろ 通 4 4 4 4 心 軽 押 当 注油 5 5 5 5 押...
- Page 4 ダイスの調整 ダイスの 調整 ダイスの ダイスの 調整 調整 態 ア 調 食 ● 来 小 通 ム ● 入 行 嵌 1 1 1 1 行 何 調 短 2 2 2 2 ア 調 ア 転 転 ~ ° 化 食...
-
Page 5: Identification Of Parts
C-700-13 SPOKE THREAD CHASER Thank you for purchasing the HOZAN C-700-13 SPOKE THREAD CHASER. With proper care and handling, this fine instrument will provide years of trouble-free operation. Please read this entire instruction manual carefully before attempting to place this instrument in service. -
Page 6: Warning And Caution Symbols
7. Heads are consumables. The degree of wear will vary depending on the frequency of use. 8. Use the C-700-13 securing in a vise. The vise must be fixed securely to the work table. 9. Do not tighten any of the nuts more than necessary. - Page 7 Operation The roller edge and spoke 3 3 3 3 Pull the handle to the maximum. end should be aligned. 1 1 1 1 Pass the spoke prepared on step Pull the handle until it stops and this is the set through the spoke guide and set it position.
-
Page 8: Head Maintenance
Head adjusting If it is in conditions described below, adjust the head properly turning the adjust nut. When the spoke does not enter into the head When the completed thread’s diameter is too small (A nipple does not go through the thread smoothly or goes hardly) 1...
Need help?
Do you have a question about the C-700-13 and is the answer not in the manual?
Questions and answers