Table of Contents
Advertisement
Quick Links
Advertisement
Table of Contents

Related Manuals for TruVision TVB-5412


Summary of Contents for TruVision TVB-5412
- Page 1 TruVision ANPR IP Camera Installation Guide P/N 1073574-EN • REV B • ISS 04MAY21...
- Page 2 Carrier, except where specifically permitted under US and international copyright law. Trademarks and TruVision names and logos are a product brand of patents Aritech, a part of Carrier. Other trade names used in this document may be trademarks or registered trademarks of the manufacturers or vendors of the respective products.
- Page 3 will be required to correct the interference at his own expense. FCC conditions This device complies with Part 15 of the FCC Rules. Operation is subject to the following two conditions: (1) This device may not cause harmful interference. (2) This Device must accept any interference received, including interference that may cause undesired operation.
- Page 4 2013/56/EU & 2006/66/EC (battery directive): This product contains a battery that cannot be disposed of as unsorted municipal waste in the European Union. See the product documentation for specific battery information. The battery is marked with this symbol, which may include lettering to indicate cadmium (Cd), lead (Pb), or mercury (Hg).
- Page 5 Contact information EMEA: https://firesecurityproducts.com Australian/New Zealand: https://firesecurityproducts.com.au/ Product Please consult the following web link to retrieve documentation the electronic version of the product documentation. The manuals are available in several languages.
-
Page 7: Table Of Contents
Setting up the camera 9 IR illumination 9 Accessing the SD card 10 Mounting the bullet camera 10 Using the camera with a TruVision recorder or another system 11 Using the camera with TruVision Navigator 11 Installation recommendations 11 Camera angle 12... - Page 8 Specifications 21 Installation Guide...
-
Page 9: Introduction
Introduction Product overview This is the installation guide for ANPR IP camera models: TVB-5412 (2 MP ANPR IP camera, 2.8 to 12 mm) TVB-5413 (2 MP ANPR IP camera, 8 to 32 mm) Contact information and manuals /... -
Page 10: Installation
Installation This section provides information on how to install the cameras. Installation environment When installing your product, consider these factors: • Electrical: Install electrical wiring carefully. It should be done by qualified service personnel. Always use a proper PoE switch or a 12 VDC UL listed Class 2 or CE certified power supply to power the camera. -
Page 11: Package Contents
be used for an extended period, put on the lens cap to protect the sensors from dirt. Package contents Check the package and contents for visible damage. If any components are damaged or missing, do not attempt to use the unit; contact the supplier immediately. If the unit is returned, it must be shipped back in its original packaging. - Page 12 Screws (4 pcs) Water joint: Provide • • water resistance to network connection Installation manual Wrench • • WEEE and Battery • Disposal sheets CAUTION: Use direct plug-in UL listed power supplies marked Class 2/CE certified or LPS (limited power source) of the required output rating as listed on the unit.
-
Page 13: Cable Requirements
CAUTION: Risk of explosion if the battery is replaced by an incorrect type. Dispose of used batteries according to the instructions. Cable requirements For proper operation, adhere to the following cable and power requirements for the cameras. Category 5 cabling or better is recommended. -
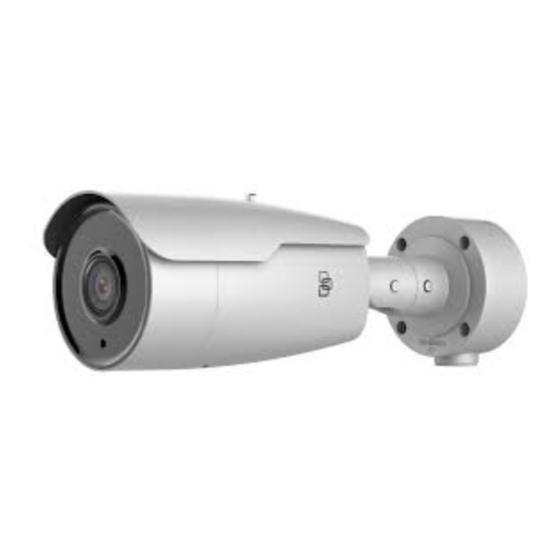
Page 14: Camera Description
Camera description Figure 1: ANPR IP VF bullet camera Light sensor Power supply Lens 10. Alarm I/O Shield 11. Audio output Mounting base 12. Audio input DC 12V output 13. Reset button BNC output 14. TF card slot Wiegand interface 15. -
Page 15: Setting Up The Camera
You can configure the IR illuminators using a web browser or a client software, such as TruVision Navigator. If the function is enabled, the IR light is On when the camera enters night (black and white) mode. If disabled, the IR light is always Off. -
Page 16: Accessing The Sd Card
Figure 1 on page 8). The card is not supplied with the camera. Recorded video and log files can be accessed via the web browser or via TruVision Navigator. Mounting the bullet camera Mount the camera on a ceiling or wall. -
Page 17: Using The Camera With A Truvision Recorder Or Another System
Using the camera with TruVision Navigator A camera can either be connected to a TruVision, or it can be added directly to TruVision Navigator. Please refer to the TruVision Navigator user manual for instructions on operating the camera with TruVision Navigator. -
Page 18: Camera Angle
• The recommended minimum height of a license plate should be between 20 to 30 pixels in the image captured by the 2-megapixel resolution camera. Camera angle It is important that the camera is correctly installed to ensure the accuracy of the license plate detection. •... - Page 19 Vertical angle The angle between the lens direction and the horizontal should be less than 30 degrees. • Road Horizontal angle The viewing angle of the camera should not exceed 30 degrees. Installation Guide...
-
Page 20: Camera Height
Vertical angle The angle between the lens direction and the horizontal should be less than 30 degrees Camera height You must first determine the installation height and then the detection range (L). Use the following formula to calculate the detection range: L = tan 30 x H Installation Guide... -
Page 21: Camera Lens Selection
L = tan 30 x H = 1.7 x H Table 2: Camera height and detection range examples Height (m) Min. L (m) When installing the camera at entrances, it is recommended that the camera height is between 1.5 m and 4 m and that the detection range is less than 4 m. -
Page 22: Tilt Of The License Plate
Camera Lens (mm) Min. Max. recognition recognition distance distance TVB-5412 2.8-12 TVB-5413 8-32 28.9 Tilt of the license plate The license plate should be as horizontal as possible. The recommended tilt angle is +/-5 degrees. Vehicles should also be directly facing the camera and not at an angle. - Page 23 • Disable the WDR and BLC functions to ensure details are visible. You may need to adjust the value depending on the environment and camera position. • The digital noise reduction (DNR) should be between 10 and 20. You may need to adjust it depending on the environment and camera position.
-
Page 24: Depth Of Field
Depth of field You need to set up the camera for the minimum depth of field (DOF) to ensure that the vehicle image is clearly captured. The DOF is the distance between the nearest and furthest objects giving an acceptable focused image. Use the following formula to calculate the DOF: Where: Ldof = L (depth of field) in meters (m) -
Page 25: Wiegand Interface
Notes: • The minimum height of a vehicle license plate on the edge of the sharpness zone should be between 20 to 30 pixels in the image captured by the 2-megapixel resolution camera. • The DOF depends on the F-number of the lens diaphragm. -
Page 26: Network Connection
Network connection Pin definitions There are eight wires on a standard UTP/STP cable, and each wire is color-coded. The following shows the pin allocation and color of straight and crossover cable connection: Figure 2: Straight-through cable White/Orange White/Orange Orange Orange White-Green White-Green Blue... - Page 27 Please make sure your connected cables have the same pin assignment and color as above before deploying the cables in your network. Specifications Electrical Voltage input 12 VDC, PoE+ (IEEE 802.3at) Power consumption Max. 16 W Miscellaneous Connectors Audio In/Out, Alarm In/Out, 12 VDC Power Input, Network Port (PoE), CVBS Output, AUX Power Output Wiegand Interface...
Need help?
Do you have a question about the TVB-5412 and is the answer not in the manual?
Questions and answers