
Related Manuals for TruVision TVD-6102


Summary of Contents for TruVision TVD-6102
- Page 1 TruVision HD-TVI Dome Camera Installation Guide P/N 1073684-EN • REV C • ISS 09JUN21...
-
Page 3: Table Of Contents
Package contents 3 Camera description 7 Installation 10 Installation environment 10 Mounting the HD-TVI fixed lens dome camera (TVD-6102) 12 Mounting the HD-TVI VF motorized lens dome camera (TVD-6101, TVD-6103, TVD-6104, TVD-6105) 15 Specifications 20 Contact information and manuals 21... -
Page 4: Product Overview
Product overview This is the installation guide for TruVision HD-TVI camera models: HD-TVI fixed lens dome camera: TVD-6102 (2MPx Dome, 2.8 mm lens) HD-TVI VF motorized lens dome camera: TVD-6101 (720P Dome, 2.7 to 13.5 mm lens) TVD-6103 (2MPx Dome, 2.7 to 13.5 mm lens) ... -
Page 5: Package Contents
Package contents Check the package and contents for visible damage. If any components are damaged or missing, do not attempt to use the unit; contact the supplier immediately. If the unit is returned, it must be shipped back in its original packaging. - Page 6 Template Installation guide • Torx wrench • 12 VDC connector: Two terminal connector with positive and negative indicators • Equipment disposal sheet Installation Guide...
- Page 7 HD-TVI VF motorized lens dome camera (TVD-6101, TVD-6103, TVD-6104, TVD- 6105) Camera with 4 screws and 4 power and video anchors output cable harness 3 screws to Template connect the camera to the back box Installation Guide...
- Page 8 • Torx wrench • G3/4 cable adapter Installation guide • Equipment disposal sheet Installation Guide...
-
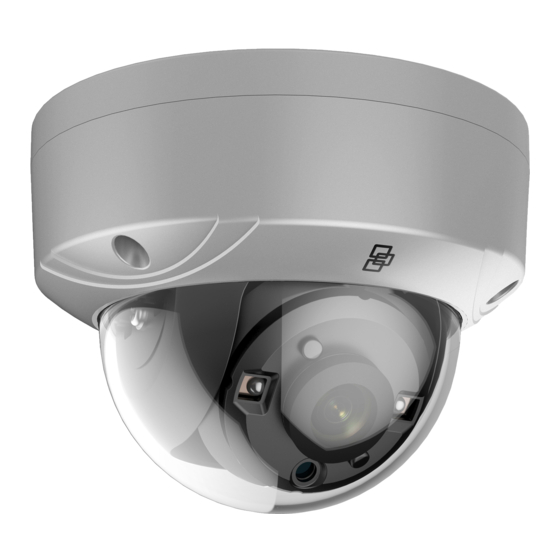
Page 9: Camera Description
Camera description Figure 1: HD-TVI fixed lens dome camera (TVD-6102) Base TVI output Lens assembly 12 VDC power Bubble assembly TVI/960H analog switch button Installation Guide... - Page 10 Figure 2: HD-TVI VF motorized lens dome camera (TVD-6101) Bubble assembly TVI output Base 12 VDC/24 VAC power Lens assembly TVI/960H analog (connect wires to switch to 960H analog) Installation Guide...
- Page 11 HD-TVI VF motorized lens dome camera (TVD-6103, TVD-6104, TVD-6105) Bubble assembly TVI output Base 12 VDC/24 VAC power Lens assembly TVI/960H analog switch button Installation Guide...
-
Page 12: Installation
Installation This section provides information on how to install the cameras. Installation environment When installing your product, consider these factors: • Electrical: Install electrical wiring carefully. It should be done by qualified service personnel. Always use a proper 12 VDC UL listed Class 2 CE certified power supply or a proper 24 VAC power supply, depending on the camera. - Page 13 temperature of the camera is between -40 to + 60°C (-40 to 140°F). Humidity is below 90%. • Moisture: Do not expose the camera to rain or moisture, or try to operate it in wet areas. Turn the power off immediately if the camera is wet and ask a qualified service person for servicing.
-
Page 14: Mounting The Hd-Tvi Fixed Lens Dome Camera (Tvd-6102)
Mounting the HD-TVI fixed lens dome camera (TVD-6102) To surface mount a camera 1. Using the template, place it level against the mounting surface and mark the position of the mounting holes. Drill Template Hole A: for cables routed through the ceiling screw hole 1: for Mounting Base 2. - Page 15 4. Securely fasten the mounting base to the mounting surface with the screws. Installation Guide...
- Page 16 5. Using a 75-ohm coaxial video cable, connect the camera TVI video output to a TVI DVR, and connect a 12 VDC power supply to the power cable. 6. Adjust the surveillance angle according to the figure below. 7. Re-attach the housing to the base. Installation Guide...
-
Page 17: Mounting The Hd-Tvi Vf Motorized Lens Dome Camera (Tvd-6101, Tvd-6103, Tvd-6104, Tvd-6105)
Mounting the HD-TVI VF motorized lens dome camera (TVD-6101, TVD-6103, TVD-6104, TVD-6105) To surface mount a camera 1. Place the provided template level against the mounting surface and mark the position of the mounting holes. 2. Following all local safety regulations, drill and prepare the mounting holes. - Page 18 4. Loosen the three screws on the edge of the bubble assembly with the supplied Torx wrench. 5. Remove the bubble assembly. 6. Secure the back box to the ceiling with the supplied screws. Installation Guide...
- Page 19 Note: Please remove the rubber knockout for cable routing outside of the camera, when required. 7. Using a 75-ohm coaxial video cable, connect the camera TVI video output to a TVI DVR, and connect a 12 VDC or 24 VAC. Align the camera with the back box and tighten the screws to secure the camera to the back box.
- Page 20 9. Adjust the surveillance angle: View the camera image on a monitor. Rotate the panning table to adjust the pan direction [0 to 355°]. Loosen the tilting lock screw. Installation Guide...
- Page 21 Rotate the tilting table to adjust the tilt direction [0 to 90°]. Tighten the tilting lock screw. Rotate the camera lens holder [0 to 355°] to adjust the lens to the surveillance angle. 10. Install the bubble assembly back on the camera.
-
Page 22: Specifications
24 VAC: Max. 340 mA, Max. 8 W TVD-6105: 12 VDC: Max. 685 mA / 24 VAC: Max. 530 mA, Max. 8.2 W Weight (net): TVD-6101/TVD-6103/TVD-6105/ TVD- 6105: 640 g / 1.41 lb. TVD-6102: 492 g / 1.08 lb. Installation Guide... -
Page 23: Contact Information And Manuals
Dimensions: TVD-6101/TVD-6103/TVD-6104/ TVD- 6105: 124.1 ×145.2 mm / 4.9 ×7.1 in. TVD-6102: 82.4× 111 mm / 3.2 × 4.4 in. Contact information and manuals For contact information and to download the latest manuals, go to the web site of your... -
Page 24: Legal And Regulatory Information
US and international copyright law.. Trademarks and patents: TruVision names and logos are a product brand of Aritech, a part of Carrier. Other trade names used in this document may be trademarks or registered trademarks of the manufacturers or vendors of the respective products. - Page 25 FCC compliance: Class A Class A: This equipment has been tested and found to comply with the limits for a Class A digital device, pursuant to part 15 of the FCC Rules. These limits are designed to provide reasonable protection against harmful interference when the equipment is operated in a commercial environment.
- Page 26 Products marked 2012/19/EU (WEEE directive): with this symbol cannot be disposed of as unsorted municipal waste in the European Union. For proper recycling, return this product to your local supplier upon the purchase of equivalent new equipment, or dispose of it at designated collection points.
- Page 27 Contact information EMEA: https://firesecurityproducts.com Australian/New Zealand: https://firesecurityproducts.com.au/ Product documentation Please consult the following web link to retrieve the electronic version of the product documentation. The manuals are available in several languages. Installation Guide...
Need help?
Do you have a question about the TVD-6102 and is the answer not in the manual?
Questions and answers