Table of Contents
Advertisement
Quick Links
Advertisement
Table of Contents

Related Manuals for Data Translation DT3120


Summary of Contents for Data Translation DT3120
- Page 1 UM-18113- E DT3120 Getting Started Manual...
- Page 2 Copyright © 2001 to 2003 by Data Translation, Fifth Edition August, 2002 Inc. All rights reserved. No part of this publication may be reproduced, stored in a retrieval system, or transmitted, in any form by any means, electronic, mechanical, by photocopying, recording, or otherwise, without the prior written permission of Data Translation, Inc.
-
Page 3: Table Of Contents
DT3120 Software........ - Page 4 Contents Chapter 4: Connecting Signals ..... . Connecting Video Signals to the Board..... Connecting an External Trigger to the Board .
-
Page 5: About This Manual
About this Manual This manual describes how to get started using a DT3120 frame grabber board. Intended Audience This document is intended for engineers, scientists, technicians, or others responsible for setting up a DT3120 board to perform machine vision and/or image analysis operations. It is assumed that you have some familiarity with the operating characteristics of your video ... -
Page 6: Conventions Used In This Manual
Refer to the following documents for more information on using an DT3120 board: • The DT3120 User’s Manual (UM-18109), included on the Imaging OMNI CD provided with the DT3120 board, describes the features of the DT3120 board and DT3120 Device Driver. -
Page 7: Where To Get Help
Where to Get Help Should you run into problems installing or using a DT3120 board, our Technical Support Department is available to provide technical assistance. Refer to the Troubleshooting chapter of the DT3120 User’s... - Page 8 About this Manual viii...
-
Page 9: Chapter 1: Overview
DT3120 Software........ -
Page 10: Key Hardware Features
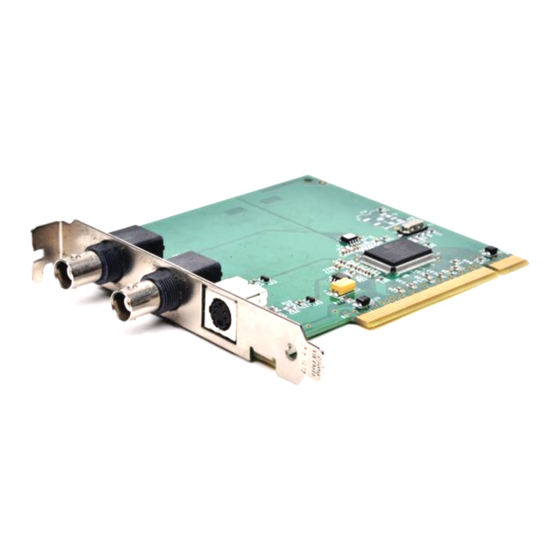
Chapter 1 Key Hardware Features The DT3120 frame grabber is a half-sized board that supports the following key hardware features: • One monochrome or composite (NTSC/RS-170 or PAL/CCIR video format) color input, or one S-video input (Y/C video format). • One external trigger input. -
Page 11: Dt3120 Software
• DT3120 Device Driver − This software must be installed and loaded before you can use a DT3120 board with any of the supported software packages or utilities. • DT3120 User’s Manual, in PDF format − Describes the features of the DT3120 board and how to use the DT3120 Device Driver with the Frame Grabber SDK to write an application program. -
Page 12: Getting Started Procedure
The flow diagram shown in Figure 1 illustrates the steps needed to get started using the DT3120 board. This diagram is repeated in each chapter; the shaded area in the diagram shows you where you are in the getting started procedure. -
Page 13: Chapter 2: Preparing To Use The Dt3120 Board
Installing the Software........Viewing the DT3120 Documentation ..... . - Page 14 Chapter 2 Prepare to Use the DT3120 Board (this chapter Install the Board and Configure the Device Driver (see Chapter 3 starting on page Connecting Signals to the Board (see Chapter 4 starting on page Verify Board Operation (see Chapter 5 starting on page...
-
Page 15: Unpacking
• DT3120 frame grabber board, and • Imaging OMNI CD. CAUTION: Keep the DT3120 board in its protective antistatic bag until you are ready to install it. If an item is missing or damaged, call Data Translation's Customer Service Department at (508) 481-3700. Customer Service will guide you through the appropriate steps for replacing missing or damaged items. -
Page 16: Checking The System Requirements
Chapter 2 Checking the System Requirements For reliable operation, your DT3120 board requires the following minimum system requirements: • 133 MHz Pentium processor with an Intel PCI chip set that supports and enables PCI-to-posted memory writes; Pentium II recommended. The following Intel PCI chip sets are known to work properly: −... - Page 17 Preparing to Use the DT3120 Board Note: Version 4, revision 6 of the Phoenix BIOS works properly. However, early versions of this BIOS are known not to work properly. If your system contains an earlier version of the Phoenix BIOS, call your system manufacturer to upgrade the BIOS to Version 4, revision 6.
-
Page 18: Installing The Software
• Frame Grabber SDK, version 3.0 or greater. You can install these software components from the Imaging OMNI CD. To install the DT3120-related software from the Imaging OMNI CD, perform the following procedure: Insert the Imaging OMNI CD into your CD-ROM drive. - Page 19 Preparing to Use the DT3120 Board Click Yes to accept the license agreement, then click Finish. Note that if the DirectX software on your computer is less than version 7.0, you are prompted to install the updated DirectX software. Follow the prompts until Version 8.0 of DirectX has been installed.
-
Page 20: Viewing The Dt3120 Documentation
In the Command Line edit box, enter x:\LAUNCH.EXE (where x is the letter of your CD-ROM drive). Click OK. The Imaging OMNI CD splash screen appears. Click View Documentation Click Getting Started Manuals and click DT3120, or click User’s Manuals and click DT3120. Adobe Acrobat Reader opens. - Page 21 Preparing to Use the DT3120 Board Here are a few helpful hints about using Adobe Acrobat Reader: • To navigate to a specific section of the document, click a heading from the table of contents on the left side of the document.
- Page 22 Chapter 2...
-
Page 23: Chapter 3: Installing The Board And Configuring The Device Driver
Installing the Board and Configuring the Device Driver Installing the Board ........Loading and Configuring the Device Driver . - Page 24 Chapter 3 Prepare to Use the DT3120 Board (see Chapter Install the Board and Configure the Device Driver (this chapter) Connecting Signals to the Board (see Chapter 4 starting on page Verify Board Operation (see Chapter 5 starting on page...
-
Page 25: Installing The Board
Installing the Board and Configuring the Device Driver Installing the Board To install the board, you need to set up the computer, select an expansion slot, then insert the board into the computer, as described in the following sections. Setting up the Computer CAUTION: To prevent electrostatic damage that can occur when handling electronic equipment, use a ground strap or similar device when... -
Page 26: Selecting An Expansion Slot
Remove the cover plate from the selected expansion slot. Retain the screw that held it in place; you will use it later to install the board. Next, insert the DT3120 board in the expansion slot, as described in the next section. Inserting the DT3120 Board in the Computer... - Page 27 Rear of Computer DT3120 Board PCI Expansion Slot Bus Connector Figure 2: Inserting the DT3120 Board in the Computer Carefully lower the board into the PCI expansion slot using the card guide to properly align the board in the slot. When the bottom of the board contacts the bus connector, gently press down on the board until it clicks into place.
- Page 28 Chapter 3 Secure the board in place at the rear panel of the system unit using the screw removed from the slot cover. Turn on the computer. Next, configure the device driver as described in the next section.
-
Page 29: Loading And Configuring The Device Driver
Loading the Device Driver (Windows XP Only) Once you have installed the DT3120 Device Driver from the Imaging OMNI CD, installed the board, and powered up the computer, the Found New Hardware Wizard message appears. Perform the following... -
Page 30: Configuring The Device Driver
Chapter 3 Configuring the Device Driver To configure the DT3120 Device Driver, perform the following steps: Open the Control Panel. Double-click the DT Imaging Control icon. Select the DT3120 board to configure. Select the Video Format as either 50 Hz or 60 Hz. - Page 31 Connecting Signals Connecting Video Signals to the Board..... Connecting an External Trigger to the Board ....
- Page 32 Chapter 4 Prepare to Use the DT3120 Board (see Chapter Install the Board and Configure the Device Driver (see Chapter 3 starting on page Connecting Signals to the Board (this chapter) Verify Board Operation (see Chapter 5 starting on page...
- Page 33 Connecting Signals Connecting Video Signals to the Board You can connect one of the following video signals to the DT3120 board: • Monochrome or composite input − Uses the NTSC/RS-170 or PAL/CCIR video format. Attach a monochrome or composite input to connector J2 on the DT3120 board, as shown in...
- Page 34 Chapter 4 DT3120 Board Connector J1 Connector J2 S-Video Connector J3 Signal Figure 4: Connecting an S-Video Signal to the DT3120 Board...
- Page 35 If you wish to qualify signals with an external event, you can connect an external trigger input to the DT3120 board. Figure 5 shows how to connect an external trigger input to connector J1 on the DT3120 board. DT3120 Board External Trigger Input...
- Page 36 Chapter 4...
- Page 37 Verifying Board Operation Installing DT-Acquire ........Using DT-Acquire.
- Page 38 Chapter 5 Prepare to Use the DT3120 Board (see Chapter 2 starting on page Install the Board and Configure the Device Driver (see Chapter 3 starting on page Connect Signals to the Board (see Chapter 4 starting on page Verify Board Operation...
- Page 39 • Display live video in passthru mode, • Open a previously saved image, and • Save an acquired image in BMP format. Note: With the DT3120 board, DT-Acquire works with your display monitor set to high color (16-bit) or true color (24-bit or 32-bit) only.
- Page 40 Chapter 5 Installing DT-Acquire To install DT-Acquire, perform the following steps: Insert the Imaging OMNI CD into the CD-ROM drive. Click Start from the Task Bar, then click Run. The Run dialog box appears. Enter D:\LAUNCH.EXE (where D is letter of the CD-ROM drive).
- Page 41 The main menu is displayed. The following subsections describe how to use DT-Acquire to verify that the DT3120 board is working. If you have any trouble performing any of these operations, refer to the Troubleshooting chapter of the DT3120 User’s Manual (see...
- Page 42 J3. From the DT-Acquire main menu, click Setup, then click Select Device. Select the alias that you gave to the DT3120 board when you configured the device driver, then click OK. To get started, select device −1.
- Page 43 J3. From the DT-Acquire main menu, click Setup, then click Select Device. Select the alias that you gave to the DT3120 board when you configured the device driver, then click OK. To get started, select device −1.
- Page 44 Chapter 5...
- Page 45 DT3120 Device Driver DT3120 documentation, viewing DT-Acquire installing selecting an expansion slot using setting up the computer slot selection S-video inputs...
- Page 46 Index unpacking the board viewing the DT3120 documentation...
Need help?
Do you have a question about the DT3120 and is the answer not in the manual?
Questions and answers