Table of Contents
Advertisement
Quick Links
Advertisement
Table of Contents

Related Manuals for Russell Hobbs RHMO10


Summary of Contents for Russell Hobbs RHMO10
- Page 1 20L COMPACT DIGITAL MICROWAVE 1 YEAR WARRANTY RHMO10 INSTRUCTIONS & WARRANTY...
-
Page 2: Important Safeguards
IMPORTANT SAFEGUARDS General Safeguards To protect against electrical hazards do not immerse the power cord, plug, or microwave oven in water or any other liquid. This appliance is not intended for use by persons (including children) with reduced physical, sensory or mental capabilities, or lack of experience and knowledge, unless they have been given supervision or instruction concerning use of the appliance by a person responsible for their safety. - Page 3 20. This appliance is not intended to be operated by means of an external timer or separate remote control system. 21. Do not leave the microwave oven unattended when in use. Location of Microwave Oven Install or locate this microwave oven only in accordance with the installation instructions provided.
- Page 4 Do not cook food wrapped in paper towels, unless your cook book contains instructions, for the food you are cooking. Remove wire twist ties and metal handles from paper or plastic containers / bags before placing them in the microwave oven. Only use the rack when operating in Grill or Convection cooking mode.
- Page 5 IMPORTANT SAFETY INSTRUCTIONS READ CAREFULLY AND KEEP FOR FUTURE REFERENCE PRECAUTIONS TO AVOID POSSIBLE EXPOSURE TO EXCESSIVE MICROWAVE ENERGY (a) Do not attempt to operate this microwave oven with the door open as this can result in harmful exposure to microwave energy. The door is fitted with safety interlock switches that prevent the microwave oven from operating with the door open.
- Page 6 To test a container / utensil for safe microwave oven use: Add 1 cup of cool water to a heat resistant glass jug and place it in the microwave oven alongside the empty container/utensil to be tested; heat for one (1) minute at maximum power. If the container/utensil you are testing is microwave oven safe (transparent to microwave energy) it should remain comfortably cool, the water in the glass jug should be hot.
- Page 7 MATERIALS YOU CAN USE IN THIS MICROWAVE OVEN NOTE: Always try to use items labelled as microwave safe to minimise any uncertainty. Aluminium foil Shielding only. Use only small amounts of foil to wrap or cover thinner sections of meat or poultry, for example, the small end of a shank or the wings of a chicken, to prevent overcooking.
-
Page 8: Materials To Be Avoided In Microwave Oven
MATERIALS TO BE AVOIDED IN MICROWAVE OVEN Aluminium tray May cause arcing. Transfer food into microwave-safe dish. Food carton with metal handle May cause arcing. Transfer food into microwave-safe dish. Metal or metal trimmed utensils Metal shields the food from microwave energy. Metal trim may cause arcing. Metal twist ties May cause arcing and could cause a fire in the microwave oven. -
Page 9: Before You Use Your Microwave Oven
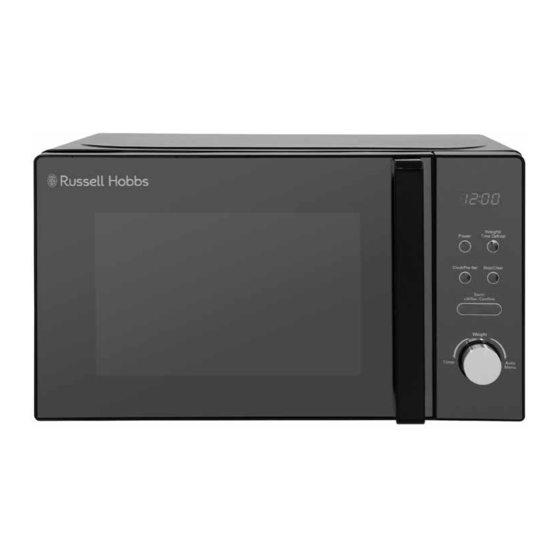
UNPACKING THE MICROWAVE NAMES OF MICROWAVE OVEN PARTS AND ACCESSORIES Remove the microwave oven and all materials from the carton and oven cavity. BEFORE YOU USE YOUR MICROWAVE OVEN Remove all the packaging. Do not remove the large piece of plastic from the right hand side of the cavity wall (Refer to the below image). - Page 10 1. Safety interlock latches 7. Screen display 2. Door assembly and window 8. Control panel - buttons and dial 3. Glass turntable 9. Turntable coupling 4. Oven cavity 10. Turntable ring 5. Microwave top 11. Glass turntable 6. Plastic waveguide cover (do not remove)
-
Page 11: Turntable Installation
INSTALLATION Remove all packing material and accessories. Examine the microwave oven for any damage such as dents or a broken door. Do not install if microwave oven is damaged in any way. Cabinet: Remove any protective film found on the microwave oven cabinet and control panel surfaces. - Page 12 To assemble the turntable, follow the steps below in number order. STEP 1 The turntable coupling should slot into the centre of microwave STEP 2 The turntable ring slots into the indents in the microwave base STEP 3 The g lass tray should align with the turntable coupling...
-
Page 13: Control Panel And Features
CONTROL PANEL & FEATURES Screen Display Cooking time, power, action indicators, and clock time are displayed. Power Press this button a number of times to set a cooking power level. Weight/Time Defrost Press this button to input weight or time for defrosting. Clock/Pre-Set Press this button to set the clock and use the pre-set function. -
Page 14: Quick Start Function
To select a power level, press the ‘ Power ’ • When pressed once the screen display will show ‘P100’ (100% power) • When pressed twice the screen display will show ‘P80’ (80% power) • When pressed three times the screen display will show ‘P50’ (50% power) •... -
Page 15: Auto Cooking Function
To commence defrosting, press the Start/+30sec/Confirm button. Remember to turn over the food half way through the defrosting cycle. Open the door and turn over the food. Close the door and press the Start/+30Sec/Confirm button to continue defrosting. To defrost by time follow the above steps but pressing the Defrost button twice to display dEF 2 and turning the dial to set the time. - Page 16 Press the Start/+30sec/Confirm button to commence. Make sure you monitor cooking progress as times can vary. Allow the food to stand in the microwave for 1-2 minutes after the cooking cycle is complete. MULTI SEQUENCE COOKING FUNCTION For some recipes, results may be better if you wish to cook on different power levels for different times, for one dish.
- Page 17 CHECKING FUNCTIONS During the cooking cycle, press the Power button and the current power will be displayed for 2-3 seconds. In pre set state, press the Clock/Pre Set button to check the time when the cooking will start. The pre set time will flash for 2 3 seconds, then the oven will turn back to the clock display. During the cooking cycle, press the Clock/Pre Set button to check the current time.
-
Page 18: Care And Cleaning
COOKING FOOD EVENLY Foods such as meat should be turned frequently to ensure more even cooking results. If the food is liquid based, stirring during the cooking time is advisable. ALLOW STANDING TIME When the microwave has stopped cooking, leave the food to rest for an adequate length of time to allow for cooking completion and cooling. -
Page 19: Problem Solving
PROBLEM SOLVING WARNING: To reduce the risk of personal injury, always unplug the microwave before performing maintenance or trouble shooting checks. The microwave oven may cause interference to your radio, TV or similar equipment. If this happens , you can stop the interference by moving the radio, TV or equipment as far away from your microwave oven as possible. - Page 20 Problem Potential reason Potential solution Spillages or splashes can burn and catch fire, all food that is put into the microwave should be appropriately covered. All spillages or splashes must be cleaned, and all areas of microwave cleaned after each use.
- Page 21 Problem Potential reason Potential solution Spillages or splashes can burn and catch fire, all food that is put into the microwave should be appropriately covered. All spillages or splashes must be cleaned, and all areas of microwave cleaned after each use.
-
Page 22: Spare Parts
Problem Potential reason Potential solution Check that the glass turntable has been 1. Glass turntable fitted placed correctly on the turntable and is not incorrectly hitting the walls/doors of the microwave during operation. Too noisy Check that the dishes/plates are the correct 2. - Page 24 Spectrum Brands Australia Pty Ltd Spectrum Brands New Zealand Ltd Locked Bag 3004 Braeside PO Box 9817 Newmarket Victoria 3195 Australia Auckland 1149 New Zealand Customer Service in Australia Customer Service in New Zealand TollFree: 1800 623 118 TollFree: 0800 736 776 Email: info@spectrumbrands.com.au Email: service@spectrumbrands.co.nz Website: www.spectrumbrands.com.au...
- Page 25 Warranty Conditions 4. The Goods must be used in accordance with the manufacturer’s instructions. This Warranty does not apply should the defect in or failure of the Goods be attributable to misuse, abuse, accident or non-observance of manufacturer’s instructions on the part of the user.
- Page 26 RUSSELL HOBBS® and logo are Trade Marks of Spectrum Brands, Inc., or one of its subsidiaries. Manufactured in China to Spectrum Brands specifications. © 2020 Spectrum Brands, Inc.
Need help?
Do you have a question about the RHMO10 and is the answer not in the manual?
Questions and answers