Table of Contents
Advertisement
Quick Links
Advertisement
Table of Contents

Related Manuals for Rankam RedHead SC2042501-RH


Summary of Contents for Rankam RedHead SC2042501-RH
- Page 1 Cowboy Fire Pit Grill Owner’s Manual Assembly and Operating Instructions Model # SC2042501-RH Tools required for assembly: (Not Included) Pliers, Philips & Flathead Screwdrivers, Adjustable Wrench. Keep this manual for future reference. SC2042501-RH_ENG 20181214-V1.0...
- Page 2 WARNING Only use this grill on a hard, level, non-combustible, stable surface (concrete, ground, etc.) capable of supporting the weight of the grill. Never use on wooden or other surfaces that could burn. When grill is in use, keep clearance of 36” between the hot grill and any combustible materials, such as bushes, trees, wooden decks, wooden fences, buildings, etc.
- Page 3 WARNING When grilling, grease from meat may drip into the charcoal and cause a grease fire. Do not use water to extinguish grease fires use a fire extinguisher. Use caution! Keep hands, face and body a safe distance away. ...
-
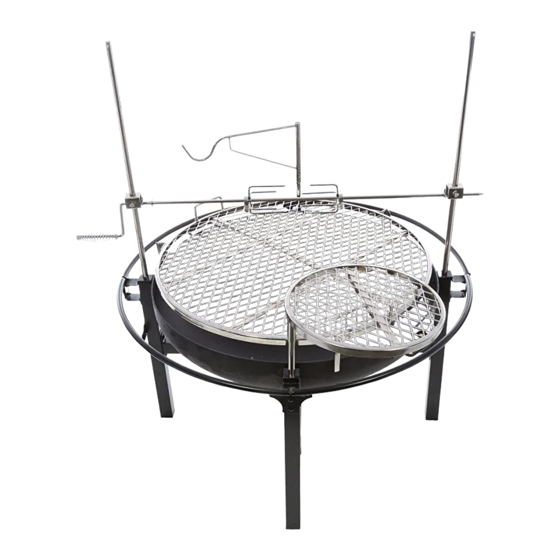
Page 4: Product Diagram
THANK YOU FOR PURCHASING THIS BROWNING COWBOY GRILL Read all safety warnings & assembly instructions carefully before assembling or operating your grill. For missing parts, please contact customer service at customerservice@rankam.com or at 888-837-1380 (U.S. only) (Proof of purchase will be required.) Inspect contents of the box to ensure all parts are included and undamaged. -
Page 5: Component List
Replacement Parts List STOP! DO NOT RETURN TO RETAILER. For assembly assistance, missing or damaged parts, please call customer service 888-837-1380, or email customerservice@rankam.com Component List 1. Leg 2. Handle Coil 3. Grate Support Plate 4. Short Horizontal Bar 4 pcs... - Page 6 Bolt 4pcs (M6X20) Hardware List Item No. Item name Diagram Bolt Bolt Bolt 2pcs Bolt (M8X60) 2pcs (M8X60) 12pcs 2pcs Bolt Bolt (M6X15) (M8X60) Bolt Bolt Bolt Bolt Bolt Bolt Bolt M8x60 2 pcs Bolt 2pcs 2pcs 2pcs (M8X60) 2pcs 2pcs (M8X60) 2pcs...
- Page 7 Symbol: The following symbols will be shown in each procedure for indication of tightening the bolt and nut if necessary. Hand Tighten only at this time Tighten with tools at this time Some steps may require the assistance of a friend. Step 1 Step 2 SC2042501-RH_ENG...
- Page 8 Step 3 Step 4 SC2042501-RH_ENG 20181214-V1.0...
- Page 9 Step 5 – Tighten all bolts. Step 6 SC2042501-RH_ENG 20181214-V1.0...
- Page 10 Step 7 Step 8 SC2042501-RH_ENG 20181214-V1.0...
- Page 11 Step 9 Step 10 SC2042501-RH_ENG 20181214-V1.0...
- Page 12 Step 11 Step 12 SC2042501-RH_ENG 20181214-V1.0...
- Page 13 Step 13 WARNING DO NOT use grill when the drain pipe cap is removed. DO NOT attempt to remove the drain pipe cap while the grill is hot. WARNING Place the grill outdoors on a hard, level, non-combustible surface away from roof overhang or any combustible material.
- Page 14 PREPARTION FOR USE & LIGHTING INSTRUCTIONS Curing your grill Prior to your first use of the Grill, follow the instructions below carefully to cure your grill. Curing your grill will minimize damage to the exterior finish as well as rid the grill of paint odor that can impart unnatural flavors to the first meal prepared on the grill.
-
Page 15: Regulating Heat
Step 3 Saturate charcoal with lighting fluid. Wait 2 to 3 minutes to allow lighting fluid to soak into charcoal. Store charcoal lighting fluid a safe distance from the grill. Step 4 Stand back and carefully light charcoal and allow to burn until covered with a light ash (approximately 20 minutes). WARNING Charcoal lighting fluid must be allowed to completely burn off (approximately 20 minutes).Failure to do this could trap fumes from charcoal lighting fluid in grill and may result in a flash-fire or explosion. -
Page 16: After-Use Safety
WARNING Never add charcoal lighting fluid to hot or even warm coals as flashback may occur causing severe burns. Step 4 When charcoal is burning strong again, wear oven mitts/gloves and carefully return cooking grate to grill body. Extinguish any hot ashes, coals or embers which may have fallen from the grill or beneath and around grill. AFTER-USE SAFETY WARNING ... - Page 17 LIMITED WARRANTY 1. Manufacturer warrants this Product to be free from defects in workmanship and materials for a period of Ninety (90) days from the date of purchase, PROVIDED claims are submitted, in writing, with proof of purchase. 2. If any part of this item fails because of a manufacturing defect within the Limited Warranty Period, Manufacturer offers to replace such part(s) provide that such parts have not been improperly repaired, altered, or tampered with or subject to misuse, abuse or exposed to corrosive conditions.
-
Page 18: Obtaining Replacement Parts
WE CAN HELP. Rankam (China) Manufacturing Co. Ltd. 18/F., New Lee Wah Centre, 88 Tokwawan Road, Kowloon, Hong Kong Please contact Rankam Customer Service at customerservice@rankam.com or at 1-888-837-1380, Mon to Fri, 8:00 a.m. – 5:00 p.m. Pacific Standard Time.
Need help?
Do you have a question about the RedHead SC2042501-RH and is the answer not in the manual?
Questions and answers