
Related Manuals for Parsun T2CBMS


Summary of Contents for Parsun T2CBMS
- Page 1 OUTBOARD MOTOR OWNER’S MANUAL T2CBMS T2.6CBMS SUZHOU PARSUN POWER MACHINE CO., LTD.
- Page 2 Thank you for owning a PARSUN outboard motor. Thank you for your trust in our company and products. “PARSUN” outboard motors are powerful, economic and safe with advanced technology and processing technique. Please read this manual carefully before operating your outboard motor. A thorough understanding of the manual will help you to know this product for proper operation, maintenance and care.
- Page 3 Record your outboard motor serial number in the spaces provided to assist you in ordering spare parts from your PARSUN dealer, or for reference in case your outboard motor is stolen. 1. Outboard motor serial number location...
- Page 4 The engine serial number is carved on the aluminum casting of engine. Serial number as follows:...
-
Page 5: Table Of Contents
Table of contents 1. Main components and General information....................1 1.1 Main components ........................... 1 1.2 General information ..........................2 1.2.1 Specifications ............................2 1.2.2 Fueling instructions..........................3 1.2.3 Propeller selection ..........................4 2. Operation ..............................5 2.1 Installation .............................. 5 2.1.1 Mounting height ........................... - Page 6 2.11.2 Tilting down............................20 2.12 Cruising in other conditions......................... 21 2.12.1 Cruising in shallow water ......................... 21 2.12.2 Cruising in salt water ........................21 3. Maintenance............................22 3.1 Greasing............................... 22 3.2 Cleaning and adjusting spark plug ......................23 3.3 Checking the fuel system........................23 3.4 Inspecting idling speed .........................
- Page 7 5.3 Treatment of submerged motor......................36 6. Troubleshooting ............................37 7. Circuit diagram ............................40...
-
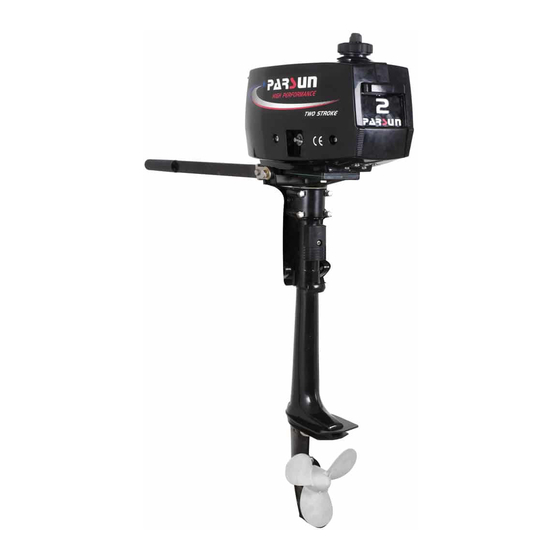
Page 8: Main Components And General Information
1. Main components and General information 1.1 Main components 1. Top cowling 5. Throttle handle / steering handle 9. Tank cover 2. Starter handle 6. Fuel cock 10. Top cowling locking hook 3. Engine stop switch 7. Anti-cavitation plate 11.Clamp bracket 4. -
Page 9: General Information
1.2 General information 1.2.1 Specifications Specifications Items Data Items Data Type of engine 2-stroke Transom 381mm Displacement 50cm Fuel tank capacity 1.2 L Bore X stroke 42mm×36mm Recommended fuel Unleaded regular gasoline 2.08(27/13) Gear ratio Recommended engine oil 2-stroke engine oil Overall length 604mm Recommended gear oil... -
Page 10: Fueling Instructions
1.2.2 Fueling instructions Fueling instructions: Recommended gasoline: Regular unleaded gasoline, If it is not available, then premium gasoline. If knocking or pinging occurs, use a different brand of gasoline or premium unleaded fuel. If leaded gasoline is usually used, engine valves and related parts should be inspected after every 100 hours of operation. WARNING: Do not smoke when refueling, and keep away from sparks, flames, or other sources of ignition. -
Page 11: Propeller Selection
“PARSUN” dealers stock a range of propellers and can advise you and install a propeller on your outboard that is best suited to your application. -
Page 12: Operation
2. Operation 2.1 Installation Mount the outboard motor on the center line (keel line) of the boat. For boats without a keel or which are asymmetrical, consult your dealer. Center line (keel line) NOTE: During water testing check the buoyancy of the boat, at rest, with its maximum load. Check that the static water level on the exhaust housing is low enough to prevent water entry into the power head, when water rises due to waves when the outboard is not running. -
Page 13: Mounting Height
The optimum mounting height of the outboard motor is affected by the boat and motor combination and the desired use. Test runs at a different height can help determine the optimum mounting height. For further information, consult your “PARSUN” dealer or boat manufacturer. -
Page 14: Clamping The Outboard Motor
2.1.2 Clamping the outboard motor 1. Tighten the transom clamp screw evenly and securely. Occasionally check the clamp screws for tightness during operation of the outboard motor because they could become loose due to engine vibration. WARNING: Loose clamp screws could allow the outboard motor to fall off or move on the transom. This ... -
Page 15: Breaking In Engine
3. Secure the clamp bracket to the transom using the appropriate bolts. For details, consult your PARSUN dealer. WARNING: Avoid using bolts, nuts or washers inappropriate. After tightening, test running the engine and check their tightness. 2.2 Breaking in engine Your new engine requires a period of break-in to allow mating surfaces of moving parts to wear in evenly. -
Page 16: Pre-Operation Checks
4. Next 7 hours of operation: Avoid continuous operation at full throttle for more than five minutes at a time. 5. Operate the engine normally. 2.3 Pre-operation checks Fuel Check to be sure you have plenty of fuel for your trip. ... -
Page 17: Filling Fuel
WARNING: If any item in the pre-operation check is not working properly, have it inspected and repaired before operating the outboard motor. Otherwise an accident could occur. CAUTION: Do not start the engine out of water. Overheating and serious engine damage can occur. 2.4 Filling fuel WARNING:... -
Page 18: Starting Engine
2.5 Starting engine 1. Loosen the air vent screw on the fuel tank cap, 2 or 3 turns. 2. Open the fuel cock. WARNING: Do not attach the lanyard to clothing that could tear loose. Do not route the lanyard where it could become entangled, preventing it from functioning. - Page 19 NOTE: Attach the engine stop switch lanyard to secure place on your clothing, or your arm or leg. Then install the lock plate on the other end of the lanyard into the engine stop switch. 3. Slightly rotate the throttle grip to approximately one-quarter of full throttle. 4.
- Page 20 5. Pull the manual starter handle slowly until you feel resistance. Then give a strong pull straight to crank and start the engine. Repeat if necessary. NOTE: It is not necessary to use the choke when starting a warm engine. ...
-
Page 21: Warming Up Engine
2.6 Warming up engine 1. After starting the engine, allow it to idle for 3 minutes to warm up. Failure to do so will shorten engine life. Gradually return the choke knob to its home position as the engine warms up. 2. -
Page 22: Reverse
2.7.2 Reverse WARNING: When operating in reverse, go slowly. Do not turn the throttle more than half. Otherwise the boat could become unstable, which could result in loss of control and lead to accident. 1. Rotate the engine by 180 degree with the tiller handle facing toward you. 2. -
Page 23: Stopping Engine
2.9 Stopping engine NOTE: Before stopping the engine, first let it cool off for a few minutes at idle or low speed. Stopping the engine immediately after operating at high speed is not recommended. PROCEDURE: 1. Push and hold the engine stop button until the engine comes to a complete stop. NOTE: If the outboard motor is equipped with an engine stop switch lanyard, the engine can also be stopped by pulling the lanyard and removing the lock plate from the engine stop switch. - Page 24 WARNING: Stop the engine before adjusting the trim angle. Use care to avoid being pinched when removing or installing the rod. Use caution when trying a trim position for the first time. Increase speed gradually and watch for any signs of instability or control problems.
-
Page 25: Tilting Up And Down
2.11 Tilting up and down If the engine will be stopped for some time or if the boat is moored in shallows, the outboard motor should be tilted up to protect the propeller and casing from damaged by collision with obstructions, and also to reduce corrosion. - Page 26 3. Tighten the air vent screw. 4. Close the fuel cock. 5. Hold the rear top cowling and tilt the engine up, and push the tilt support knob into the clamp bracket.
-
Page 27: Tilting Down
2.11.2 Tilting down 1. Slightly tilt the outboard motor up. 2. Pull the knob out, and then slowly tilt the outboard motor down 3. Loose the steering friction adjuster by turning it counterclockwise, and adjust the steering friction according to operator preference. WARNING: If there is too much resistance it could be difficult to steer, which could result in an accident. -
Page 28: Cruising In Other Conditions
2.12 Cruising in other conditions 2.12.1 Cruising in shallow water The outboard motor can be tilted up partially to allow operation in shallow water. WARNING: The tilt lock mechanism does not work while the shallow water cruising system is being used. Run the boat at the lowest possible speed to avoid the outboard motor being lifted out of the water, resulting in loss of control. -
Page 29: Maintenance
WARNING: Be sure to turn off the engine when you perform maintenance unless otherwise specified. If you or the owner is not familiar with machine servicing, this work should be done by your PARSUN dealer or other qualified mechanic. CAUTION: If replacement parts are necessary, use only genuine PARSUN parts or parts of the same type and of equivalent strength and materials. -
Page 30: Cleaning And Adjusting Spark Plug
Wipe off any dirt from the threads and screw in the spark plug to the correct torque. 3.3 Checking the fuel system Check the fuel lines for leaks, crack, or malfunction. If a problem is found, your PARSUN dealer or other qualified mechanic should repair it immediately. -
Page 31: Inspecting Idling Speed
Correct idling speed inspection is only possible if the engine is fully warmed up. If not warmed up fully, the idle speed will measure higher than normal. If you have difficulty verifying the idle speed, or the idle speed requires adjustment, consult a PARSUN dealer or other qualified mechanic. 3.5 Checking wiring and connectors Check that each grounding wire is properly secured and each connector is engaged securely. -
Page 32: Checking Propeller
3.7 Checking propeller WARNING: Before inspecting, removing or installing the propeller, always take actions to ensure the engine will not accidentally starts, such as removing the spark plug caps from the spark plugs, placing the shift control in neutral, and removing the lanyard from the engine stop .switch, etc.. -
Page 33: Removing The Propeller
3.7.1 Removing the propeller 1. Straighten the cotter pin and pull it out using a pair of pliers. 2. Remove the propeller and thrust washer. 1. Cotter pin 2. Propeller 3. Cushion 3.7.2 Installing the propeller CAUTION: Be sure to install the propeller cushion before installing the propeller, otherwise the gear box and propeller could be damaged. -
Page 34: Changing Gear Oil
4. Remove the oil level plug to allow the oil to drain completely. CAUTION: Inspect the used oil after it has been drained. If the oil is milky, water is getting into the gear case which can cause gear damage. Consult PARSUN dealer. -
Page 35: Checking And Replacing Anode(S)
7. Insert and tighten the gear oil drain screw (If necessary, change the seal spacer). 3.9 Checking and replacing anode(s) Inspect the external anodes periodically. Remove scales from the surfaces of the anodes. Consult a PARSUN dealer for replacement of external anodes. -
Page 36: Checking Top Cowling
3.10 Checking top cowling Check the fitting of the top cowling by pushing it with both hands. If it is loose have it repaired by your PARSUN dealer. 3.11 Maintenance Table When utilized under normal condition, maintained and repaired in the proper manner, the motor can work normally within the normal life period. - Page 37 The “●” symbol indicates the check-ups which you may carry out by yourself. The “○” symbol indicates work to be carried out by your PARSUN dealer. Initial Every Item Operations 10 hours 50 hours 100 hours 200 hours (1 month)
-
Page 38: Transporting And Storing
4. Transporting and storing 4.1 Transporting The outboard motor should be trailed and stored in the normal running position. If there is insufficient road clearance in this position, then trailer the outboard motor in the tilt position using a motor support device. CAUTION: Do not use the tilt support lever or knob when trailing the boat. -
Page 39: Storing
It is advisable to have your outboard motor serviced by an authorized PARSUN dealer prior to storage. However, you, the owner, with a minimum of tools, can perform the following procedures. - Page 40 6. Start the engine. Flush the cooling system. Perform the flushing and fogging at the same time, as fogging/lubricating of the engine is mandatory to prevent engine rust. WARNING: Do not touch or remove electrical parts when starting or during the operation. ...
-
Page 41: Actions In Emergency
2. Inspect the control system and all components for damage. 3. Whether damage is found or not, return to the nearest harbor slowly and carefully. 4. Have a PARSUN dealer inspect the outboard motor before operating it again. 5.2 Starter will not operate If the starter mechanism does not operate, the engine can be started with an emergency starter rope. - Page 42 The procedure is as follows: 1. Remove the top cowling. 2. Remove the starter cover after removing the three bolts. 3. Prepare the engine for starting. For further information, see section 2.5. 4. Insert the knotted end of the emergency starter rope into the notch in the flywheel rotor and wind the rope several turns around the flywheel clockwise.
- Page 43 5.3 Treatment of submerged motor If the outboard is submerged, take it to a PARSUN dealer. Otherwise some corrosion may begin almost immediately. 1. Thoroughly wash away contaminants with fresh water. 2. Remove the spark plug(s), and then face the spark plug hole downward to allow any mud, or contaminants to drain.
- Page 44 6. Troubleshooting Trouble type Possible reason Recovery action Starter components are faulty Have serviced by your dealer Starter will not operate Shift lever is not in neutral Shift to neutral Fuel tank is empty Fill tank with clean, fresh fuel Fuel is contaminated or stale Fill tank with clean, fresh fuel Inspect spark plug(s).
- Page 45 Continuation /…1 Trouble type Possible reason Recovery action Check wires for wear or breaks. Ignition wiring damaged or poorly Tighten all loose connections. connected Replace worn or broken wires Specified engine oil is not being used Check and replace oil as specified Thermostat is faulty or clogged Have serviced by your dealer Carburetor adjustments are incorrect...
- Page 46 Continuation /…2 Trouble type Possible reason Recovery action Check for pinched or kinked fuel line or Fuel system is obstructed other obstructions in fuel system Fuel is contaminated or stale Fill tank with clean, fresh fuel Spark plug gap is incorrect Inspect and adjust as specified Check wires for wear or breaks.
- Page 47 7. Circuit diagram Spark plug Ignition coil Engine stop switch Exciter coil black/white Magneto black Orange CD UNIT brown white DESCRIPTION...
Need help?
Do you have a question about the T2CBMS and is the answer not in the manual?
Questions and answers
I have bought new coil,cdi,pulser for T2cbm, got wiring mixed-up, need help
The circuit diagram in the manual provides wiring details for the Parsun T2CBMS. Follow these connections:
1. CDI Unit
- Connect the black/white (B/W) wire to the engine stop switch.
- Connect the orange (Or) wire to the ignition coil.
- Connect the brown (Br) wire to the exciter coil.
2. Ignition Coil
- Connect the orange (Or) wire from the CDI unit.
- Connect the black (B) wire to the ground.
3. Pulser Coil
- Connect the white (W) and black (B) wires to the CDI unit.
Ensure all connections are secure and match the diagram. If unsure, consult a PARSUN dealer.
This answer is automatically generated
need wiring diagram for pulser, coil and CDI
The wiring diagram for the pulser, coil, and CDI for the Parsun T2CBMS is as follows:
1. Exciter coil connects to the CDI unit.
2. Pulser coil connects to the CDI unit.
3. CDI unit connects to the ignition coil.
4. Ignition coil connects to the spark plug.
5. Engine stop switch connects to the CDI unit.
Wire color codes:
- B/W: Black/White
- Or: Orange
- B: Black
- Br: Brown
- W: White
Each component is linked according to its function, with specific wire colors for identification.
This answer is automatically generated