DigiDesign Mbox 2 Getting Started
Hide thumbs
Also See for Mbox 2:
- Getting started manual (84 pages) ,
- Basic manual (22 pages) ,
- Setup manual (20 pages)
Table of Contents
Advertisement
Quick Links
Advertisement
Table of Contents

Subscribe to Our Youtube Channel
Related Manuals for DigiDesign Mbox 2


Summary of Contents for DigiDesign Mbox 2
- Page 1 Getting Started Mbox 2™ Version 7.0...
- Page 2 However, there is no © 2005 Digidesign, a division of Avid Technology, Inc. All rights guarantee that interference will not occur in a particular reserved. This guide may not be duplicated in whole or in part installation.
- Page 3 This symbol on the product or its packaging indicates that this product must not be disposed of with other waste. Instead, it is your responsibility to dispose of your waste equipment by handing it over to a designated collection point for the recycling of waste electrical and electronic equipment.
-
Page 5: Table Of Contents
Connecting Mbox 2 to the Computer ........ - Page 6 Before You Call Digidesign Technical Support ........
-
Page 7: Chapter 1. Welcome To Mbox 2
Mbox 2, and an introduction to Pro Tools LE software • The Mbox 2 Basics Guide, designed to give new users specific methods for accomplishing common tasks (such as getting sound in and... -
Page 8: Mbox 2 Features
• 1/4-inch (TRS) stereo headphone output with adjustable level control • USB-powered operation Mbox 2 will not function properly if con- nected to a passive USB hub. If you need to use a hub for other USB peripherals, use a powered hub or a separate dedicated USB port for Mbox 2 to function properly. -
Page 9: System Requirements
Digidesign Web site only when necessary. (www.digidesign.com/compato). MIDI Requirements Mbox 2 includes one MIDI In port and one MIDI Out port, providing 16 channels of MIDI input and 16 channels of MIDI output. If you require additional MIDI ports, add a MIDI interface to your system. - Page 10 24 mono tracks, 60 minutes 7 GB 7.8 GB 10.5 GB 11.6 GB 32 mono tracks, 5 minutes 800 MB 883 MB 1.2 GB 1.3 GB 32 mono tracks, 60 minutes 9.4 GB 10.4 GB 14 GB 15.4 GB Mbox 2 Getting Started Guide...
-
Page 11: Digidesign Registration
• DigiBase Guide provides details on using This Getting Started with Mbox 2 Guide explains Pro Tools DigiBase databasing and browsers how to install and use Mbox 2 to record, edit, for data and media management. and mix audio and MIDI tracks in Pro Tools LE. -
Page 12: About Www.digidesign.com
Shortcuts show you useful keyboard or mouse shortcuts. News and Events Get the latest news from Digidesign; sign up for a Pro Tools demo. Cross References point to related sections in To learn more about these and other resources other Digidesign guides. -
Page 13: Chapter 2. Windows Configuration
12. “Launching Pro Tools LE” on page 14. “Configuring Pro Tools LE” on page 15. Making audio and MIDI connections to the Mbox 2. (See Chapter 4, “Mbox 2 Hardware and Connections” for details.) Chapter 2: Windows Configuration... - Page 14 Click OK to save your settings and close the Standby power scheme must be set to Always Effects dialog. On. This helps prevent long record or playback passes from stopping due to system resources Click OK. powering down. Restart the computer. Mbox 2 Getting Started Guide...
- Page 15 Recommended Optimizations Under the General tab, choose “Do not use this device (disable)” from the Device Usage Pro Tools can also be affected by other software pop-up menu, and click OK. and hardware drivers installed on your com- Close the Computer Management window. puter.
-
Page 16: Hard Drive Configuration And Maintenance
• DHCP Client, TCP/IP Net BIOS, and other drive may result in lower track counts or fewer networking-related items (unless the com- plug-ins. puter has no network or internet connec- tion, in which case these items can be disabled) Mbox 2 Getting Started Guide... - Page 17 Formatting an Audio Drive When formatting is complete, close the For- mat window. For optimum performance, audio drives should be formatted as FAT32 or NTFS. Audio Drives and Disk Cleanup To format an audio drive: The process of recording and editing can quickly decrease overall drive performance.
-
Page 18: Installing Pro Tools Le And Mbox 2
USB hub. If you need to use a hub for other USB peripherals, connect the To install QuickTime: hub to a separate USB port; Mbox 2 must Visit www.apple.com and go to the Quick- have a dedicated port in order to function Time page. -
Page 19: Optional Software On The Pro Tools Installer Cd
For detailed information on configuring the If you plan to use a Control|24 with your sys- Digidesign ASIO Driver, see the Digidesign tem, you will need to install the Digidesign ASIO Guide . Ethernet software. To install Digidesign Ethernet software:... -
Page 20: Launching Pro Tools Le
Pro Tools system and use them as Transfer your desktop (or the application icon in the drives. Pro Tools folder inside the Digidesign folder). Enter the authorization code in the dialog Transfer drives can be used for storage, but (making sure to type it exactly as printed, and not for playback or recording. -
Page 21: Configuring Pro Tools Le
Pro Tools sessions. Playback Engine dialog for Mbox 2 Hardware Buffer Size From the H/W Buffer Size pop-up menu, select the audio buffer size, in samples. - Page 22 Increasing the CPU Usage Limit may slow To change the DAE Playback Buffer Size: down screen response on slower computers. Choose Setup > Playback Engine. From the DAE Playback Buffer pop-up menu, select a buffer size. Click OK. Mbox 2 Getting Started Guide...
- Page 23 Mbox 2 analog inputs 1–2 and/or are recording digital inputs into Default Sample Rate Mbox 2 inputs 3–4 where the digital device is synchronized to the Mbox 2 digital output. The Sample Rate setting appears as the default sample rate when you create a new session.
-
Page 24: Removing Pro Tools Le
Removing Pro Tools LE If you need to remove Pro Tools LE software I/O Setup dialog for Mbox 2 from your computer, you can use the Add or Re- Click the Input, Output, Insert, or Bus tab to move Programs command. -
Page 25: Chapter 3. Macintosh Configuration
Installation Overview details on Administrator privileges in Mac OS X, refer to your Apple OS X documentation. Installation of the Mbox 2 on a Macintosh in- cludes the following steps: Do not use the Mac OS X automatic Soft- ware Update feature, as it may upgrade “Macintosh System Optimization”... - Page 26 To disable Spotlight indexing: Choose System Preferences from the Apple menu and click Spotlight. In the Spotlight window, click Privacy. To prevent indexing of a drive, drag its icon from the desktop into the list. Mbox 2 Getting Started Guide...
-
Page 27: Hard Drive Configuration And Maintenance
Choose the Mac OS Extended (Journaled) for- Hard Drive Configuration and mat. Maintenance Do not choose the “Case-Sensitive” format It is recommended that you start with a newly option. Pro Tools will not operate properly initialized audio drive. with case-sensitive formatted drives. Always back up any important data on Type a name for the new volume. -
Page 28: Optional Software On The Pro Tools Installer Cd
USB peripherals, connect the The Pro Tools LE Installer CD includes a demo hub to a separate USB port; Mbox 2 must be session that you can use to verify that your sys- connected to a dedicated port on the com- tem is working. -
Page 29: Configuring Pro Tools Le
In most cases, the default settings for your sys- tem provide optimum performance, but you may want to adjust them to accommodate large Playback Engine dialog for Mbox 2 or processing-intensive Pro Tools sessions. From the H/W Buffer Size pop-up menu, select the audio buffer size, in samples. - Page 30 85 percent for single-processor com- From the DAE Playback Buffer pop-up menu, puters to 99 percent for multi-processor com- select a buffer size. puters. Click OK. Increasing the CPU Usage Limit may slow down screen response on slower computers. Mbox 2 Getting Started Guide...
- Page 31 Mbox 2 analog inputs 1–2 and/or are recording digital inputs into The Sample Rate setting appears as the default Mbox 2 inputs 3–4 where the digital device is sample rate when you create a new session. synchronized to the Mbox 2 digital output.
-
Page 32: Removing Pro Tools Le
Removing Pro Tools LE If you need to remove Pro Tools software from I/O Setup dialog for Mbox 2 your computer, you can use the Installer CD or the downloaded Installer file. Click the Input, Output, Insert, or Bus tab to display the corresponding connections. -
Page 33: Chapter 4. Mbox 2 Hardware And Connections
4 Mbox 2 Hardware and Connections This chapter explains how to connect your Mbox 2 for monitoring, playback and recording. If you are new to working with digital audio workstations, first read through the Mbox 2 Basics Guide for basic setup information (such as connecting audio inputs, headphones, mics and instruments). - Page 34 MIDI cables Mbox 2 cable FireWire drive instrument MIDI Device Laptop headphones Figure 2. Mbox 2 micro studio configuration running Pro Tools LE on a laptop computer Mbox 2 Getting Started Guide...
-
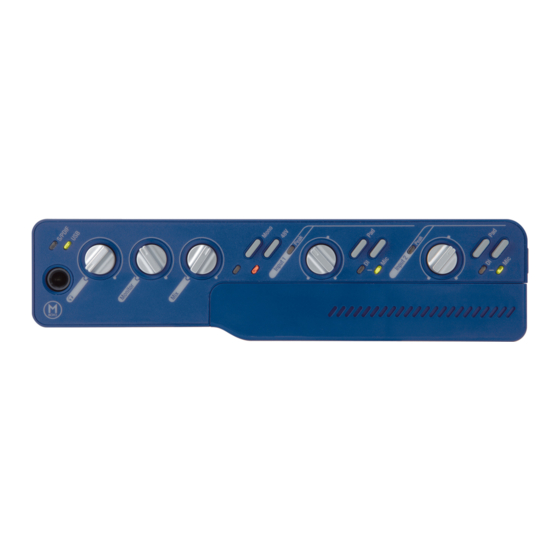
Page 35: Mbox 2 Front Panel Features
Line Outputs. USB LED Monitor Level The USB LED indicates that the Mbox 2 has re- ceived power from its USB connection. Once the The Monitor knob adjusts the output level of USB light is on, audio can pass in or out of the the Line Out ports. - Page 36 Mix (Ratio) Control Mono Switch and LED Mbox 2 gives you the ability to monitor your The Mono switch sums the input channels to a analog input signals while recording, without mono signal (delivering that identical signal to the delay incurred by A/D/A converters and both speakers).
- Page 37 Phantom power is activated by the switch la- The Pad switches engage a –20 dB pad on their beled 48V on the front panel of Mbox 2. The corresponding input channels. When engaged, LED, when lit, indicates that 48V phantom the Pad LEDs light.
-
Page 38: Mbox 2 Back Panel Features
Mbox 2 Back Panel Features Figure 4 identifies each port on the Mbox 2 back panel. Input 2 Input 1 (analog (analog input 2) input 1) Monitor S/PDIF MIDI I/O USB port outputs digital I/O Line Line Figure 4. Mbox 2 back panel... -
Page 39: Making Signal Connections To Mbox 2
Input 2) provides Mic, DI, and Line (TRS) ports. These balanced/unbalanced analog audio in- Mbox 2 can be used in a variety of audio setups. puts support a broad range of input levels, as fol- This section describes how to make basic con-... - Page 40 To connect monitor speakers with a power amp or self-powered monitor speakers: DI ports. Using 1/4-inch cables, connect the left and right Mon Outs on the back of Mbox 2 to the ap- propriate inputs on your mixer, power amp, or powered speakers. Mbox 2 Getting Started Guide...
- Page 41 S/PDIF input to Mbox 2’s S/PDIF output port. channel’s Source switch until the Mic LED lights. To configure Mbox 2 to record from a digital • To select the DI port, press that channel’s source, choose Setups > Hardware Setup in Source switch until the DI LED lights.
- Page 42 MIDI Connections Connecting a Recorder for Mixdowns The two MIDI ports on Mbox 2 let you take ad- vantage of all the MIDI features of Pro Tools LE, After you record and mix your sessions in including recording and editing MIDI tracks.
-
Page 43: Chapter 5. Working With Pro Tools Le
chapter 5 Working with Pro Tools LE This tutorial of Pro Tools LE software introduces Starting a Session its main windows and features, and also in- cludes a step-by-step overview of audio record- To create a new session: ing. Launch Pro Tools LE. All features described in this chapter are ex- Choose File >... - Page 44 To switch between the Edit and Mix windows, press Control+Equals (=) (Windows) or Command+Equals (=) (Macintosh). Edit tools Main Counter Edit Mode buttons Rulers Track List Tracks Group List Automation data Audio region MIDI notes Figure 5. Edit window Mbox 2 Getting Started Guide...
- Page 45 Plug-In Insert Inserts Sends Send controls Pan sliders Track controls Volume fader Level meter Tracks Figure 6. Mix window Transport Window Provides controls for Play, Stop, Rewind, Fast-Forward, Pause, and Record. The Transport window can also show Counter and MIDI Control displays. Transport controls MIDI controls Counters...
- Page 46 Change Tempo dialog To base the BPM value on a different note value (such as an eighth note rather than the de- fault quarter note), select a note value from the Resolution pop-up menu. Click OK. Mbox 2 Getting Started Guide...
- Page 47 Using the Click Plug-In To use the Click plug-in: Choose Options > Click to enable the Click The Click plug-in creates an audio click during option. session playback. This works like a metronome that you can use as a tempo reference when per- –...
- Page 48 Choose a MIDI sound source from the Output fer to another system, saving to older Pro Tools pop-up menu and click OK. session formats, or saving a session at another sample rate. Mbox 2 Getting Started Guide...
-
Page 49: Transport Controls
System Resources and Settings Transport Controls You can change specific Pro Tools system set- The Transport window provides access to all tings to optimize system performance. Pro Tools LE transport commands. Different transport controls can be displayed or hidden in Playback Engine Dialog this window. -
Page 50: Tracks
Options menu also affects playback. See the Pro Tools Reference Guide for more information. New Track dialog Specify the number of tracks, track type, and mono or stereo (for all types except MIDI). Mbox 2 Getting Started Guide... - Page 51 To create multiple new track types in one step, In the Edit window, tracks are displayed hori- click the “+” button in the New Tracks dialog. zontally along the Timeline. The area in which Specify the number of tracks, track type, and audio appears for each track is the Playlist.
- Page 52 Track Type indicator Track name Volume indicator Color bar Track name Color bar Track comment area Track comment area Figure 9. MIDI track in the Mix window Figure 8. Stereo audio track in the Mix window Mbox 2 Getting Started Guide...
-
Page 53: Region List
Instrument Tracks Region List Instrument tracks have many controls in com- A region is a piece of audio or MIDI data that can mon with audio tracks, and also have an addi- also have associated automation data. For exam- tional Instruments View, which provides con- ple, a region could be a loop, a guitar riff, a verse trols for MIDI input, output, mute, volume, and of a song, a sound effect, a piece of dialog, or an... -
Page 54: Navigating In A Session
Click in the Main Counter and enter a loca- Markers ruler. tion using your computer keyboard. On some Windows laptops, you can press Fn+Enter to create a memory location. This is especially useful for laptops that do not have a numeric keypad. Mbox 2 Getting Started Guide... - Page 55 In the New Memory Location dialog, you can Viewing and Zooming define a marker, store a selection, or store any When viewing tracks in the Edit window, you combination of the other available settings. can adjust the height of tracks as well as zoom in These settings include Track Height, Group En- vertically and horizontally using the Track ables, Pre- and Post-Roll values, and Track...
- Page 56 Make another edit selection and click the • Drag to the right to zoom in horizontally Zoom Toggle button to recall the stored zoom • Drag to the left to zoom out horizontally state, and continue editing. Mbox 2 Getting Started Guide...
-
Page 57: Importing Data Into Pro Tools Sessions
Zoom Presets Importing Data into Pro Tools Pro Tools provides five Zoom Preset buttons. Sessions You can use these to immediately return to es- Pro Tools LE lets you import audio, MIDI, and a tablished zoom levels. You can define the mag- wide range of Pro Tools session data into your nification level for each preset, on a session-by- current session. - Page 58 Pro Tools sessions, see the Pro Tools Choose File > Import > MIDI to Region List. Reference Guide. To import MIDI files to tracks: Choose Window > Workspace and locate the MIDI files you want to import. Mbox 2 Getting Started Guide...
-
Page 59: Basic Recording
Input 1 This section describes how to record audio and jack on the back of the Mbox 2. Select In 1–2 if MIDI into Pro Tools LE. your audio source is stereo and is connected to Input 1 and Input 2 connectors. - Page 60 Click the track’s Record Enable button a sec- ond time to take it out of Record mode. On the front of the Mbox 2, turn the Mix con- trol fully right to Playback. Click Play in the Transport window or press the Spacebar to start playback.
- Page 61 Recording MIDI Do one of the following, depending on the type of instrument you are using: Instrument tracks combine a MIDI track and • If you are using an instrument plug-in, Auxiliary Input into a single channel strip that click an Insert selector and insert the plug- provides both MIDI and audio capabilities.
- Page 62 Record, and Wait for Note buttons flash. Recording begins when the first MIDI event is received. • If you are using Countoff, click Play. The Record and Play buttons flash during the Countoff, then recording begins. Mbox 2 Getting Started Guide...
-
Page 63: Editing
Play your MIDI controller or input device. Editing When you have finished recording, click Stop Pro Tools LE provides several tools for editing in the Transport window, or press the Spacebar. audio and MIDI. In the Edit window, audio and The newly recorded MIDI data appears as a MIDI MIDI tracks can be edited into regions or re- region on the track in the Edit window, as well... - Page 64 In this way, you can try out different edits of a For detailed descriptions of the Edit Tools, track, and switch back and forth between play- see the Pro Tools Reference Guide. lists for comparison. Mbox 2 Getting Started Guide...
- Page 65 Editing Regions Move the cursor near the end of the audio re- gion (notice the cursor displays as a “]”). The Edit tools in Pro Tools LE are used to edit re- gions in the Edit window. Trimming the end of a region Click at the end of the region and drag left to Audio region shorten the region.
- Page 66 Audio track. useful for groove and tempo manipulation, ed- iting, and arranging. Click the Grabber tool and select the Separa- tion Grabber tool. For more information on Region Groups, see the Pro Tools Reference Guide. Mbox 2 Getting Started Guide...
-
Page 67: Mixing
Basic Signal Routing Mixing Signal routing is accomplished by assigning The Pro Tools mix environment provides many track inputs and outputs. Audio track inputs can familiar channel strip controls for setting vol- be from any hardware input or bus path. Once ume, pan, solo, and mute. - Page 68 (0 dB) by enabling or disabling the Sends Default To “–INF” option in the Click the Output selector of the Auxiliary In- Operation Preferences page. put and choose an output path. Mbox 2 Getting Started Guide...
-
Page 69: Plug-Ins
Master Faders To create a Master Fader: Choose Track > New and specify 1 Mono or Master Faders are used as output and bus mas- Stereo Master Fader track, then click Create. ters, and can control any mono or stereo output or bus path in a session. -
Page 70: Mix Automation
Start playback and begin writing automation For more information about plug-ins in- by adjusting faders and other controls during cluded with Pro Tools, see the DigiRack playback. Pro Tools LE remembers all moves Plug-Ins Guide. performed on enabled parameters. Mbox 2 Getting Started Guide... -
Page 71: Final Mixdown
Once written, automation can be re-written or To Bounce to Disk: displayed and edited graphically in the Edit win- Choose File > Bounce to > Disk. dow. Select any mono or stereo output or bus path as the source for the bounce. Select the File Type (such as WAV), Format (such as mono or stereo), Resolution (such as 16- bit), and Sample Rate (such as 44.1 kHz). - Page 72 TweakHead (highest quality). The higher the quality of sample rate conversion, the longer it takes to convert the bounced file. For more information on using dither and sample rate conversion when mixing down, see the Pro Tools Reference Guide . Mbox 2 Getting Started Guide...
-
Page 73: Appendix A. Configuring Midi Studio Setup (Windows Only)
appendix a Configuring MIDI Studio Setup (Windows Only) MIDI Studio Setup Window MIDI Studio Setup The MIDI Studio Setup window is organized MIDI Studio Setup (MSS) lets you configure the into three sections. Interface controls are at the MIDI controllers and sound modules that are top of the window. - Page 74 (such as MIDI of your instrument, and press Enter. I/O), in addition to the MIDI ports on Mbox 2, the MIDI Studio setup window shows both the If you do not enter an instrument name, the...
-
Page 75: Midi Patch Name Support
MIDI devices. Pro Tools available MIDI interface input ports. Inputs will installs MIDI patch name files (.midnam) for the include Mbox 2 and any additional MIDI inter- factory default patch names of many common faces enabled on your system. The MIDI inter- MIDI devices. - Page 76 Patch Select dialog names. In the Open dialog, navigate to Program Files\Common Files\Digidesign\MIDI Patch Names\Digidesign\<name of manufacturer>, and select the MIDI Patch Name file (.midnam) for the MIDI device. Mbox 2 Getting Started Guide...
-
Page 77: Appendix B. Configuring Ams (Mac Os X Only)
appendix b Configuring AMS (Mac OS X Only) For any MIDI devices connected to the MIDI Audio MIDI Setup interface, click Add Device. A new external de- vice icon with the default MIDI keyboard image Pro Tools recognizes the ports on your MIDI in- will appear. - Page 78 (If the Manufacturer and Model pop-up menus do not provide a name for your particular de- vice, you can type a name.) Naming a new MIDI device Enabling MIDI channels Mbox 2 Getting Started Guide...
-
Page 79: Midi Patch Name Support
MIDI devices. These files reside in directories, sorted by manufacturer, in /Library/Audio/MIDI Patch Names/Digidesign. To import MIDI patch names into Pro Tools: Verify the MIDI Device name in the Audio MIDI Setup window (see “Audio MIDI Setup” on page 71). - Page 80 Done. MIDI patch name files (.midnam) can be edited in any text editor, or you can use third party patch librarian and editor soft- ware to create your own custom patch names. Mbox 2 Getting Started Guide...
-
Page 81: Appendix C. Troubleshooting
CD burners. quired amount of RAM to launch Pro Tools. See The best way to back up an entire session is to the compatibility page of the Digidesign Web use the Save Copy In command. This command site (www.digidesign.com/compato). -
Page 82: Performance Factors
DAE errors, and their solutions based interchange of audio data. on the latest information from Digidesign Tech- nical Support. This database is installed in the Background Applications Any software utilities Digidesign folder when you install Pro Tools. - Page 83 Gather Important Information Other Hardware Refer to the manufacturer’s documentation for Digidesign wants to help you resolve problems operational details. as quickly and efficiently as possible. If you have the following information handy when you The most common hardware additions include: contact Technical Support, it will make the diag- •...
- Page 84 Mbox 2 Getting Started Guide...
-
Page 85: Index
ASIO driver (Windows) 13 Internal setting 17, 25 audio S/PDIF (digital) setting 17, 25 analog connections 34 Conductor ruler 40 digital connections 35 connecting Mbox 2 editing 57 Macintosh 22 importing 51 Windows 12 monitor connections 34 CoreAudio driver (Macintosh) 22... - Page 86 51 indicators Meter ruler 40 peak level 31 MIDI phantom power 31 connections 36 S/PDIF 29 editing 57 USB connection 29 importing 52 requirements 3 setup (Macintosh) 71 setup (Windows) 67 Mbox 2 Getting Started Guide...
- Page 87 MIDI Studio Setup (MSS) (Windows) 67 power management settings MIDI tracks 44, 46 Macintosh 20 mix automation 64 Windows 8 mix control (Mbox 2) 30 Pro Tools LE Mix window 38, 61 capabilities 2 mixdown 65 configuration (Macintosh) 23 and bit resolution 65...
- Page 88 Transport window 39, 43, 44 DAE Playback Buffer Size 16, 24 Hardware Buffer Size 15, 23 I/O Setup 17, 25 RTAS Processors 15, 23 Zoom Presets 51 Sample Rate 17, 25 Zoom Toggle 50 Zoomer tool 58 zooming 49 Mbox 2 Getting Started Guide...
Need help?
Do you have a question about the Mbox 2 and is the answer not in the manual?
Questions and answers