Table of Contents
Advertisement
Getting Started with Mbox
Version 6.4 for LE Systems on Windows or Macintosh
Digidesign
2001 Junipero Serra Boulevard
Daly City, CA 94014-3886 USA
tel: 650·731·6300
fax: 650·731·6399
Technical Support (USA)
tel: 650·731·6100
fax: 650·731·6384
Product Information (USA)
tel: 650·731·6102
tel: 800·333·2137
International Offices
Visit the Digidesign Web site
for contact information
Web Site
www.digidesign.com
Advertisement
Table of Contents

Related Manuals for DigiDesign Mbox


Summary of Contents for DigiDesign Mbox
- Page 1 Getting Started with Mbox Version 6.4 for LE Systems on Windows or Macintosh Digidesign 2001 Junipero Serra Boulevard Daly City, CA 94014-3886 USA tel: 650·731·6300 fax: 650·731·6399 Technical Support (USA) tel: 650·731·6100 fax: 650·731·6384 Product Information (USA) tel: 650·731·6102 tel: 800·333·2137 International Offices...
- Page 2 If this equipment does cause harmful interference to radio or television reception, which can be determined by turning the This guide is copyrighted ©2004 by Digidesign, a division of equipment off and on, the user is encouraged to try and correct Avid Technology, Inc.
-
Page 3: Table Of Contents
Connecting Mbox to the Computer ........ - Page 4 Making Signal Connections to Mbox ........
- Page 5 Configuring the Digidesign CoreAudio Driver ........
- Page 6 Getting Started with Mbox...
-
Page 7: Chapter 1. Welcome To Mbox
24-bit analog-to-digital Suite) and AudioSuite plug-ins, optional soft- and digital-to-analog converters. ware, and electronic PDF guides • This Getting Started with Mbox Guide, which in- cludes instructions for installing and config- uring Mbox, and an introduction to Pro Tools LE software •... -
Page 8: Mbox Features
Mbox will not function properly if connected to a USB hub. If you need to use a hub for other USB peripherals, use a separate USB port; Mbox must have a dedicated port in or- der to function properly. Getting Started with Mbox... -
Page 9: System Requirements
For a list of qualified hard drives, visit the System Requirements Digidesign Web site (www.digidesign.com/compato). Mbox can be used with a Digidesign-qualified Windows or Macintosh computer running Avoid Recording to System Drives Pro Tools LE software. Although Pro Tools LE will let you record to... -
Page 10: Digidesign Registration
The Getting Started with Mbox Guide explains Pro Tools systems on Windows or Macintosh. how to install and use Mbox to record, edit, and Serial MIDI interfaces are supported on Win- mix audio and MIDI tracks in Pro Tools LE. -
Page 11: About Www.digidesign.com
Pro Tools demo. Shortcuts show you useful keyboard or mouse shortcuts. To learn more about these and other resources available from Digidesign, visit our Web site (www.digidesign.com). Cross References point to related sections in other Digidesign guides. - Page 12 Getting Started with Mbox...
-
Page 13: Chapter 2. Windows Configuration
2 Windows Configuration Installing the Mbox on a Windows computer in- Recommended Configuration These instructions cludes the following steps: should be followed to optimize your system’s capabilities, or to let older computers run Configure Windows System Software settings. Pro Tools. - Page 14 Standby power scheme must be set to Always On. This helps prevent long record or playback Click OK. passes from stopping due to system resources powering down. Completing Required Windows System Settings When finished updating required Windows sys- tem settings, restart your computer. Getting Started with Mbox...
-
Page 15: Installing Pro Tools Le And Mbox
See“Windows System Settings” try unplugging the USB cable from the on page 7 for more information. Mbox USB port, and plugging it back in. If Start up Windows, logging in with Adminis- the USB LED still does not illuminate, shut trator privileges. -
Page 16: Removing Pro Tools Le
In Classic View, launch Add or Remove Pro- grams. To check and update the firmware on Mbox: From the Currently Installed Programs list, se- Make sure Pro Tools is installed and the Mbox lect Digidesign Pro Tools LE. is connected to the computer. Click the Change/Remove button. -
Page 17: Installing Optional Software For Pro Tools Le
Stand-Alone ASIO Driver Installer Before installing the demo session to your Digidesign ASIO Driver 6.4 can be installed on audio drive, make sure the drive is config- Digidesign-qualified Windows XP systems with ured as described in “Formatting an Audio Pro Tools 6.4 (for example, if the ASIO Driver... -
Page 18: Launching Pro Tools Le
To install and configure the MacOpener demo your desktop (or the application in the Pro Tools included with Pro Tools: folder inside the Digidesign folder). Insert the Pro Tools Installer CD into your CD- ROM drive. Enter the authorization code in the dialog... -
Page 19: Configuring Pro Tools Le
In most cases, the default settings for your sys- tem provide optimum performance, but you Playback Engine dialog for Mbox may want to adjust them to accommodate large From the H/W Buffer Size pop-up menu, select or processing-intensive Pro Tools sessions. - Page 20 To change the DAE Playback Buffer Size: Choose Setups > Playback Engine. From the DAE Playback Buffer pop-up menu, select a buffer size. Hardware Setup dialog for Mbox Click OK. Select the sample rate from the Sample Rate pop-up menu.
- Page 21 Your digital input device must be connected The Pro Tools Hardware Setup dialog allows you and powered on for Pro Tools to synchro- to configure the two inputs on Mbox to receive nize to it. If your input device is not powered analog or digital signals.
-
Page 22: Hard Drive Configuration And Maintenance
XP documentation. Format. For optimal disk performance, select 32K from the Allocation unit size pull-down. This in- creases how efficiently audio data is written to and read from the drive. Getting Started with Mbox... - Page 23 Defragmenting an Audio Drive Periodically defragment audio drives to maintain system performance. To defragment an audio drive: Right-click My Computer and choose Man- age. Under Storage, choose Disk Defragmenter. In the Disk Defragmenter window, choose the drive you want to defragment Click the Defragment button and follow the on-screen instructions.
- Page 24 Getting Started with Mbox...
-
Page 25: Chapter 3. Macintosh Configuration
3 Macintosh Configuration Installation of the Mbox on a Macintosh in- Apple System Settings for cludes the following steps: Mac OS X Configure Apple System Software settings. (See “Apple System Settings for Mac OS X” on To ensure optimum performance with page 19.) -
Page 26: Installing Pro Tools Le
Apple Audio MIDI Setup (AMS) utility. Select your audio drive as the install location See Appendix E, “Configuring AMS and click Install. (Mac OS X Only)” for details. When installation is complete, click Quit. Getting Started with Mbox... -
Page 27: Connecting Mbox To The Computer
If the USB LED on the front panel of Mbox does Connecting Mbox to the not illuminate after you connect it and launch Computer Pro Tools, try unplugging the USB cable from the Mbox USB port, then plugging it back in. - Page 28 The DAE Playback Buffer Size determines the amount of memory DAE uses to manage disk buffers, which affects system performance. Playback Engine dialog for Mbox (Pro Tools 6.x) Lower DAE Playback Buffer Size settings can CPU Usage Limit improve playback and recording initiation speed.
- Page 29 Channel 1–2 Input Format Choose Setups > Playback Engine. The Pro Tools Hardware Setup dialog allows you to configure the two inputs on Mbox to receive From the DAE Playback Buffer pop-up menu, either analog or digital signals. select a buffer size.
-
Page 30: Hard Drive Configuration And Maintenance
You should record to system drives only when necessary—for example, if your com- puter system has just one hard drive. I/O Setup dialog for Mbox, Input page Click the Input, Output, Insert, or Bus tab to display the corresponding connections. -
Page 31: Chapter 4. Mbox Hardware And Connections
4 Mbox Hardware and Connections This chapter explains how to connect your Mbox for monitoring, playback and recording. If you are new to working with digital audio workstations, first read through the Mbox Basics Guide for basic setup information (such as connecting audio inputs, headphones, mics and instruments). - Page 32 Mbox instrument FireWire drive Laptop headphones Figure 2. Mbox micro studio configuration running Pro Tools LE on a laptop computer Getting Started with Mbox...
-
Page 33: Mbox Front Panel Features
• Line for line level signals on TRS or TS in- puts Figure 3. Mbox front panel • Inst (instrument) for other 1/4-inch TRS or The Mbox front panel has the following fea- TS connections tures: For more information, see “Analog Audio” on page 32. - Page 34 This ability to blend and control the relative lev- els of Pro Tools playback and latency-free live The USB LED indicates that the Mbox has re- analog inputs can be particularly effective when ceived power from its USB connection. Once the overdubbing.
-
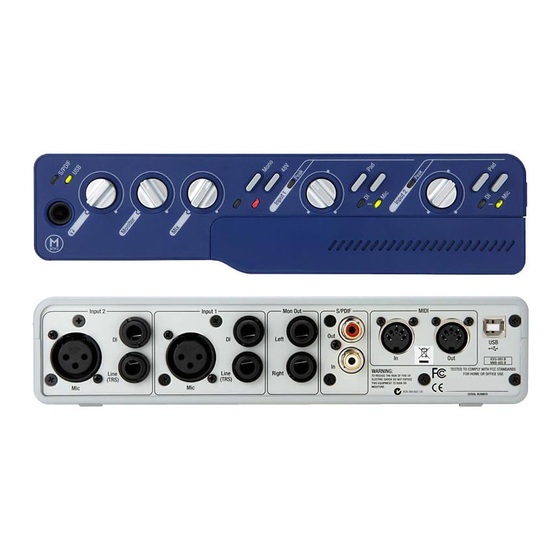
Page 35: Mbox Back Panel Features
Use the front panel Headphone port to connect Figure 4. Mbox back panel stereo headphones with a 1/8-inch stereo mini The Mbox back panel has the following features: connector. The front panel 1/8-inch Headphone port is dis- Back Panel Headphone Output abled when a 1/4-inch stereo connector is in- serted into the back panel Headphone port. -
Page 36: Line Outputs
Be sure to check the 48V LED on the front such as a stereo power amp, or another stereo panel of Mbox before plugging in any mi- destination. crophones. The 48V switch on the back is... -
Page 37: Making Signal Connections To Mbox
Making Signal Connections to • Connect headphones with an 1/8-inch stereo Mbox mini connector (or an adapter) to the front Mbox can be used in a variety of audio setups. Headphone jack. This section describes how to make basic con- – or –... - Page 38 Using 1/4-inch cables, connect the Line Out- Plug an XLR or TRS cable directly into puts on the back panel of Mbox to the appropri- Mic/Line Input 1 or 2 on Mbox. These inputs ac- ate inputs on your stereo.
-
Page 39: Connecting A Recorder For Mixdowns
To insert a device in the signal path: To configure Mbox to record from a digital You will need a cable that breaks a TRS con- source, choose Setups > Hardware Setup in nector on one end out to two unbalanced con- Pro Tools, then select S/PDIF in the Clock nectors. -
Page 40: Midi Connections
(sound source) you’ll need to connect its audio Connect the MIDI OUT of your MIDI device outputs to a sound system (or your Mbox). Your or controller to the MIDI IN of your MIDI inter- MIDI instruments have two signal paths, one for face. -
Page 41: Chapter 5. Working With Pro Tools Le
chapter 5 Working with Pro Tools LE This tutorial of Pro Tools LE software introduces Starting a Session its main windows and features, and also in- cludes a step-by-step overview of audio record- To create a new session: ing (see “Basic Recording” on page 46). Launch Pro Tools LE. - Page 42 Play, Stop, Rewind, Fast-Forward, Pause, and Record. The Transport window can also show Counter and MIDI Control displays. Mix window Edit window Main Counter Rulers Tracks Tracks Main Counter Transport window Figure 5. Main session windows Getting Started with Mbox...
-
Page 43: Setting A Tempo
Setting a Tempo The Click plug-in is one of many plug-ins You can set the tempo for your session by using that can be inserted on a Pro Tools track. Tempo Events, or by using the MIDI tempo con- See “Plug-Ins” on page 54. trols in the expanded Transport window. - Page 44 It does not create a new Audio Files or Fade Files folder. This can be useful if you want to experiment with different arrangements in the session with- Click/Countoff Options dialog out affecting the original session. Getting Started with Mbox...
-
Page 45: Transport Controls
Save Session Copy In Saves copies of the session Transport Controls file and the files that you are using in the cur- rent session. This can be useful for creating a fi- The Transport window provides access to all nal copy of the session that does not include au- Pro Tools LE transport commands. -
Page 46: Tracks
Specify the number of tracks, track type, and for more information. mono or stereo (for all types except MIDI). Click Create. In the Mix window, audio tracks, Auxiliary In- puts, Master Faders, and MIDI tracks appear as vertical channel strips. Getting Started with Mbox... - Page 47 Track type is indicated by the Track Type icons Audio tracks, Auxiliary Inputs, Master Faders, just below the faders. and MIDI tracks can be automated. Inserts Sends Input Output Automation mode Pan sliders Record Enable Solo Mute Open Output window Clipping indicator Volume (lights red)
-
Page 48: Regions Lists
Enable the Selector tool at the top of the Edit name. The Regions List pop-up menus provide window by clicking it. features for managing regions and files (such as sorting, selecting, importing, or exporting files). Selector tool Edit tools in Edit window Getting Started with Mbox... -
Page 49: Memory Locations
Click in a track or Timebase Ruler. The cursor Memory Locations appears at the selected location and the Memory Locations provide another way to nav- counters display the current time location. igate within sessions. Memory Locations appear as markers under the Timebase Rulers. Click in a track or on a Timebase Ruler To define a memory location: Navigate to the location at which you want to... - Page 50 Using Memory Locations for Zoom Control Pro Tools Memory Locations let you store many attributes with each marker or memory loca- tion, including Track Height and Zoom Settings. By creating Memory Locations that are neither Getting Started with Mbox...
-
Page 51: Importing Audio
Markers nor Selections, but have Track Height, In the session, create a new track by choosing Zoom Settings, or other options enabled, you File > New Track. can use Memory Locations to zoom in and out using just the numeric keypad. For more information on creating memory locations, see “Memory Locations”... -
Page 52: Basic Recording
Audio From Other Movie command. Mic/Line 1 if your audio source is plugged into For more information, see the Pro Tools Ref- the Source 1 jack on the back of the Mbox. erence Guide. DigiBase provides additional options for importing audio. -
Page 53: Recording Midi
Recording an Audio Track Click Stop in the Transport window or press the Spacebar to stop playback. To record an audio track: Recording MIDI Assign the input for a track and set its input levels appropriately. To configure a MIDI track for recording: Click the Record Enable button for a track. - Page 54 – or – Connect the MIDI instrument’s audio output to the appropriate inputs on your Mbox. If using Wait for Note, the Play, Record, and Wait for Note buttons flash. Recording begins Choose File > New Track and specify 1 mono when the first MIDI event is received.
-
Page 55: Editing
The Edit mode affects the movement and place- Editing ment of audio and MIDI regions (and individual MIDI notes), how commands like Copy and Pro Tools LE provides several tools for editing Paste function, and also how the various edit audio and MIDI. - Page 56 Prepare to record using a MIDI click (see “Us- Click at the beginning of the region and drag ing the Click Plug-In” on page 37 or “Using an right to shorten the region. External MIDI Click” on page 38). Getting Started with Mbox...
- Page 57 Record a drum track (see “Recording an Audio With the new region still selected, choose Track” on page 47) keeping in mind that you Edit > Repeat. want to use only the best bar (measure). Your re- cording should fit the grid at the specified tempo and meter.
-
Page 58: Mixing
(dry level) and Auxiliary Input fader Select Windows > Show Mix. (wet, or effect return level). Press Control+Equals (=) in Windows or Command+Equals (=) on Macintosh to switch between the Edit and Mix windows. Getting Started with Mbox... - Page 59 Creating a Send Creating a Return Pro Tools LE provides up to five sends per audio Auxiliary Inputs can be created to act as return track. A send can be mono or stereo, routing to channels for busses, as well as for inputs from an output or one of 16 internal bus paths.
-
Page 60: Plug-Ins
Master Fader track, then click Create. In the Mix window, click the Master Fader’s Output Selector and choose the output path that you want to control. You can choose either outputs or internal busses. Getting Started with Mbox... -
Page 61: Mix Automation
Pro Tools comes with a complete set of DigiRack plug-ins, and many more are available from Enabling automation (left) and choosing a track Digidesign and our Development Partners. Automation mode (right) For more information about plug-ins, see the DigiRack Plug-Ins Guide, the Digide- sign Plug-Ins Guide, and the Plug-Ins chap- ter of the Pro Tools Reference Guide. -
Page 62: Final Mixdown
Bounce to Disk does not mix includes the following: automatically apply dither. To dither a bounce file, insert an included Digidesign Dither plug- Audible Tracks All audible tracks are included in in, or another dither plug-in, on a Master Fader the bounce. -
Page 63: Appendix A. Windows System Optimizations
Under the General tab, choose “Do not use QuickTime. this device (disable)” from the Device Usage • Repeat the installation instructions in “In- pop-up menu, and click OK. stalling Pro Tools LE and Mbox” on page 9. Close the Computer Management window. Appendix A: Windows System Optimizations... - Page 64 • Plug and play • Event log • Cryptographic services • DHCP Client, TCP/IP Net BIOS, and other net- working-related items (unless the computer has no network or internet connection, in which case these items can be disabled) Getting Started with Mbox...
-
Page 65: Appendix B. Digidesign Asio Driver (Windows Only)
Digidesign ASIO Driver (Windows Only) The Digidesign ASIO Driver will provide up to Introduction 18 channels of input and output, depending on your Pro Tools hardware: The Digidesign ASIO Driver is a multichannel, • Up to 8 channels of input and output with... -
Page 66: Installing The Asio Driver
Digidesign Pro Tools. Click the Change/Remove button. ASIO Control Panel button Modify your installation by unchecking the Digidesign ASIO Driver option only. Setup Example, using Propellerhead Reason ASIO Driver Control Panel Digidesign ASIO Control Panel Getting Started with Mbox... - Page 67 The Digidesign ASIO Driver Control Panel can- In some third-party audio programs, performing not be accessed under the following circum- various tasks such as maximizing or minimizing stances: windows will interrupt the ASIO Driver and cre- ate glitches in the audio. Choosing medium or •...
- Page 68 Getting Started with Mbox...
-
Page 69: Appendix C. Digidesign Wavedriver (Windows Only)
Digi 002 Rack party drivers for Pro Tools hardware, as well as current known issues. • Up to 2 channels of output with Mbox The WaveDriver is not multi-client. Only Compatible Software one application at a time can use the WaveDriver. -
Page 70: Installing The Wavedriver
(such as Sound Forge). Configuring WaveDriver for QuickTime Player (Required for Using iTunes) In order to let Digidesign hardware play back through iTunes for Windows, you must config- ure WaveDriver in the waveOut option of the QuickTime Player SoundOut settings to wave- Out. - Page 71 In Classic View, launch Sounds and Audio De- vices. Click the Audio tab. Select the Digidesign audio interface in the Sound Playback default device lists. Close the Control Panel. When you run Win- dows Media Player, it automatically outputs to your Digidesign hardware.
- Page 72 Getting Started with Mbox...
-
Page 73: Appendix D. Digidesign Coreaudio Driver (Macintosh Only)
Digidesign CoreAudio Driver (Macintosh Only) Introduction Compatible Software The Digidesign CoreAudio Driver is a multi- For a list of CoreAudio Driver-compatible soft- channel, multimedia sound driver that allows ware, see the compatibility documents available third-party audio programs that support the on the Digidesign Web site (www.digide-... -
Page 74: Configuring The Digidesign Coreaudio Driver
QuickTime Player, also require that you config- which CoreAudio-compatible applications can ure either the Apple Sound Preferences or Apple be used with the Digidesign CoreAudio Driver. Audio MIDI Setup to use the Digidesign CoreAu- dio Driver. To add support for a CoreAudio-compatible application:... - Page 75 CoreAudio-compatible application you want to alog lets you set the size of each of the two buff- add. ers the Digidesign CoreAudio Driver uses on Digidesign hardware. You may select from the Click Open. The selected application is added following buffer sizes (depending on your Digi-...
- Page 76 CoreAudio will let you adjust the CoreAudio Buffer Size setting from within the applica- tion. Figure 8. Hardware Setup dialog In Digidesign CoreAudio Setup, click Done to Configure the Hardware Setup dialog for your apply your changes. Digidesign hardware.. HW Setup Button...
- Page 77 Configuring the Apple Sound Click the Input tab and select Digidesign HW as the device for sound input. Preferences or Apple Audio MIDI Setup To use your Digidesign hardware with common CoreAudio-compatible playback applications (such as Apple iTunes or QuickTime Player), you...
- Page 78 From the System Settings Default Input pop- up menu, select Digidesign HW. From the System Settings Default Output pop- up menu, select Digidesign HW. Leave System Output and Selected Audio Device set to Built-in audio controller. The Digidesign CoreAudio Driver cannot be used for system sounds.
-
Page 79: Appendix E. Configuring Ams (Mac Os X Only)
appendix e Configuring AMS (Mac OS X Only) Pro Tools recognizes the ports on your MIDI in- For any MIDI devices connected to the MIDI terface as generic ports. With Mac OS X, you use interface, click Add Device. A new external de- Apple’s Audio MIDI Setup (AMS) utility to iden- vice icon with the default MIDI keyboard image tify external MIDI devices connected to your... - Page 80 Model names for any of your external MIDI devices is not available in the AMS Manu- facturer and Model pop-up menus, you can External Device Icon add them by editing any of the current .middev files in any text editor (such as TextEdit). Getting Started with Mbox...
- Page 81 Click the More Properties arrow to expand the Click the device image. The window expands dialog, then enable the appropriate MIDI chan- to show images for various MIDI devices (such nels (1–16) for the Transmits and Receives op- as keyboards, modules, interfaces, and mixers). tions.
- Page 82 Getting Started with Mbox...
-
Page 83: Index
index Numerics Click plug-in Accented parameter 37 32K clusters 16 Unaccented parameter 37 Clock Source 15, 23 cluster size 16 AMS (Audio MIDI Setup) 73 CPU Usage Limit 22 configuring MIDI devices in 74 ASIO driver 59 audio DAE Playback Buffer Size 22 analog 32 defragment editing 49... - Page 84 30 fade files 35 digital 30 FAT32 16 inserts 30 firmware 10 analog on Mbox 32 plug-ins 55 gain headphones 29 key commands 5 input 27 Grabber tool 49 Grid mode 49 latency see monitoring hard drive and Macintosh system drive 24...
- Page 85 returns 53 creating 53 NTFS 16 rulers 36 outputs S/PDIF I/O 30 analog 30 S/PDIF input indicator 28 digital 30 S/PDIF mirroring 33 Sample Rate 14, 23 Scrubber tool 49 Pan slider 52 Selector tool 49 peak indicators 28 sends 42, 53 Pencil tool 49 assigning 53 phantom power 30, 32...
- Page 86 Windows configuration 12 Volume fader 52 Windows required System settings 7 System Standby 8 windows 36 Edit window 36 Mix window 36, 52 Transport window 36, 39 Windows System Standby 8 Windows XP maintenance 16 Workspace 36 Getting Started with Mbox...
Need help?
Do you have a question about the Mbox and is the answer not in the manual?
Questions and answers