Table of Contents
Advertisement
Quick Links
Mbox Basics Guide
Version 6.7 for LE Systems on Windows XP or Mac OS X
Digidesign
2001 Junipero Serra Boulevard
Daly City, CA 94014-3886 USA
tel: 650·731·6300
fax: 650·731·6399
Technical Support (USA)
tel: 650·731·6100
fax: 650·731·6384
Product Information (USA)
tel: 650·731·6102
tel: 800·333·2137
International Offices
Visit the Digidesign Web site
for contact information
Web Site
www.digidesign.com
Advertisement
Table of Contents

Related Manuals for DigiDesign Mbox


Summary of Contents for DigiDesign Mbox
- Page 1 2001 Junipero Serra Boulevard Daly City, CA 94014-3886 USA tel: 650·731·6300 fax: 650·731·6399 Technical Support (USA) tel: 650·731·6100 fax: 650·731·6384 Product Information (USA) tel: 650·731·6102 tel: 800·333·2137 International Offices Visit the Digidesign Web site for contact information Web Site www.digidesign.com...
- Page 2 Copyright This guide is copyrighted ©2004 by Digidesign, a division of Avid Technology, Inc. (hereafter “Digidesign”), with all rights reserved. Under copyright laws, this guide may not be duplicated in whole or in part without the written consent of Digidesign.
-
Page 3: Online Resources
Introduction Welcome to the Mbox Basics Guide. This guide is DiSK (Digidesign Sound Knowledge) Instruc- designed to give new users specific methods for tional material about how to use Pro Tools, in- accomplishing common tasks with the Mbox cluding DiSK Flix movies that show how to do a desktop audio interface and Pro Tools LE soft- number of popular tasks using Pro Tools. -
Page 4: Connecting Headphones
To hear audio recorded into a Pro Tools session, Connecting a Sound System you will need to connect headphones or an ex- The outputs on the back of the Mbox support ternal sound system (such as powered monitors 1/4-inch plugs. These connections can be bal- or a home stereo) to Mbox. -
Page 5: Connecting Audio Inputs
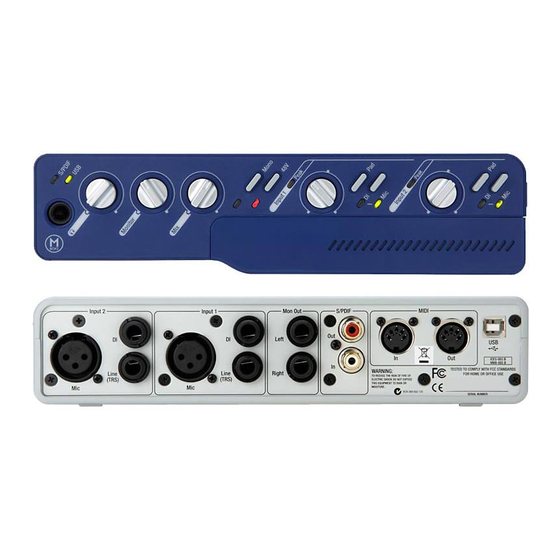
Source 2 input Source 1 input Source Inputs on back of Mbox Mbox has two audio inputs, labeled Source 1 and Source 2. For stereo inputs, use Source 1 for the left input, and Source 2 for the right input. -
Page 6: Connecting A Microphone
XLR connectors. If you are Mbox not sure about the phantom power require- There are several ways to use Mbox with a mi- ments for your microphone, consult your mi- crophone, depending on the type of micro- crophone’s documentation or contact the man-... - Page 7 The 48V LED on the front of compressor or EQ). the Mbox will light when phantom power is be- ing supplied. On the front of the Mbox, set the source to Inst (instrument) by pressing the Source selector until the Inst LED is lit. Phantom Power...
-
Page 8: Connecting Instruments To The Mbox
Connecting Instruments Connecting Instruments to the On the front of the Mbox, set the Source to Inst (instrument) by pressing the Source selector Mbox until the Inst LED is lit. Mbox provides two switchable line input types that correspond to the different signal strengths output by different types of instruments. - Page 9 Input. Plug your keyboard, mixer, or other audio source into either the Source 1 or Source 2 input on your Mbox. If your source is stereo (such as a Line LED Source stereo keyboard or the stereo output from a...
-
Page 10: Recording A Pro Tools Session
Recording a Pro Tools Session Recording with Pro Tools and the Mbox in- To prepare an audio track for recording: volves creating a Pro Tools session, preparing an Create a new track to record on by choosing audio track for recording, and recording. - Page 11 Transport window. Click Return To Zero to Mic/Line 1 if your audio source is plugged into cue to the beginning of the session. the Source 1 jack on the back of the Mbox. Return To Zero Fast Forward Rewind...
-
Page 12: Impor Ting Audio From A Cd
Open the Workspace Browser by choosing alog as needed, or leave at their default settings. Windows > Show Workspace. The Workspace (For details, see the Getting Started with Mbox Browser is a window where you can find, audi- Guide.) tion, and manage your audio files. - Page 13 To play back the new track: In the Transport window, click Return To Zero to cue the beginning of the track. On the front of the Mbox, turn the Mix con- trol fully right to Playback. Click Play in the Transport window to begin playback.
-
Page 14: Creating An Audio Cd From A Pro Tools Session
Choose BWF (.WAV) for the File Type. Choose Stereo Interleaved for the Format. Choose 16 for the Resolution and 44100 for the Sample Rate. Audio session highlighted and ready to bounce Mbox Basics Guide... - Page 15 Choose “Convert after Bounce,” and click Pro Tools will begin bouncing to disk. Pro Tools Bounce. bounces are done in real time, so you hear audio playback of your mix during the bounce process (though you cannot adjust it). Bouncing to Disk dialog Burning a CD After the bounce is completed, you will have an audio file that is ready for burning onto a CD.
- Page 16 MIDI keyboard or sound module (real or virtual) connected to the computer through a MIDI interface. Audio from your MIDI instrument can be sent to an external mixer or monitored through the Mbox. MIDI sound module MIDI Input Selector MIDI Audio In the Mix window, click on the track’s MIDI...
- Page 17 Connect the MIDI instrument’s audio output to start recording from the beginning of the ses- to the appropriate inputs on your Mbox. sion. You can also record according to a selec- tion or from the cursor location in the Edit Choose File >...
- Page 18 Controlling Delay (Latency) During Monitoring Mbox and Pro Tools LE use your computer for Do one of the following: all audio processing, playback, and recording. • Mute the track you are recording on. This This causes a small amount of audio delay, or la- prevents you from hearing the delayed sig- tency.
- Page 19 Controlling Delay (Latency) During Monitoring...
Need help?
Do you have a question about the Mbox and is the answer not in the manual?
Questions and answers