DigiDesign Mbox 2 Getting Started Manual
Hide thumbs
Also See for Mbox 2:
- Getting started (90 pages) ,
- Getting started manual (34 pages) ,
- Basic manual (22 pages)
Table of Contents
Advertisement
Advertisement
Table of Contents

Subscribe to Our Youtube Channel
Related Manuals for DigiDesign Mbox 2


Summary of Contents for DigiDesign Mbox 2
-
Page 1: Getting Started
Getting Started Mbox ® Version 7.4... - Page 2 This equipment has been tested and found to comply with the limits for a Class B digital device, pursuant to Part 15 of the This guide is copyrighted ©2007 by Digidesign, a division of FCC Rules. Avid Technology, Inc. (hereafter “Digidesign”), with all rights reserved.
- Page 3 Any modifications to the unit, unless expressly approved by Digidesign, could void the user's authority to operate the equipment. Canadian Compliance Statement: This Class B digital apparatus complies with Canadian ICES- 003. Cet appareil numérique de la classe B est conforme à la norme NMB-003 du Canada.
-
Page 5: Table Of Contents
About www.digidesign.com ........ - Page 6 MIDI Patch Name Support..........62 Mbox 2 Getting Started Guide...
- Page 7 Before You Call Digidesign Technical Support ........
- Page 8 Mbox 2 Getting Started Guide...
-
Page 9: Chapter 1. Installation Quickstart
chapter 1 Installation QuickStart Windows Installation Mac Installation Overview Overview (Mac OS X Systems Only) (Windows Systems Only) Installation of the Mbox 2 on a Mac includes the following steps: Installing the Mbox 2 on a Windows computer includes the following steps: “Installing Pro Tools LE”... - Page 10 Mbox 2 Getting Started Guide...
-
Page 11: Chapter 2. Welcome To Mbox 2
24-bit analog-to-digi- • This Getting Started Guide, covering installa- tal and digital-to-analog converters. tion, configuration, and common tasks for your Pro Tools system. • USB connector cable • Digidesign Registration Information Card Chapter 2: Welcome to Mbox 2... -
Page 12: Mbox 2 Features
Mbox 2 will not function properly if con- nected to a passive USB hub. If you need to use a hub for other USB peripherals, use a powered hub or a separate dedicated USB port for Mbox 2 to function properly. Mbox 2 Getting Started Guide... -
Page 13: System Requirements
Hard Drive Requirements System Requirements For optimal audio recording and playback, all Mbox 2 can be used with a Digidesign-qualified Pro Tools systems require one or more Digide- Windows or Mac computer running sign-qualified drives. Pro Tools LE software. For a list of Digidesign-qualified hard drives,... -
Page 14: About The Pro Tools Guides
RTAS and AudioSuite plug-ins included with Pro Tools. Important Notices include information that could affect your data or the performance of • Digidesign Plug-ins Guide explains how to use your system. optional Digidesign plug-ins. • Pro Tools Shortcuts lists keyboard and Right- click shortcuts for Pro Tools. -
Page 15: About Www.digidesign.com
Development Partners and their plug-ins, applications, and hardware. News and Events Get the latest news from Digidesign; sign up for a Pro Tools demo. To learn more about these and other resources available from Digidesign, visit the Digidesign website (www.digidesign.com). - Page 16 Mbox 2 Getting Started Guide...
-
Page 17: Chapter 3. Installing Pro Tools On Windows
chapter 3 Installing Pro Tools on Windows This chapter contains information for Windows Connecting Mbox 2 and systems only. If you are installing Pro Tools on a Installing Pro Tools LE Mac computer, see Chapter 4, “Installing Pro Tools on Mac.” To install Pro Tools LE: Before installing this version of Pro Tools, Start Windows, logging in with Administrator... - Page 18 The Pro Tools Installer disc includes addi- Pro Tools, visit the compatibility pages of tional software for your system. For more the Digidesign website information, see “Additional Software on (www.digidesign.com). the Pro Tools Installer Disc” on page 11. Mbox 2 Getting Started Guide...
-
Page 19: Launching Pro Tools Le
Double-click the Pro Tools LE shortcut on Restart your computer. your desktop (or the application icon in the Pro Tools folder inside the Digidesign folder). If the USB LED on the front panel of the Mbox 2 does not illuminate after installa-... - Page 20 The Digidesign ASIO Driver and WaveDriver for Pro Tools Demo Session Mbox 2 are automatically installed when you The Pro Tools LE Installer disc includes a demo install Pro Tools. session that you can use to verify that your sys- tem is working.
-
Page 21: Uninstalling Pro Tools
From your DVD drive, locate and open the Ad- ditional Files/LE Session Templates Installer From the Currently Installed Programs list, se- folder. lect Digidesign Pro Tools. Double-click LE Session Templates Setup.exe. Click the Remove button. Follow the onscreen instructions. Follow the on-screen instructions to remove Pro Tools. - Page 22 Mbox 2 Getting Started Guide...
-
Page 23: Chapter 4. Installing Pro Tools On Mac
chapter 4 Installing Pro Tools on Mac This chapter contains information for Mac sys- Installing Pro Tools LE tems only. If you are installing Pro Tools on a Windows computer, see Chapter 3, “Installing After the Apple System software settings are con- Pro Tools on Windows.”... -
Page 24: Connecting Mbox 2 To The Computer
Mbox 2 to your computer. MIDI I/O Driver The MIDI I/O Driver is required if you are using the Digidesign MIDI I/O inter- To connect Mbox 2 to your computer: face. Connect the small end of the included USB ca- ble to the USB port on Mbox 2. -
Page 25: Launching Pro Tools Le
Pro Tools Installer disc (in the Additional Pro Tools folder inside the Digidesign folder). Files Folder). Enter the authorization code in the dialog For information on installing and configur-... -
Page 26: Uninstalling Pro Tools
DVD drive. From your DVD drive, locate and open the Ad- Clean Uninstall Removes all Pro Tools files, in- ditional Files/LE Session Templates Installer cluding system files, Digidesign plug-ins, and folder. MIDI patch names. Double-click LE Session Templates Setup.exe. Click Uninstall. -
Page 27: Chapter 5. Configuring Your Pro Tools System
chapter 5 Configuring Your Pro Tools System After you have connected your system and in- Shut down your Pro Tools system in this order: stalled Pro Tools software, you are ready to start Quit Pro Tools and any other running applica- up and configure your Pro Tools system. -
Page 28: Configuring Pro Tools Le
In addition to causing slower screen re- sponse and monitoring latency, higher Hardware Buffer Size settings can increase the latency caused by RTAS plug-ins, and affect the accuracy of plug-in automation, mute data, and MIDI track timing. Mbox 2 Getting Started Guide... - Page 29 To change the Hardware Buffer Size: • Depending on the importance of video and overall screen response, and on the density of Choose Setup > Playback Engine. automation being employed, try different From the H/W Buffer Size pop-up menu, select combinations of RTAS Processing and CPU the audio buffer size, in samples.
- Page 30 The DAE Playback Buffer Size determines the amount of memory DAE allocates for disk buff- Click OK. ers. The buffer size is shown in milliseconds, which indicates the amount of audio buffered when the system reads from disk. Mbox 2 Getting Started Guide...
- Page 31 The optimum DAE Playback Buffer Size for most Cache Size disk operations is 1500 msec (Level 2). The Cache Size determines the amount of mem- • DAE Playback Buffer Size settings lower than ory DAE allocates to pre-buffer audio for play- 1500 msec (Level 2) may improve playback and back and looping when using Elastic Audio.
- Page 32 The default setting of 250 ms (Level 2) is recommended unless you are experiencing problems with the audio quality of sample playback. Mbox 2 Getting Started Guide...
- Page 33 Default Sample Rate To select the Clock Source: Choose Setup > Hardware. The Sample Rate setting appears as the default sample rate when you create a new session. Choose the clock source from the Clock (This setting is available in the Hardware Setup Source pop-up menu.
-
Page 34: Optimizing A Windows System For Pro Tools
DMA mode by default. problems. To enable DMA for any IDE hard drives (Windows XP): Choose Start > Control Panel. Double-click System. Click the Hardware tab. Under Device Manager, choose Device Man- ager. Mbox 2 Getting Started Guide... - Page 35 In the Device Manager window, double-click Disabling ClearType Font Smoothing IDE ATA/ATAPI controllers, then double-click the When using Pro Tools, the Effects “Clear Type” Primary IDE Channel for your IDE hard drive. setting must be disabled. Click the Advanced Settings tab. To disable ClearType font smoothing For each device, set the Transfer Mode to “DMA (Windows XP):...
- Page 36 Deselect Load Startup Items and click OK. Under the Performance section, click the Set- Click Restart to restart the computer. tings button. In the Performance Options window, click the Advanced tab. Under the Processor Scheduling section, select the Background Services option. Mbox 2 Getting Started Guide...
-
Page 37: Optimizing A Mac System For Pro Tools
For details on qualified versions of Mac OS, folders in the background, affecting system per- refer to the latest compatibility information formance. It is recommended that you disable on the Digidesign website (www.digide- Spotlight indexing before using Pro Tools. sign.com). Disabling Spotlight indexing will cause the Find function in Mac OS X to no longer work. - Page 38 Pro Tools, this shortcut must be dis- abled. To disable the Dashboard keyboard shortcut: Choose System Preferences from the Apple menu and click Dashboard and Exposé. Set the Dashboard keyboard shortcut to “–” to disable the shortcut. Mbox 2 Getting Started Guide...
-
Page 39: Chapter 6. Mbox 2 Hardware Overview
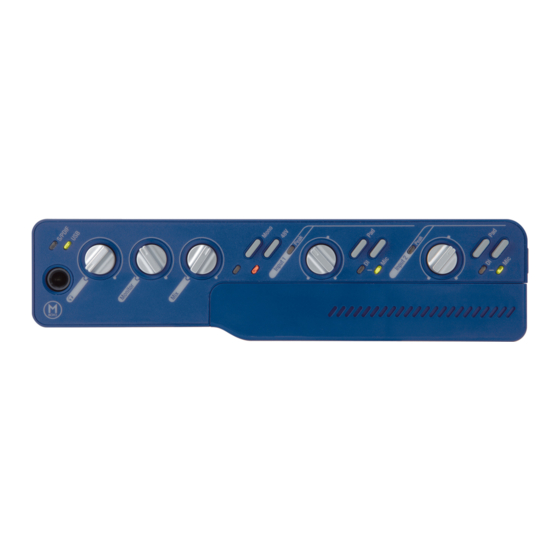
chapter 6 Mbox 2 Hardware Overview Mbox 2 Front Panel Features The Mbox 2 front panel has the following features: Input 2 Input 1 Headphone Monitor Level Level (Ratio) S/PDIF Source Source Gain Gain selector selector Mono Peak Peak Headphone Output Mono 48V Mic/DI LEDs... - Page 40 This ability to blend and control the relative lev- relationships with the Mono switch can also as- els of Pro Tools playback and latency-free live sist you in finding the optimal microphone analog inputs can be particularly effective when placement. overdubbing. Mbox 2 Getting Started Guide...
-
Page 41: Peak Leds
48V Switch and LED Pad Switches and LEDs Phantom power is activated by the switch la- The Pad switches engage a –20 dB pad on their beled 48V on the front panel of Mbox 2. The corresponding input channels. When engaged, LED, when lit, indicates that 48V phantom the Pad LEDs light. -
Page 42: Mbox 2 Back Panel Features
Pro Tools LE. MIDI I/O The S/PDIF output channels always mirror the The MIDI In and MIDI Out ports are standard 5- main outs 1–2. pin MIDI ports, each providing 16 channels of MIDI input and output. Mbox 2 Getting Started Guide... - Page 43 Mon Out (Monitor Output) Source 2 is at the far left (when looking at the back panel), and Source 1 is to its right. The back These outputs support balanced TRS, or unbal- panel inputs for Source 1 and Source 2 are lo- anced TS, 1/4-inch connections.
- Page 44 Mbox 2 Getting Started Guide...
-
Page 45: Chapter 7. Making Hardware Connections
chapter 7 Making Hardware Connections To hear audio recorded into a Pro Tools session, Connecting a Sound System you will need to connect headphones or an ex- ternal sound system (such as powered monitors The monitor outputs on the back of the Mbox 2 or a home stereo) to Mbox 2. -
Page 46: Connecting A Recorder For Mixdowns
S/PDIF In and S/PDIF Out RCA ports on the back of Mbox 2 When recording from Pro Tools to a digital device, make sure the Pro Tools Clock Source setting is set to Internal clock mode. Mbox 2 Getting Started Guide... -
Page 47: Connecting A Microphone
Each Input section has three analog input jacks: XLR connector Mic For XLR microphone cables. Line (TRS) For 1/4-inch Tip-Ring-Sleeve cables from keyboards, mixers, microphones, and other line sources. 1/4-inch connector DI For 1/4-inch Tip-Sleeve cables from guitar, XLR and 1/4-inch connectors bass, microphones, or similar sources. - Page 48 Gain control to the right to increase the input level of your microphone signal. If the incoming signal is too loud, press the Pad switch to engage the 20 dB pad. Input 1 Source selector and LEDs Mbox 2 Getting Started Guide...
-
Page 49: Connecting Instruments To The Mbox 2
Using a Mic that Has a 1/4-Inch If the incoming signal is too loud, press the Pad switch to engage the 20 dB pad. Connector To use a microphone that has a 1/4-inch TS (Tip-Sleeve) connector: Connecting Instruments to On the back of the Mbox 2, plug the 1/4-inch the Mbox 2 connector from your microphone into one of Mbox 2 provides two input types (DI and Line) - Page 50 Mbox 2. On the front of the Mbox 2, turn the Mix con- trol fully left to Input. Mix control Mic/DI selector Input 1 Gain (level) control Source selector and Gain control for Input 1 Mbox 2 Getting Started Guide...
-
Page 51: Midi Connections
Set your instrument’s volume to its optimal Using S/PDIF Input level. For example, the optimal level for most keyboards is between 80% and 100% of maxi- To configure Pro Tools to record from a S/PDIF device: mum volume. Choose Setups > Hardware Setup. On the front of the Mbox 2, carefully turn the Gain control to the right to increase the input Choose S/PDIF from the Clock Source selector. - Page 52 To connect your MIDI instrument for monitoring in Pro Tools: Connect the MIDI instrument’s audio output to a Line (TRS) input on your Mbox 2. Input 2 Input 1 (right channel) (left channel) Mbox 2 connections for line-level stereo input source Mbox 2 Getting Started Guide...
-
Page 53: Chapter 8. Common Tasks With Pro Tools Le
chapter 8 Common Tasks with Pro Tools LE This chapter is designed to give new users spe- Recording a Pro Tools Session cific methods for accomplishing common tasks with your Pro Tools system. Before you record with Pro Tools LE, you first create a Pro Tools session, then prepare an audio For the most complete information on using track for recording. - Page 54 Creating a stereo track in Pro Tools will not make a mono instrument into a stereo in- strument. If a mono instrument is recorded on a stereo track, one of the sides of the ste- reo track will show no signal. Mbox 2 Getting Started Guide...
-
Page 55: Importing Audio From A Cd
To record an audio track: To play back a recorded track: Click the track’s Record Enable button. If the track’s Record Enable button is lit, click on it to take it out of Record mode. Click Play in the Transport window or press the Spacebar to start playback. -
Page 56: Creating An Audio Cd From A Pro Tools Session
Click Play in the Transport window to begin playback. Session audio selected and ready to bounce Click Stop in the Transport window or press the Spacebar to stop playback. Choose File > Bounce to > Disk. Mbox 2 Getting Started Guide... - Page 57 Choose “Convert after Bounce,” and click Bounce. Choosing Bounce to Disk from the File menu In the Bounce Options dialog, choose Analog 1–2 as the Bounce Source. Choose WAV (BWF) for the File Type. Bounce options for creating CD burnable tracks Choose Stereo Interleaved for the Format.
-
Page 58: Recording Midi In A Pro Tools Session
To record or playback tracks using MIDI data, your Pro Tools system must be config- ured for MIDI. See Appendix A, “Configuring MIDI Studio Setup (Windows Only)” or Appendix B, “Configuring AMS (Mac OS X Only).” Mbox 2 Getting Started Guide... - Page 59 To create an Instrument track and configure it for Do one of the following, depending on the recording: type of instrument you are using: • If you are using an instrument plug-in, Choose Setup > MIDI > Input Devices and make click an Insert selector and insert the plug- sure your input device is selected in the MIDI In- in on the Instrument track.
- Page 60 In the Mix Window, click the track’s Record Enable button to enable the Instrument track for MIDI recording. Track Record Enable button Enabling an Instrument track for MIDI recording Make sure Options > MIDI Thru is selected. Mbox 2 Getting Started Guide...
- Page 61 To record MIDI on the Instrument track: To play back recorded MIDI data: Verify that the Instrument track you want to Click the track’s Record Enable button to take record to is record-enabled and receiving MIDI. the Instrument track out of Record mode. In the Transport window, click Return to Zero In the Transport window, click Return to Zero to start recording from the beginning of the ses-...
- Page 62 Mbox 2 Getting Started Guide...
-
Page 63: Appendix A. Configuring Midi Studio Setup (Windows Only)
appendix a Configuring MIDI Studio Setup (Windows Only) MIDI Studio Setup Window MIDI Studio Setup The MIDI Studio Setup window is organized MIDI Studio Setup (MSS) lets you configure the into three sections. Interface controls are at the MIDI controllers and sound modules that are top of the window. - Page 64 When a previously defined instrument is se- For more information, see “MIDI Patch lected in the Instrument list, the Properties sec- Name Support” on page 57. tion changes to reflect the properties of the se- lected instrument. Mbox 2 Getting Started Guide...
-
Page 65: Midi Patch Name Support
Program Files\ port through which MIDI data is sent from the Common Files\Digidesign\MIDI Patch Names\ external MIDI device specified in the Instru- Digidesign. ment Name field into your MIDI interface. - Page 66 Patch Select dialog ware to create your own custom patch names. In the Open dialog, navigate to Program Files\Common Files\Digidesign\MIDI Patch Names\Digidesign\<name of manufacturer>, and select the MIDI Patch Name file (.midnam) for the MIDI device. Mbox 2 Getting Started Guide...
-
Page 67: Appendix B. Configuring Ams (Mac Os X Only)
appendix b Configuring AMS (Mac OS X Only) Click MIDI Devices. AMS scans your system Audio MIDI Setup for connected MIDI interfaces. If your MIDI in- terface is properly connected, it appears in the Pro Tools recognizes the ports on your MIDI in- window with each of its ports numbered. - Page 68 Repeat steps 3–6 for each MIDI device in your TextEdit). MIDI setup. To configure an external MIDI device: Select the external device icon and click Show Info (or double-click the new device icon). External Device Icon Mbox 2 Getting Started Guide...
- Page 69 Click the More Properties arrow to expand the Click the device image. The window expands dialog, then enable the appropriate MIDI chan- to show images for various MIDI devices (such nels (1–16) for the Transmits and Receives op- as keyboards, modules, interfaces, and mixers). tions.
-
Page 70: Midi Patch Name Support
MIDI patch name files (.midnam) can be edited in any text editor, or you can use third-party patch librarian and editor soft- ware to create your own custom patch names. Patch Select button, Mix window Mbox 2 Getting Started Guide... -
Page 71: Appendix C. Hard Drive Configuration And Maintenance
Beat Detective in a session. For complete hard drive requirements, see the Digidesign website (www.digidesign.com). Hard Drive Configuration and Maintenance... -
Page 72: Formatting An Audio Drive
Format. • In the Format window, name the volume. For complete information on track count with • Choose a file system. For optimum perfor- internal drives, refer to the Digidesign website mance, audio drives should be formatted as (www.digidesign.com). NTFS. - Page 73 • In the New Partition Wizard window, click Next. • When prompted, select the partition type. Digidesign recommends using Primary par- titions, instead of Extended partitions. • Follow the on-screen instructions to select a partition size and other partition settings.
-
Page 74: Partitioning Drives
Avoid distributing audio files within a ses- sion over different partitions on the same On Windows, to avoid fragmentation, for- drive since this will adversely affect drive mat drives with higher cluster sizes (such as performance. 32K). Mbox 2 Getting Started Guide... - Page 75 Optimizing (Defragmenting) Drives Defragmenting Windows Audio Drives To prevent fragmentation, you can optimize To defragment an audio drive (Windows Vista): your drive, which rearranges your files into a Choose Start > Control Panel. contiguous format. Most optimizing software lets you run a check on a drive to find out the Click System and Maintenance.
-
Page 76: Using Mac Drives On Windows Systems
24 mono tracks, 60 minutes 7 GB 7.8 GB 10.5 GB 11.6 GB 32 mono tracks, 5 minutes 800 MB 883 MB 1.2 GB 1.3 GB 32 mono tracks, 60 minutes 9.4 GB 10.4 GB 14 GB 15.4 GB Mbox 2 Getting Started Guide... -
Page 77: Appendix D. Troubleshooting
appendix d Troubleshooting Backing Up Your System Backing Up Your Work Configuration It is highly recommended that you back up your After configuring your system and Pro Tools, work on a regular basis, and especially before you should save an image of your system drive making changes to your system configuration. -
Page 78: Common Issues
Pro Tools. Power Saver Features Some automatic power saver features, such as those that spin down the system hard drive, can affect Pro Tools perfor- mance. These features should be turned off. Mbox 2 Getting Started Guide... -
Page 79: Before You Call Digidesign Technical Support
Gather Important Information Before You Call Digidesign Digidesign wants to help you resolve problems Technical Support as quickly and efficiently as possible. If you have the following information handy when you Register Your System contact Technical Support, it will make the diag- nosis of your problem easier. - Page 80 Note any DAE errors or other error codes you en- counter. Additonally, note the ability to repro- duce the problem under different conditions, for example, with another session, or after changing settings (such as the Hardware Buffer Size). Mbox 2 Getting Started Guide...
-
Page 81: Index
index ASIO driver (Windows) 12 Energy Saver (Mac), turning off 29 audio digital connections 43 audio drivers FireWire requirements 64 ASIO driver (Windows) 12 CoreAudio driver (Mac) 17 WaveDriver (Windows) 12 gain Audio MIDI Setup (AMS) (Macintosh) 59 headphones 32 authorizing Pro Tools LE input 33 Mac 17... - Page 82 5 installing (Windows) 9 setup (Macintosh) 59 setup (Windows) 55 processor performance (Mac) 29 MIDI Input Selector 51 Processor Scheduling performance (Windows) 28 MIDI Studio Setup (MSS) (Windows) 55 mix control (Mbox 2) 32 Mbox 2 Getting Started Guide...
- Page 83 system settings Cache Size 23 QuickTime Clock Source 25 installing (Windows) 10 CPU Usage Limit 22 DAE Playback Buffer Size 22 Hardware Buffer Size 20 ratio control (Mbox 2) 32 I/O Setup 25 recording Plug-in Streaming Buffer 24 digital inputs 43 Plug-in Streaming Buffer Size 24 registration information 5 Sample Rate 25...
- Page 84 DIGIDESIGN TECHNICAL SUPPORT (USA) PRODUCT INFORMATION (USA) INTERNATIONAL OFFICES Visit the Digidesign website 2001 Junipero Serra Boulevard Tel: 650.731.6100 Tel: 800.333.2137 for contact information Daly City, CA 94014-3886 USA Fax: 650.731.6384 Tel: 650.731.6300 Fax: 650.731.6399...
Need help?
Do you have a question about the Mbox 2 and is the answer not in the manual?
Questions and answers