
Related Manuals for Telycam TLC-700-S


Summary of Contents for Telycam TLC-700-S
- Page 1 All manuals and user guides at all-guides.com TLC-700-S HD PTZ Video Camera User Manual Version V1.0 (English)...
-
Page 2: Table Of Contents
All manuals and user guides at all-guides.com CONTENTS SAFETY GUIDES..............................1 ACCESSORIES..............................2 QUICK START..............................2 PRODUCT HIGHLIGHTS..........................3 CAMERA SPEC..............................3 CAMERA INTERFACE............................4 CAMERA DIMENSION............................4 IR REMOTE CONTROLLER..........................5 VISCA IN (RS232) PORT...........................7 SERIAL PORT CONFIGURATION........................8 VISCA PROTOCOL............................8 PELCO-D PROTOCOL.............................15 PELCO-P PROTOCOL.............................16 OSD MENU..............................17 IR TRANSFER(IR PASS)..........................19... - Page 3 All manuals and user guides at all-guides.com...
-
Page 4: Safety Guides
All manuals and user guides at all-guides.com SAFETY GUIDES 1.Before operation, please fully read and follow all instructions in the manual. For your safety, always keep this manual with the camera. 2.The camera power input range is 100-240VAC(50-60Hz),ensure the power supply input within this rate before powering on. -
Page 5: Accessories
All manuals and user guides at all-guides.com ACCESSORIES Check all bellow items when open the package: Camera · · · · · · · · · · · · · · · · · · · · · · · · · · · · · · · · · · · · · · · · · · · · · · · · · · · · · · · · · · · · · · · · · · · · · · · · 1 Power Adapter ·... -
Page 6: Product Highlights
All manuals and user guides at all-guides.com PRODUCT HIGHLIGHTS 1. Fashionable and smart design, with advanced DSP and 20x optical lens, provides ultra crystal image quality. 2. Fast switching between different video format. 3. Fast and accurate focus. 4. Support remote firmware update. 5.Daisy chain function: with both Visca in and Visca out port, max 8 cameras can be controlled by RS232 port at Visca protocol. -
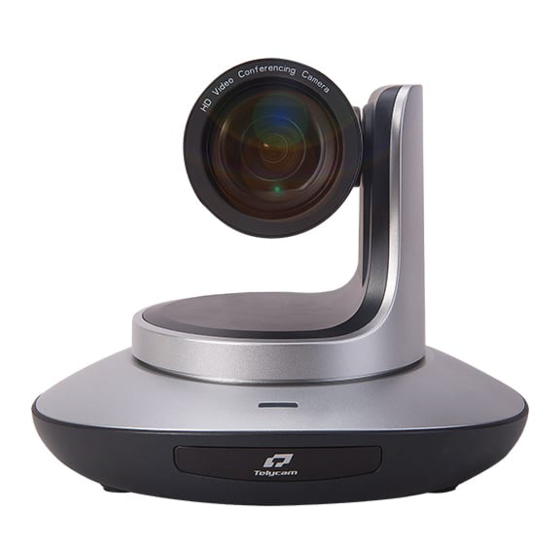
Page 7: Camera Interface
All manuals and user guides at all-guides.com CAMERA INTERFACE 1.Camera Lens 5.Dial Switch 9.VISCA OUT port 2.Camera Base 6. Tripod Screw Hole 10.CVBS port 3.IR Receiver Panel 7. Installation Hole 11.HD-SDI port 4.Power Indicator Light 8.VISCA IN port 12. DVI-I port 5.Power Input 12VDC 14. -
Page 8: Ir Remote Controller
All manuals and user guides at all-guides.com IR REMOTE CONTROLLER POWER Under normal working mode, short press POWER key, the camera will enter stand by mode; Press it again, the camera will do self-configuration, then go back to HOME position. It will go to preset position if power on model has been set before. - Page 9 All manuals and user guides at all-guides.com FOCUS KEY( ON THE LEFT) Manual focus, only valid under manual focus model. ZOOM KEY( ON THE RIGHT SIDE) Set the zoom rate NAVIGATE KEY: UP/DOWN/LEFT/RIGHT Under working mode, use navigate key to set the pan tilt, and select menu when enter OSD.
-
Page 10: Visca In (Rs232 Port
All manuals and user guides at all-guides.com VISCA IN (RS232 PORT) Function VISCA IN &RS485 Connection Camera VISCA IN RS485 A(+) A(+) IR OUT B(-) B(-) IR OUT VISCA IN &Mini DIN Connection Camera VISCA IN Mini DIN VISCA IN & DB9 Connection Camera VISCA IN Windows DB-9 A(+) -
Page 11: Serial Port Configuration
All manuals and user guides at all-guides.com SERIAL PORT CONFIGURATION Parameter Value Parameter Value Baud rate 2400/4800/9600/115200 Stop Bit 1bit Start Bit 1 bit Check Bit None Date Bit 8 bit VISCA PROTOCOL Part1 Camera Return Command Ack/Completion Message Command Packet Note z0 41 FF Returned when the command is accepted. - Page 12 All manuals and user guides at all-guides.com Command Funnation Command Packet Note Direct 8x 01 04 48 0p 0q 0r 0s FF pqrs: Focus Position One Push AF 8x 01 04 18 01 FF pqrs: Zoom Position (0(wide)~ 8x 01 04 47 0p 0q 0r 0s CAM_ZoomFocus Direct 0x4000(tele))
- Page 13 All manuals and user guides at all-guides.com Command Funnation Command Packet Note Direct 8x 01 04 0C 00 00 0p 0q FF pq: Gain Positon (0~0x0E) Reset 8x 01 04 0D 00 FF 8x 01 04 0D 02 FF Bright Setting CAM_Bright Down 8x 01 04 0D 03 FF...
- Page 14 All manuals and user guides at all-guides.com Command Funnation Command Packet Note Preset Freeze Off 81 01 04 62 23 FF Freeze Off When Running Preset pp: 0~9 Video format 0:1080P60 1:1080P50 2:1080I60 3:1080I50 VideoSystem Set 8x 01 06 35 00 pp FF 4:1080P30 5:1080P25 6:720P60...
- Page 15 All manuals and user guides at all-guides.com PART 3 INQUIRY COMMAND Command Command Packet Return Packet Note y0 50 02 FF CAM_PowerInq 8x 09 04 00 FF y0 50 03 FF Off(Standby) CAM_ZoomPosInq 8x 09 04 47 FF y0 50 0p 0q 0r 0s FF pqrs: Zoom Position y0 50 02 FF Auto Focus...
- Page 16 All manuals and user guides at all-guides.com y0 07 7D 01 04 07 FF Zoom tele/wide y0 07 7D 01 04 38 FF AF On/Off y0 07 7D 01 04 33 FF CAM_Backlight y0 07 7D 01 04 3F FF CAM_Memory y0 07 7D 01 06 01 FF Pan_tiltDrive...
- Page 17 All manuals and user guides at all-guides.com VISCA EXPOSURE VALUE 1/10000 close 1/6000 1/4000 1/3000 1/2000 1/1500 1/1000 1/725 1/500 f9.6 Iris 1/350 f6.8 1/250 f5.6 Shutter speed 1/180 f4.8 1/125 f4.0 1/100 f3.4 1/90 f2.8 1/60 f2.4 1/30 f2.0 1/15 f1.8 16dB...
-
Page 18: Pelco-D Protocol
All manuals and user guides at all-guides.com 0x3C47 0x3D25 0x3DDF 0x3E7B 0x3EFB 0x3F64 0x3FBA x20(tele) 0x4000 PELCO-D PROTOCOL Function Byte1 Byte2 Byte3 Byte4 Byte5 Byte6 Byte7 0xFF Address 0x00 0x08 Pan Speed Tilt Speed Down 0xFF Address 0x00 0x10 Pan Speed Tilt Speed Left 0xFF... -
Page 19: Pelco-P Protocol
All manuals and user guides at all-guides.com PELCO-P PROTOCOL Function Byte1 Byte2 Byte3 Byte4 Byte5 Byte6 Byte7 Byte8 0xA0 Address 0x00 0x08 Pan Speed Tilt Speed 0xAF Down 0xA0 Address 0x00 0x10 Pan Speed Tilt Speed 0xAF Left 0xA0 Address 0x00 0x04 Pan Speed... -
Page 20: Osd Menu
All manuals and user guides at all-guides.com OSD MENU 1.Under working mode, press the MENU key on the IR remote controller, to enter the OSD menu as bellow: 2.After enter the main menu, use the navigate UP/DOWN key to select the main menu. Once been selected, the main menu will change to blue background, and the right side will show all sub menu options . - Page 21 All manuals and user guides at all-guides.com GAIN Gain setting:0dB~28dB , only valid under manual mode BRIGHT Bright setting:0~15, only valid under bright priority mode. EC MODE Exposure compensation ON/FF EC POSI Set exposure compensation lever Back light compensation ON/FF White Balance:AUTO 、...
-
Page 22: Ir Transfer(Ir Pass)
All manuals and user guides at all-guides.com 1080P60 1080P25 1080P50 720P60 VIDEO Once selected, press OK key to 1080I60 720P50 FORMAT confirm. 1080I50 720P30 1080P30 720P25 SYS RESET System reset CAM RESET Camera reset RESET PT RESET Pan tilt reset ALL RESET All reset IR ADDR... - Page 23 All manuals and user guides at all-guides.com...
Need help?
Do you have a question about the TLC-700-S and is the answer not in the manual?
Questions and answers