Advertisement
Attention
The indoor stations have to be (de-)installed only voltage-free!
The table rack is pre-confi gured and has to be connected to a RJ45 socket. Therefore, please note the connection diagram under "cable
assignment"!
(1)
(3)
(2)
(4)
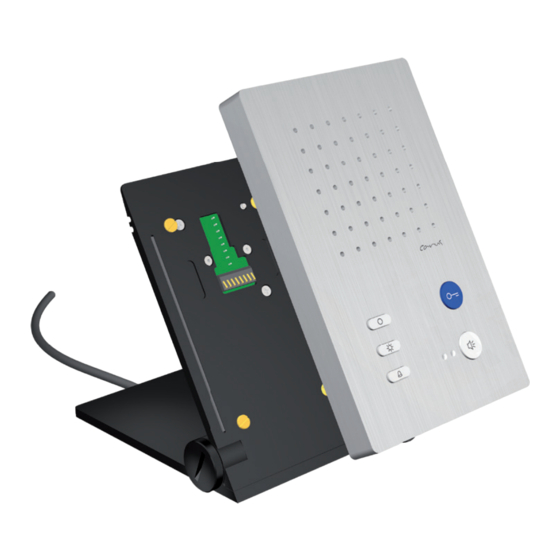
Set up the table rack
Turn the table rack into the desired position and fi x the position by tightening the knurled screws by hand.
max. 60°
Assembly instruction
CAI 1010
(1) adapter plate
(2) lock pins (4x)
(3) connecting cable (2.5 m)
(4) knurled screws
(5) grub screw / hexagonal socket
Connection terminal UAE socket with 8 pins
8 7 5 4 6 3 2 1 S
ET
Cable assignment
wires
plug PIN no.
2
3
a
b
4
P
5
Cable is already pre-installed.
connect to
connection terminal
orange
a
green/white
b
blue
E
blue/white
P
(5)
Advertisement
Table of Contents

Related Manuals for Carus CAI 1010


Summary of Contents for Carus CAI 1010
- Page 1 Assembly instruction CAI 1010 Attention The indoor stations have to be (de-)installed only voltage-free! The table rack is pre-confi gured and has to be connected to a RJ45 socket. Therefore, please note the connection diagram under “cable assignment“! (1) adapter plate (2) lock pins (4x) (3) connecting cable (2.5 m)
- Page 2 Loosen the grub screw for deinstalling the device. Take the device into both hands. Push the device upwards (3) and pull it off towards you (4). grub screw lock pins (4x) www.carus-concepts.com - Art. no. 0035874 Version 1 A -...
Need help?
Do you have a question about the CAI 1010 and is the answer not in the manual?
Questions and answers