
Related Manuals for ETEKCITY MSR-A600


Summary of Contents for ETEKCITY MSR-A600
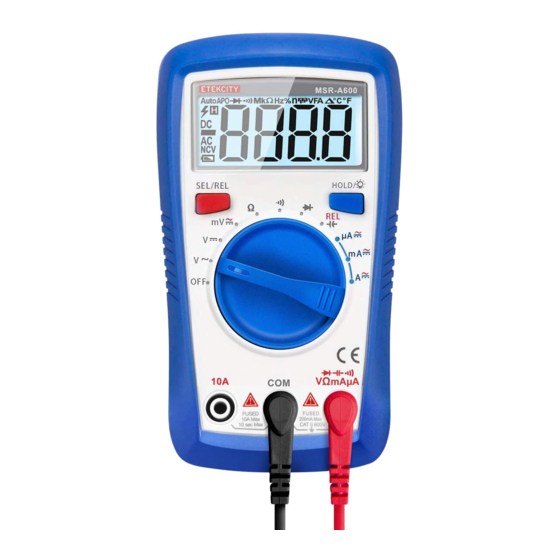
- Page 1 Digital Multimeter Model No.: MSR-A600 Questions or Concerns? support@etekcity.com • (855) 686-3835...
- Page 2 Thank You! Thank you for purchasing the MSR-A600 Digital Multimeter by Etekcity. We are dedicated to providing our customers with quality products for building on better living. Should you have any questions or concerns about using your new product, feel free to reach out to our helpful Customer Support team at support@etekcity.com.
-
Page 3: Table Of Contents
Table of Contents Package Contents Package Contents 1 x MSR-A600 Digital Multimeter Safety Information 2 x Test Leads • International Electrical 2 x 1.5V AAA Batteries (Pre-installed) Symbols 1 x User Manual Function Diagram Rotary Switch Button Functions LCD Screen Symbols... -
Page 4: Safety Information
Safety Information This multimeter complies with the standards WARNING IEC61010: in pollution degree 2, overvoltage category (CAT. II 600V), and double insulation. • Please read and follow all of the instructions and warnings in this Use the multimeter only as instructed in manual before using the product. -
Page 5: International Electrical Symbols
• DO NOT use the multimeter if it is damaged International Electrical Symbols or if any part of the case is removed. Always inspect all parts of the multimeter, the case, AC or DC and the test leads before each use. •... -
Page 6: Function Diagram
Function Diagram LCD Screen Selection/Relative Mode Button Hold/Backlight Button Rotary Switch Terminal COM Terminal Terminal... -
Page 7: Rotary Switch
Rotary Switch Button Functions The table below briefly describes each of the / Current Measurement: rotary positions (see the Operation section for Press once to switch to the further details, pages 10–15). alternate function. Multimeter is Off Capacitance Test SEL/REL Press once to switch to the AC Voltage Measurement Relative Mode, which removes... -
Page 8: Lcd Screen Symbols
LCD Screen Symbols Symbol Description Symbol Description Auto range mode. The multimeter Megaohm: 1 x 10^6 or 1,000,000 will automatically select the ohms. range with the best resolution. Volts: the unit of voltage Auto power-off Millivolt: 1 x 10^-3 or 0.001 volts Data hold is active Amperes (amps): the unit of current... -
Page 9: Before First Use
Before First Use • When setting up the multimeter, connect the black test lead before connecting the red test lead. To disconnect, take out the red test lead before removing the black test lead. • Inspect the test leads for damaged insulation or exposed metal parts. -
Page 10: Operation
Operation Voltage Measurement ii. AC or DC Measurement 1. Insert the black test lead into the COM red test lead terminal, and the into the WARNING terminal. 2. Turn the rotary dial to DO NOT measure voltages higher than 600V. Doing so may result in electric Note: The default function is DC. -
Page 11: Resistance Testing
Resistance Testing • If the resistance reading with the WARNING connected test leads is not ≤ 0.5Ω, check if the leads are loose or damaged. To avoid damaging the multimeter or • The maximum resistance rating for the the object being measured, ALWAYS multimeter is 200MΩ. -
Page 12: Continuity Testing
Continuity Testing Diode Testing WARNING WARNING To avoid damaging the multimeter or To avoid damaging the multimeter or the object being measured, ALWAYS the object being measured, ALWAYS disconnect the circuit power and disconnect the circuit power and discharge all high-voltage capacitors discharge all high-voltage capacitors before testing for continuity. -
Page 13: Capacitance Testing
Capacitance Testing Connect the test leads to the capacitor. WARNING The negative end is often marked on the side of the capacitor. Hold the test leads A capacitor stores an electrical charge until the reading on the display stabilizes. and may still be energized after being removed. -
Page 14: Dc And Ac Current Measurement
DC and AC Current Measurement Series WARNING • Before measuring current, ALWAYS make sure the power supply for the circuit has been switched off. Check if the leads are connected to the correct input terminals and that the rotary switch has been turned to the correct measurement range. - Page 15 Note: If the display only reads “ 0.0 ” when Turn off power to the circuit and discharge all high-voltage capacitors. measuring current using the Insert the black test lead into the COM Terminal, it means that the 200mA fuse terminal.
-
Page 16: Maintenance
Maintenance General Maintenance Using a small screwdriver, remove the screw securing the battery compartment • Regularly use a dry cloth to dust the cover on the back of the multimeter. protective case and multimeter interface. [Figure 5.1 on next page] •... -
Page 17: Checking The Fuses
Checking the Fuses 10A Fuse Always check the 10A fuse before each use, especially before measuring current. If the internal fuse is overloaded, you must immediately replace it. Plug the red test lead into the 1.5V AAA battery terminal. Turn the rotary dial to Insert the metal end of the red test lead into the... -
Page 18: Replacing The Fuses
Replacing the Fuses WARNING To avoid electrical shock, arc blasts, arc flashes, personal injury, or damage to the multimeter, use the specified fuses ONLY in accordance with the following procedure. Disconnect the test leads from the multimeter and turn the rotary switch to Carefully remove the rubber case from the multimeter. -
Page 19: Specifications
Specifications General Specifications Maximum Voltage 600V Maximum Overload Protection 600V rms (AC or DC) Measurement Speed 2~3 times/second Fused Protection VΩmAµA Terminal: 200mA 10A Terminal: 10A Operating: 32° – ±104°F (0°C – ±40°C) Temperature Storage: 14° – ±122°F (-10° – ±50°C) ≤... -
Page 20: Accuracy Specifications
Accuracy Specifications Note: i. DC Voltage • The following specifications are based on testing the multimeter in an environmental Range Resolution Accuracy temperature range of 64.4°–82.4°F ± (0.7%+3) (18°–28°C). If the temperature is out of 200.0mV 0.1mV this range, it is required to multiply the ±... - Page 21 ii. AC Voltage iii. Resistance Range Resolution Accuracy Range Resolution Accuracy ± (1.0%+2) ± (1.0%+2) 200.0mV 0.1mV 200.0Ω 0.1Ω ± (0.7%+3) 2.000V 0.001V 2000Ω 1Ω ± (1.0%+3) ± (0.8%+2) 20.00V 0.01V 20.00KΩ 0.01KΩ 200.0V 0.1V 200.0KΩ 0.1KΩ ± (1.2%+3) ± (1.2%+5) 600V 20.00MΩ...
- Page 22 Accuracy Specifications (cont.) iv. Continuity & Diode v. Capacitance Range Resolution Accuracy Range Resolution Accuracy Under REL If the measured 2.000nF 0.001nF mode ± (4%+10) resistance is greater than 50Ω, the 20.00nF 0.01nF multimeter will read ± (3%+10) the circuit as open, 200.0nF 0.1nF and the buzzer will...
- Page 23 vi. DC Current vii. AC Current Range Resolution Accuracy Range Resolution Accuracy 200.0μA 0.1μA 200.0μA 0.1μA 2000μA 1μA 2000μA 1μA ± (1.0%+2) ± (1.2%+3) 20.00mA 0.01mA 20.00mA 0.01mA 200.0mA 0.1mA 200.0mA 0.1mA 2.000A 0.001A 2.000A 0.001A ± (1.2%+5) ± (1.5%+5) 10.000A 0.01A 10.000A...
-
Page 24: Warranty Information
TERMS & POLICY • Damage in return transit. • Unsupervised use by children under 18 Etekcity warrants all products to be of the highest years of age. quality in material, craftsmanship, and service effective from the date of purchase to the end of Etekcity and its subsidiaries assume no liability the warranty period. -
Page 25: Customer Support
Additional 1-Year Warranty Your satisfaction is our goal! You can extend your 1-year warranty by an additional year. Log onto www.etekcity.com/warranty and enter your order CUSTOMER SUPPORT number (e.g., from Amazon or Houzz) within the Etekcity Corporation first 14 days of your purchase to register your new 1202 N. - Page 27 Connect with us @Etekcity...
- Page 28 Building on better living. AL0518BFV1.3US...
Need help?
Do you have a question about the MSR-A600 and is the answer not in the manual?
Questions and answers