
Related Manuals for Hioki 9754


Summary of Contents for Hioki 9754
- Page 1 9754 Instruction Manual CLAMP ON NOISE SENSOR May 2015 Revised edition 3 9754A981-03 15-05H...
-
Page 3: Table Of Contents
Contents Contents Introduction ............... 1 Verifying Package Contents........1 Safety Information ............. 2 Operating Precautions ..........4 Chapter 1 Overview Product Overview ........9 Names and Functions of Parts ....10 Chapter 2 Measurement Measurement Procedure ......13 Disconnecting the NOISE SENSOR ..15 When Connecting to Instruments other than the 3145-20 ........ - Page 4 Contents...
-
Page 5: Introduction
Introduction Thank you for purchasing the HIOKI "Model 9754 CLAMP ON NOISE SENSOR." To obtain maximum performance from the instrument, please read this manual first, and keep it handy for future reference. This device is a sensor for use with a 3145-20 NOISE HiLOG- GER. -
Page 6: Safety Information
Safety Information This instrument is designed to comply with IEC 61010 Safety Standards, and has been thoroughly tested for safety prior to ship- ment. However, mishandling during use could result in injury or death, as well as damage to the instrument. Be certain that you understand the instructions and precau- tions in the manual before use. - Page 7 The following symbols in this manual indicate the relative impor- tance of cautions and warnings. Indicates that incorrect operation presents an extreme hazard that could result in serious injury or death to the user. Indicates that incorrect operation presents a significant hazard that could result in serious injury or death to the user.
-
Page 8: Operating Precautions
Operating Precautions Preliminary Checks Before using the instrument the first time, verify that it operates normally to ensure that the no damage occurred during storage or shipping. If you find any damage, contact your dealer or Hioki representative. Operating Environment ... - Page 9 Exposed to high Subject to vibra- levels of particu- tion late dust Handling the Instrument • To avoid damage to the instrument, protect it from physical shock when transporting and han- dling. Be especially careful to avoid physical shock from dropping.Be especially careful to avoid physical shock from dropping.
-
Page 11: Chapter 1 Overview
1.1 Product Overview Chapter 1 Overview 1.1 Product Overview This device is a current sensor for use with the 3145-20 NOISE HiLOGGER. By simply clamping onto the conductor to be mea- sured one can easily monitor noise current levels. It can also be connected to the measuring instruments of other waveform measuring equipment to monitor waveforms and cur- rent levels. -
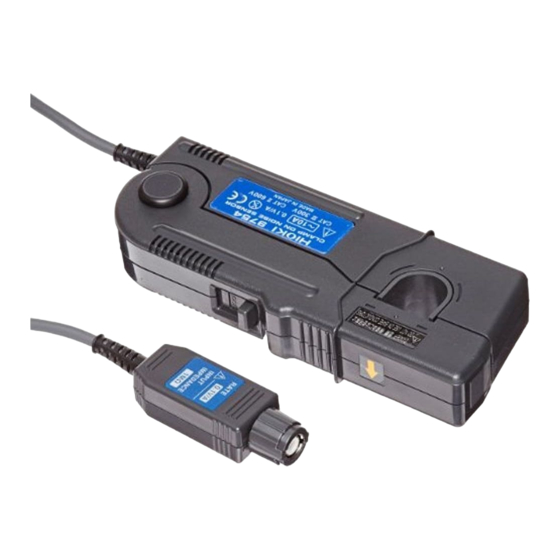
Page 12: Names And Functions Of Parts
1.2 Names and Functions of Parts 1.2 Names and Functions of Parts Front Panel (2) Slider (1) Clamp (4) BNC connector (3) Sensor head (1) Clamp Clamps around the conductor to be mea- sured. (2) Slider Used to open and close the clamp. Always use this slider when opening and closing the clamp. -
Page 13: Chapter 2 Measurement
索引 ture. It varies according to the frequency of the measured current. (Use the 9754 CLAMP ON NOISE SENSOR at the highest effective value within the maximum continuous input range.) In addition to the maximum continuous input range, there is also the "maximum peak current value 15 Apeak"... - Page 14 1.2 Names and Functions of Parts • Acoustic resonance may occur depending on the level and frequency of the measured current, but this will not affect measurement unless a foreign substance such as dust is present on the contact surfaces of the sensor head. •...
-
Page 15: Measurement Procedure
2.1 Measurement Procedure Turn on the power of the instrument being connected to the 9754 CLAMP ON NOISE SENSOR. Connect the BNC connector of the 9754 CLAMP ON NOISE SENSOR to the input terminal of the instrument being connected to. Line up... - Page 16 2.1 Measurement Procedure Clamp the conductor to be measured and close the clamp. Make sure that the cur- Current direction Current indicator rent direction indicator ar- row matches the direction of current flow on the con- ductor being measured. Make sure also that the conductor is clamped in the center of the clamp opening.
-
Page 17: Disconnecting The Noise Sensor
Pull the sensor slider to open the clamp. 索引 Remove the 9754 CLAMP ON NOISE SENSOR from the conductor being measured. Turn off the power on the instrument being connected to. -
Page 18: When Connecting To Instruments Other Than The 3145-20
2.3 When Connecting to Instruments other than 2.3 When Connecting to Instruments other than the 3145-20 The 9754 CLAMP ON NOISE SENSOR can be connected to waveform measuring equipment other than the 3145-20 NOISE HiLOGGER and used to monitor current waveforms. Please care-... - Page 19 (those not connected to this device) is impressed upon the 9754 CLAMP ON NOISE SENSOR. If dangerous voltage is impressed upon this device, dangerous volt-...
- Page 20 2.3 When Connecting to Instruments other than <Examples> • If connecting the 9754 CLAMP ON NOISE SENSOR to a mea- suring instrument that does not provide isolation between its input terminals and chassis or other input terminals, connect the ground terminal to a ground potential. If it is connected to a...
-
Page 21: Chapter 3 Specifications
2.3 When Connecting to Instruments other than Chapter 3 Specifications Accuracy We define measurement tolerances in terms of rdg. (reading) values, with the following meanings: rdg. (reading or displayed value) The value currently being measured and indicated on the mea- suring instrument. - Page 22 2.3 When Connecting to Instruments other than Influence of 0.4% or less conductor (Based on f=15 kHz 10 A sine wave input, in position the center of the clamp opening) Residual current 40 mA or less characteristic (At f=15 kHz, 10 A, lead wire with 18 mm or less round-trip distance between lines) Input "...
- Page 23 2.3 When Connecting to Instruments other than 10000 1000000 100000000 100M Frequency (Hz) 周波数 (Hz) 周波数特性(特性例) Frequency characteristics (typical characteristics) 1000 10000 100000 100000 100000 100000 100k 100M Frequency (Hz) 周波数 (Hz) 周波数によるディレーティング Derating according to frequency 索引...
- Page 24 2.3 When Connecting to Instruments other than 10.000 1.000 0.100 0.01 0.010 0.001 0.001 100k 1000 10000 100000 1000000 10000000 10000000 100M Frequency (Hz) 周波数 (Hz) 入力インピーダンス(特性例) Input impedance (typical characteristics)
-
Page 25: Maintenance And Service
4.1 Cleaning Maintenance and Chapter 4 Service Never modify the instrument. Only Hioki service engineers should disassemble or repair the instru- ment. Failure to observe these precautions may result in fire, electric shock, or injury. 4.1 Cleaning To clean the instrument, wipe it gently with a soft cloth moist- ened with water or mild detergent. -
Page 26: Troubleshooting
If the instrument seems to be malfunctioning, confirm that the cables are not open circuited before contacting your dealer or Hioki representative. Pack the instrument so that it will not sustain dam- age during shipping, and include a description of existing damage.
Need help?
Do you have a question about the 9754 and is the answer not in the manual?
Questions and answers