Raymarine i70 Operation Instructions Manual
Hide thumbs
Also See for i70:
- Operation instructions manual (96 pages) ,
- Installation & operation instructions (90 pages) ,
- Installation instructions manual (82 pages)

Related Manuals for Raymarine i70


Summary of Contents for Raymarine i70
- Page 1 / i70s INSTRUMENT Operation instructions English (en-US) Date: 08-2021 Document number: 81401 (Rev 2) © 2021 Raymarine UK Limited...
- Page 3 Please check the website to ensure you have the latest documentation. Publication copyright Copyright ©2021 Raymarine UK Ltd. All rights reserved. No parts of this material may be copied, translated, or transmitted (in any medium) without the prior written permission of Raymarine UK Ltd.
-
Page 5: Table Of Contents
Contents Chapter 1 Important information..................9 TFT Displays ..........................9 Water ingress ..........................9 Disclaimer ........................... 9 Declaration of conformity......................9 Product disposal ........................9 Warranty registration ........................ 10 IMO and SOLAS ........................10 Technical accuracy ........................10 Chapter 2 Document and product information.............11 2.1 Product documentation...................... - Page 6 Calibrating Water temperature .....................34 4.4 Wind calibration ......................... 34 Calibrating wind ........................34 Aligning the wind transducer ....................35 Adjusting the wind transducer ....................36 Adjusting apparent wind speed.................... 37 4.5 Rudder reference calibration ................... 38 Centering the Rudder ......................38 Adjusting the Rudder Angle....................39 Inverting the Rudder ......................39 4.6 Compass calibration ......................
- Page 7 7.1 Automatic Identification System (AIS) overview ............. 60 7.2 AIS target symbols ......................61 7.3 Setting AIS range....................... 62 7.4 Viewing AIS target information ..................62 7.5 Enabling and disabling AIS Silent mode................. 63 Chapter 8 Fuel manager....................65 8.1 Fuel manager overview..................... 66 Detect fuel messages ......................
- Page 8 12.3 System data troubleshooting ..................88 12.4 Miscellaneous troubleshooting ..................89 12.5 Performing a Factory Reset .................... 90 Chapter 13 Technical support..................91 13.1 Raymarine product support and servicing..............92 13.2 Viewing product information ..................93 Appendix A Supported NMEA 2000 PGN list ............. 95...
-
Page 9: Chapter 1 Important Information
Raymarine. Raymarine is not responsible for damages or injuries caused by your use or inability to use the product, by the interaction of the product with products manufactured by others, or by errors in information utilized by the product supplied by third parties. -
Page 10: Warranty Registration
In addition, our policy of continuous product improvement may change specifications without notice. As a result, Raymarine cannot accept liability for any differences between the product and this document. Please check the Raymarine website (www.raymarine.com) to ensure you have... -
Page 11: Chapter 2 Document And Product Information
Chapter 2: Document and product information Chapter contents • 2.1 Product documentation on page 12 • 2.2 Applicable software version on page 13 • 2.3 Applicable products on page 13 Document and product information... -
Page 12: Product Documentation
2.1 Product documentation The following documentation is applicable to your product: This and other Raymarine product documents are available to download in PDF format from www.raymarine.com. i70s documentation: • 81401 — i70 / i70s Operation Instructions (This document) • 87420 — i70s Instrument Display Installation Instructions •... -
Page 13: Applicable Software Version
This document has been updated to reflect displays running software version 3.20. Check the website for the latest software and user manuals: • www.raymarine.com/software • www.raymarine.com/manuals 2.3 Applicable products This document is applicable to the products shown below. i70 (E22172) 2. i70s (E70327) Document and product information... -
Page 15: Chapter 3 Getting Started
Chapter 3: Getting started Chapter contents • 3.1 Controls on page 16 • 3.2 Power on page 16 • 3.3 Completing the set up wizard on page 17 • 3.4 Display settings on page 17 • 3.5 Multiple data sources (MDS) on page 21 •... -
Page 16: Controls
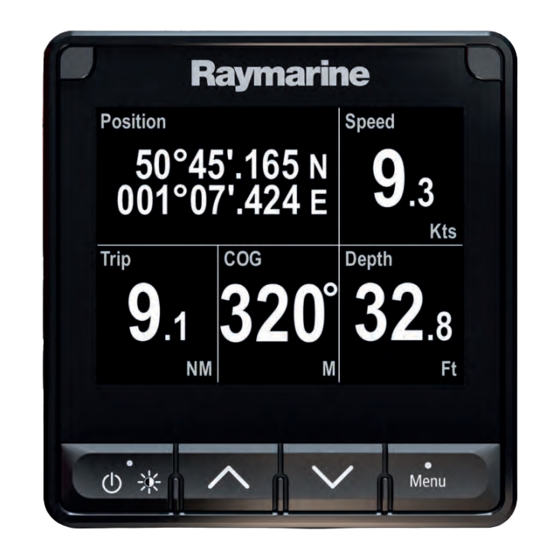
3.1 Controls Use the buttons to operate the display. Each button has multiple functions. Note: The i70s is pictured below. The i70 and i70s have the same control buttons. Power • Power on • Power off • Open Brightness page •... -
Page 17: Completing The Set Up Wizard
Note: When powered off, the display may still draw a small amount of power from the battery, if this is a concern unplug the power supply or switch off at the breaker. 3.3 Completing the set up wizard If the display is being switched on for the first time or after a factory reset the set up wizard will be launched. - Page 18 LightHouse™ / LightHouse™ 2 MFD Instrument display / Pilot controller VHF DSC Radio LightHouse™ 3 V3.4 or greater Multiple brightness groups can be configured. For example, these groups could be used to reflect the physical location of products on your vessel e.g.: helm and flybridge. Shared brightness requires: •...
- Page 19 2. Select Brightness/Color Group. 3. Select This Group. 4. Select Sync. The System will now synchronize all displays assigned to the same group. 5. Select OK. 6. Carry out steps 1 to 5 on all displays. When the brightness level is adjusted it will effect all displays assigned to the same group. Unsharing the display Displays can be removed from shared brightness so that brightness is individual to the display.
-
Page 20: Display Response
Day 1 2. Day 2 3. Inverse 4. Red/Black Note: If the display is part of a shared brightness network group the color scheme will change on all displays that support color schemes and are assigned to the same network group. Display response Setting the display response Display response determines how quickly the values displayed onscreen are changed when changes... -
Page 21: Multiple Data Sources (Mds)
3.5 Multiple data sources (MDS) MDS is a Raymarine scheme for managing multiple sources of identical data types on the same network (e.g.: in an MFD network you may have more than one source of GPS / GNSS position data). -
Page 22: Quick Options Menu
• Ensure that the unit has a reliable power supply and that the update process is not interrupted. • Damage caused by an incomplete update is not covered by Raymarine warranty. • By downloading the software update package, you agree to these terms. -
Page 23: Chapter 4 Transducer Calibration
Chapter 4: Transducer calibration Chapter contents • 4.1 Transducer calibration on page 24 • 4.2 Depth calibration on page 24 • 4.3 Speed calibration on page 25 • 4.4 Wind calibration on page 34 • 4.5 Rudder reference calibration on page 38 •... -
Page 24: Transducer Calibration
4.1 Transducer calibration The transducers listed below can be calibrated using the display. • Depth transducers — Connected via iTC-5 or a legacy depth pod. • Speed and temperature transducers — Connected via iTC-5 or a legacy speed pod. • Wind transducers — Connected via iTC-5 or a legacy wind pod. •... -
Page 25: Speed Calibration
5. Select the device that the transducer you are calibrating are connected to. A list of available transducer data is displayed. 6. Select Depth Important: (1) Step only applicable to iTC-5. 7. Select Depth Offset. 8. Select Depth From:. A list of transducer offsets is displayed: •... -
Page 26: Point Speed Calibration
Note: A Speed Run Calibration can only be performed if SOG data is available. If required, further calibration points can be added and a calibration factor can be applied to further align the log speed with actual vessel speed. iTC-5 Smart (DST) Speed pod No SOG... -
Page 27: Nautical Measured Mile Markers
SOG speed reading Current speed reading If SOG data is not available then the SOG value will display dashes. 9. Accelerate your vessel to a steady, typical cruising speed. 10. Use the Up and Down buttons to adjust the current speed reading so that it matches the SOG reading or matches your estimated speed. - Page 28 Markers — side view Front marker 2. Rear marker When the 2 markers appear vertically aligned your vessel is on the correct range line to begin a measured mile run. Marker alignment (viewed from vessel) Vessel left of range line 2.
-
Page 29: Performing A Speed Run Calibration Using Sog
Measuring a nautical mile Starting point (start stopwatch) 2. Measured mile 3. End point (stop stopwatch) 4. First pair of markers 5. Second pair of markers To provide a more accurate reading the vessel should make between 4 to 6 runs in both directions to allow for tide and wind conditions. -
Page 30: Calibration Table
5. Select the device that the transducer you are calibrating is connected to. A list of available transducer data is displayed. Select Speed. Important: (1)Step only applicable to iTC-5. 7. Select Speed Calibration. 8. Select New cal using SOG. You will need to add calibration points at a range of speeds spanning the full speed range of the vessel. - Page 31 1. Press the Menu button. 2. Select Set-up. 3. Select Transducers Set-up. 4. Select Continue. The display will search for and show a list of connected devices. (i.e. iTC-5, DST or transducer pod) 5. Select the device that the transducer you are calibrating is connected to. A list of available transducer data is displayed, Select Speed.
- Page 32 Manually calculate a calibration factor New calibration factors can be calculated manually following the steps below. Prerequisites: • You will need to be underway, with sufficient space to maneuver unhindered. • To ensure accuracy, water conditions should be calm with zero tide and zero current. •...
- Page 33 13. Repeat steps 7 to 11 for each Calibration point you want to add. The more Calibration points you add the higher the accuracy of Log speed will be. Note: If the text appears red then the new reading deviates too far from the stored reading. You will need to add a Calibration point closer to the stored reading a try again.
-
Page 34: Calibrating Water Temperature
3. Use the Up and Down buttons to select the desired speed that you want to add a Calibration point for. 4. Select Next. 5. Use the Up and Down buttons to adjust the Calibration factor to the correct value. 6. -
Page 35: Aligning The Wind Transducer
• Conditions should be calm (i.e. a slight sea) and a steady breeze. Try to ensure the vessel is not rolling or pitching too much. From a favorite page: 1. Press the Menu button. 2. Select Set-up. 3. Select Transducers Set-up. 4. -
Page 36: Adjusting The Wind Transducer
Select Wind. Important: (1) Step only applicable to iTC-5. 3. Select Align Wind Xdcr. 4. Now steer your vessel directly into the wind and select Continue. Adjusting the wind transducer Adjusting the wind transducer compensates for any small errors which may exist in the alignment of the wind transducer. -
Page 37: Adjusting Apparent Wind Speed
Important: (1)Step only applicable to iTC-5. 4. Select Wind Xdcr Adjust. 5. Use the Up and Down buttons to adjust the offset value so that the reported AWA is 0 degrees. 6. Select Select. Adjusting apparent wind speed Adjusting the Apparent Wind Speed (AWS) reading compensates for any small errors which may exist in the apparent wind speed reading. -
Page 38: Rudder Reference Calibration
4. Use the Up and Down buttons to adjust the calibration factor until the AWS reading matches your referenced source of AWS. The Calibration Factor default is 1.00 the Calibration Factor can be adjusted from 0.25 to 2.00. 5. Select Select to save the Calibration factor. 4.5 Rudder reference calibration You can calibrate a rudder reference transducer that is connected to an iTC-5. -
Page 39: Adjusting The Rudder Angle
6. When the Rudder is centered, select OK. 7. Select Back to return to the Rudder calibration menu. Adjusting the Rudder Angle Rudder Angle can be adjusted manually. Manual adjustment of the Rudder Angle requires a method of knowing the Rudder’s actual position. From the Transducer Set-up menu (Menu >... -
Page 40: Setting The Compass Offset
If you still find a deviation of more than 15 degrees, contact your Raymarine dealer for advice. If the deviation is within acceptable limits, press Continue. -
Page 41: Chapter 5: Favorite Pages
Chapter 5: Favorite Pages Chapter contents • 5.1 Favorite pages on page 42 • 5.2 Customizing pages on page 50 Favorite Pages... -
Page 42: Favorite
5.1 Favorite pages Data is displayed on Favorite pages. By default 7 Favorite pages are created. The default page’s layout and content are dependent on the boat type selected during the startup wizard. The data displayed on each page can be customized. Pages can be deleted and new pages can be created. -
Page 43: Digital Speed Favorite Page
Digital speed favorite page The Digital speed page is available for all sailing boat types. The Digital speed favorite page displays current speed through water value. Speed dial favorite page The Speed dial page is available for all motor boat types. The Speed dial favorite page displays current speed through water value. - Page 44 AWA (Apparent Wind Angle) / AWS (Apparent Wind Speed) dial 2. Digital Depth 3. Digital Speed AWA/AWS dial overview The AWA/AWS dial identifies the current Apparent Wind Angle (AWA), Apparent Wind Speed (AWS), minimum wind angle, and maximum wind angle. It’s important to be aware that Apparent Wind is different from True Wind, because wind direction and strength become a lot more complicated once a vessel starts to move.
-
Page 45: Single Engine Page
4. Maximum AWA indicator (The maximum AWA indicator can be reset from the Quick options menu: Menu > Quick Options > Reset Max. AWA.) 5. Apparent Wind Speed (AWS) Note: When tacking to the wind, the minimum and maximum AWA indicators will help to show how the wind direction is changing. -
Page 46: Dual Engine Favorite Page
5. Coolant indicator — Displayed when an engine coolant related alarm is active. Dual engine favorite page The Dual engine page is available for Workboat, Inboard speedboat, all Power cruisers and Sport fishing boat types. The Dual engine favorite page displays current engine data, engine management warnings and Speed through water. -
Page 47: Honda Engine Page
Honda engine page When connected to compatible Honda engines the Engine dial pages include indicators for Honda’s ECO and Trolling modes. Trolling mode indicator 2. ECO mode indicator Note: If trolling mode and ECO mode are activated at the same time the Trolling mode indicator will be displayed. -
Page 48: Way-Split Data Page
For more details refer to: p.59 — AIS 6 Way-split data page The 6 Way-split page is available for all boat types. The 6 Way-split data favorite page displays the following data: Fuel economy 2. Engine RPM 3. Engine coolant pressure 4. -
Page 49: Favorite Pages Menu Settings
Ground wind direction 2. Water depth 3. Heading indicator 4. Compass 5. Heading 6. Speed Favorite pages menu settings The following settings are available from the Favorite pages menu: • Edit page — Select and customize the data displayed on existing Favorite pages. •... -
Page 50: Favorite Page Layout
Favorite page layout Data items are displayed within data panes on Favorite pages. The data panes can be arranged in various layouts. The following layouts are available when creating new Favorite pages. 5.2 Customizing pages Customizing an existing page The data displayed on each page can be changed. With the page that you want to edit displayed onscreen: 1. -
Page 51: Adding A Page
Adding a page Follow the steps below to add a new Favorite page. From the Favorite pages menu: 1. Select New Page. If there are already 10 Favorite pages, you must first delete an existing page before a new page can be created. - Page 52 With no menu displayed, press and hold the Menu button for 5 seconds, until the Main Menu is displayed. Then select Favorite Pages, and select the Deactivate Page Lock option. Finally, select OK.
-
Page 53: Chapter 6 Data (Quick View)
Chapter 6: Data (quick view) Chapter contents • 6.1 Data (quick view) on page 54 Data (quick view) -
Page 54: Data (Quick View)
6.1 Data (quick view) Any data item can be viewed fullscreen, without being adding to a Favorite page using the Data (quick view) menu. The Data (quick view) menu can be accessed form the Main menu. Data (quick view) items can be quickly added as Favorite pages from the Quick Options menu (Menu >... - Page 55 Data category Favorite page data Items Data (quick view) data items • Transmission Oil Temperature • Transmission Oil Pressure • Transmission • Transmission Oil Temperature • 2 Engine Overview • Transmission • 1 Engine Overview • Fuel Flow Rate 1 •...
- Page 56 Data category Favorite page data Items Data (quick view) data items • SOG (Speed Over Ground) • COG (Course Over Ground) • SOG History • COG History • Max. SOG • COG and SOG (Speed Over Ground) • Avg. SOG •...
- Page 57 Data category Favorite page data Items Data (quick view) data items • Turn & DTW • Turn & DTW Pilot • Pilot Heading • Pilot Heading • Pilot Heading & Speed • Pilot Heading & Speed • Pilot Status • Pilot Status •...
- Page 58 Data category Favorite page data Items Data (quick view) data items • TWA History • TWA History • TWA & TWS (True Wind Speed) • TWA Min • TWA (CH) & TWS • TWA Max • TWA & VMG • GWD (Ground Wind Direction) •...
-
Page 59: Chapter 7 Ais
Chapter 7: AIS Chapter contents • 7.1 Automatic Identification System (AIS) overview on page 60 • 7.2 AIS target symbols on page 61 • 7.3 Setting AIS range on page 62 • 7.4 Viewing AIS target information on page 62 •... -
Page 60: Automatic Identification System (Ais) Overview
7.1 Automatic Identification System (AIS) overview When an AIS receiver/transceiver is connected to your system, the AIS feature enables you to receive information broadcast by other AIS equipped vessels, and to view these vessels as targets relative to your vessel. The AIS feature is standalone, settings and alarms cannot be shared with other AIS enabled products on your system. -
Page 61: Ais Target Symbols
• Alarm off icon — Transmitting & Alarms are switched off • Data lost — Transmitting. AIS target lost. • No fix — No GNSS (GPS) fix • Insufficient COG/Hdg data — Unstable COG or heading data Note: • If no AIS message is displayed then the AIS in enabled and transmitting. •... -
Page 62: Setting Ais Range
AIS target symbol status Dangerous target — The AToN off position — The targets outline will turn target’s outline will be red if red and flash when the the AToN is off position. target is within a specified distance (CPA) or time (TCPA). -
Page 63: Enabling And Disabling Ais Silent Mode
7.5 Enabling and disabling AIS Silent mode AIS silent mode enables you to disable the transmitting functions of your AIS equipment. This is useful when you do not want to transmit your vessel’s AIS data to other AIS receivers, but still wish to receive data from other vessels. -
Page 65: Chapter 8 Fuel Manager
Chapter 8: Fuel manager Chapter contents • 8.1 Fuel manager overview on page 66 • 8.2 Fuel manager menu on page 66 • 8.3 Setting up the fuel manager on page 67 • 8.4 Setting tank fill on page 67 •... -
Page 66: Fuel Manager Overview
8.1 Fuel manager overview The fuel manager feature displays essential data about the fuel of your vessel. Fuel manager estimates the amount of fuel onboard, based on you logging each time you fill up, the total fuel capacity, and how much fuel is burned by the engine(s). This data is used to estimate the distance and time until fuel depletion. -
Page 67: Setting Up The Fuel Manager
– Total Fuel Capacity — Specify the total fuel capacity of your fuel tanks. – Fuel Calculations — Switch fuel calculation between Fuel Used (Trip) and Fuel flow rate. – Detect fuel messages — Scans the system for available, supported fuel related messages. 8.3 Setting up the fuel manager The Fuel manager requires setting up before it can be used. -
Page 68: Using Fuel Manager
Fuel manager will now calculate fuel estimates based on the chosen variable. 8.6 Using Fuel manager Once fuel manager has been set up it provides fuel estimates. Fuel estimates for favorite pages You can display various fuel estimates on the favorite pages. Refer to Chapter 5 Favorite Pages for more information on how to create favorite pages. - Page 69 ii. Select Reset Trip Fuel Used to reset the amount of fuel used on the current trip. Fuel manager...
-
Page 71: Chapter 9 Race Timer Settings
Chapter 9: Race timer settings Chapter contents • 9.1 Setting the Race Timer on page 72 • 9.2 Using the Race Timer on page 72 Race timer settings... -
Page 72: Setting The Race Timer
9.1 Setting the Race Timer The Race Timer is used to show the time elapsed since the start of a race. The Race Timer has 3 countdown timers. When a timer count down is complete (reaches zero) then the Race Timer will start to count up. -
Page 73: Chapter 10 Alarms
Chapter 10: Alarms Chapter contents • 10.1 Alarms on page 74 • 10.2 Active Engine Alarms on page 75 • 10.3 Alarm settings on page 75 Alarms... -
Page 74: Alarms
10.1 Alarms Alarms are used to alert you to a situation or hazard requiring your attention. Some examples of alarms are: • Anchor alarm — Used when anchored, this alerts you to a change in depth which could mean that the chain length requires adjusting. -
Page 75: Active Engine Alarms
Note: Bearing and Range require GNSS (GPS) data to be available on the network. 10.2 Active Engine Alarms When engine alarms are active they can be viewed from the Active Engine Alarms page. The Active Engine Alarms page can be access from the Alarms menu: Menu > Alarms > Active Engine Alarms When the alarm condition has cleared the alarm will be removed from the list. - Page 76 • Boat Speed Low — The Boat speed low alarm is triggered when vessel speed drops below the specified value. Temperature alarms Temperature alarms can be enabled and disabled and alarm threshold values can be set from the Temperature menu: Menu > Alarms > Settings > Temperature. The following temperature alarms are available: •...
-
Page 77: Honda Engine Alarms
Engine alarms Engine alarms can be enabled and disabled from the Other menu: Menu > Alarms > Settings > Other > Engines. When enabled, supported engine alarms will be shown on the display. Fuel alarms When the Fuel manager has been set up fuel related alarms can be enabled and disabled and alarm thresholds can be set from the Other menu: Menu >... -
Page 79: Chapter 11 Setup Menu
Chapter 11: Setup menu Chapter contents • 11.1 Setup menu on page 80 • 11.2 Transducer set-up menu on page 80 • 11.3 User preferences menu on page 82 • 11.4 System Set-up menu on page 84 Setup menu... -
Page 80: Setup Menu
11.1 Setup menu The Set-up menu provides settings to configure the unit. • Transducer Set-up — Set up and calibrate transducers as detailed in Transducer calibration chapter: p.23 — Transducer calibration • User Preferences — Configure the following options: – Time & Date — Refer to: p.82 —... - Page 81 Depth The Depth menu provides transducer details and calibration settings. The following options are available: • Details — The details menu displays information about the installed transducer or interface such as serial number and software version etc. • Depth Offset — The depth offset menu allows you to configure the location depth readings are taken from and specify the distance the location is from the transducer face.
-
Page 82: User Preferences Menu
11.3 User preferences menu Time and date The Time & Date menu provides date and time format options and a time offset setting to compensate for any time zone difference between local time and the Universal Time Constant (UTC). The following options are available: Date format Time format Time offset... -
Page 83: Boat Types
Boat types The Boat Type menu allows you to select a boat type that is similar to your vessel The boar type selection determines the default setup of the display including which default favorite pages are available. The following options are available: Race Sail Sail Cruiser Catamaran... -
Page 84: System Set-Up Menu
11.4 System Set-up menu Network group The Network group menu allows you to add multiple displays to a group so that when the color scheme or brightness is changed on one display the changes are applied to all displays in that group. The groups available are: •... -
Page 85: Chapter 12 System Checks And Troubleshooting
Chapter 12: System checks and troubleshooting Chapter contents • 12.1 Troubleshooting on page 86 • 12.2 Power up troubleshooting on page 87 • 12.3 System data troubleshooting on page 88 • 12.4 Miscellaneous troubleshooting on page 89 • 12.5 Performing a Factory Reset on page 90 System checks and troubleshooting... -
Page 86: Troubleshooting
If after referring to this section you are still having problems with your product, please refer to the Technical support section of this manual for useful links and Raymarine Product Support contact details. -
Page 87: Power Up Troubleshooting
In the unlikely event that the product’s software has become corrupted, try downloading and installing the latest software from the Raymarine website. 2. On display products, as a last resort, attempt to perform a ‘Power on Reset’. Be aware that this will delete all settings / presets and user data (such as waypoints and tracks), and revert the unit back to factory defaults. -
Page 88: System Data Troubleshooting
Network problem. Check that all required equipment is system data is missing connected to the network. from some but not all Check the status of the Raymarine network displays. Switch. Check that SeaTalk / RayNet cables are free from damage. -
Page 89: Miscellaneous Troubleshooting
Check that the power source is of the correct • System crashes or voltage and sufficient current. other erratic behavior. Software mismatch Go to www.raymarine.com and click on on system (upgrade support for the latest software downloads. required). Corrupt data / other Perform a factory reset. -
Page 90: Performing A Factory Reset
12.5 Performing a Factory Reset To reset your unit to factory default settings follow the steps below. Note: Performing a factory reset will erase all saved data and customized settings. 1. Press the Menu button. 2. Select Set Up. 3. Select Factory Reset. 4. -
Page 91: Chapter 13 Technical Support
Chapter 13: Technical support Chapter contents • 13.1 Raymarine product support and servicing on page 92 • 13.2 Viewing product information on page 93 Technical support... -
Page 92: Raymarine Product Support And Servicing
You can obtain this product information using diagnostic pages of the connected MFD. Servicing and warranty Raymarine offers dedicated service departments for warranty, service, and repairs. Don’t forget to visit the Raymarine website to register your product for extended warranty benefits: http://www.raymarine.co.uk/display/?id=788. United Kingdom (UK), EMEA, and Asia Pacific: •... -
Page 93: Viewing Product Information
• Tel: +47 692 64 600 Denmark (Raymarine subsidiary): • E-Mail: support.dk@raymarine.com • Tel: +45 437 164 64 Russia (Authorized Raymarine distributor): • E-Mail: info@mikstmarine.ru • Tel: +7 495 788 0508 13.2 Viewing product information 1. Press the Menu button. -
Page 95: Appendix A Supported Nmea 2000 Pgn List
• 126464 — PGN Transmit and Receive List (Receive / Transmit) • 126996 — Product Information (Receive / Transmit) Raymarine® provides field programmability of the Device and System Instances within PGN 60928 which can be commanded via use of PGN 126208 as required by the latest NMEA 2000 standard. - Page 96 • 129810 — AIS Class B "CS" Static Report, Part B (Receive) • 130306 — Wind Data (Receive / Transmit) • 130310 — Environmental Parameters (Receive / Transmit) • 130311 — Environmental Parameters (Receive / Transmit) • 130576 — Small Craft Status (Receive) •...
- Page 99 Index Depth calibration .............24 Depth offset.............24 Depth units ..............82 6 Way-split data............48 Diagnostics............. 80 Digital Speed ............43 Display brightness ............ 17 Display response............ 20 About display............80 Distance (long) units ..........82 About system............80 Distance (short) units ..........82 Add to favorites ............22 Document conventions ...........
- Page 100 Single engine ............45 Software updates ............22 Inverting the Rudder..........39 Software version............13 Speed ..............42 Speed calibration ........25, 31–32 1 Point ............26–27 Key beep ..............83 Adding calibration points........32 Calibration table...........30 Deleting calibration points ........33 Editing calibration points ........33 Language selection ..........
- Page 101 Wind speed units.............82...
- Page 104 Raymarine Marine House, Cartwright Drive, Fareham, Hampshire. PO15 5RJ. United Kingdom. Tel: +44 (0)1329 246 700 www.raymarine.com a brand by...
Need help?
Do you have a question about the i70 and is the answer not in the manual?
Questions and answers
What parameters are used to measure distance travelled