
Subscribe to Our Youtube Channel
Related Manuals for Belling BFS60SCIND


Summary of Contents for Belling BFS60SCIND
- Page 1 BFS60SCIND Freestanding Single Door Oven with Induction Cooktop INSTRUCTION MANUAL PLEASE READ THE INSTRUCTION MANUAL CAREFULLY BEFORE USING THE UNIT. www.belling.com.au www.belling.co.nz...
- Page 2 Dear Customer, Congratulations on the purchase of your new product from Belling. We recommend you please take some time to read the instruction manual thoroughly to familiarise yourself with the functionality and operations to ensure optimum performance of your new appliance.
-
Page 3: Table Of Contents
CONTENTS 1.SAFETY INSTRUCTIONS ....................4 1.1 General Safety Warnings ....................4 1.2 Installation Warnings ......................7 1.3 During Use ........................8 1.4 During Cleaning and Maintenance .................9 2.INSTALLATION AND PREPARATION FOR USE ............11 2.1 Instructions for the Installer ..................11 2.2 Electrical Connection and Safety..................12 2.3 Safety Chain .........................13 2.4 Adjusting the feet ......................13 3.PRODUCT FEATURES ....................14... -
Page 4: Safety Instructions
1. SAFETY INSTRUCTIONS • Carefully read all instructions before using your appliance and keep them in a convenient place for reference when necessary. 1.1 General Safety Warnings • This appliance can be used by children aged from 8 years and above and by persons with reduced physical, sensory or mental capabilities or lack of experience and knowledge if they have been given supervision or instruction concerning use of... - Page 5 WARNING: Danger of fire: Do not store items on the cooking surfaces. WARNING: If the surface is cracked, switch off the appliance to avoid the possibility of electric shock. • For induction hobs, metallic objects such as knives, forks, spoons and lids should not be placed on the hob surface because they can get hot.
- Page 6 before replacing the lamp. CAUTION: Accessible parts may be hot when cooking or grilling. Keep young children away from the appliance when it is in use. • Your appliance is produced in accordance with all applicable local and international standards and regulations.
-
Page 7: Installation Warnings
its service agent or similarly qualified persons in order to prevent a danger. • Do not let children climb on the oven door or sit on it while it is open. • Please keep children and animals away from this appliance. -
Page 8: During Use
1.3 During Use • When you first use your oven you may notice a slight smell. This is perfectly normal and is caused by the insulation materials on the heater elements. We suggest that, before using your oven for the first time, you leave it empty and operate it at maximum temperature for 45 minutes. -
Page 9: During Cleaning And Maintenance
• Do not place anything on the oven door when it is open. This could disrupt the balance of the oven or damage the door. • Do not place heavy or flammable items (e.g. nylon, plastic bags, paper, cloth, etc.) into the drawer. This includes cookware with plastic accessories (e.g. - Page 10 detailed information about recycling of this product, please contact your local city office, your household waste disposal service or the retailer who you purchased this product from. EN - 10...
-
Page 11: Installation And Preparation For Use
2. INSTALLATION AND cooktop, the kitchen furniture must be at least 10 cm away from the sides of PREPARATION FOR USE appliance for air circulation. WARNING : This appliance must be • There should be a minimum 2cm blank installed by a qualified electrician space around the appliance for air according to the instructions in this circulation. -
Page 12: Electrical Connection And Safety
2.2 Electrical Connection and Safety • A double pole disconnector (with at least 3 mm contact spacing) must be used in WARNING: The electrical connection order to meet the safety regulations. of this appliance should be carried out by an licensed electrician, according •... -
Page 13: Safety Chain
2.3 Safety Chain The appliance can be prevented from falling over by securing the supplied safety chain to the rear of the cooker. Use a wall plug to fasten the hook (1) to the kitchen wall and connect the safety chain (3) to the hook with the help of the locking mechanism. -
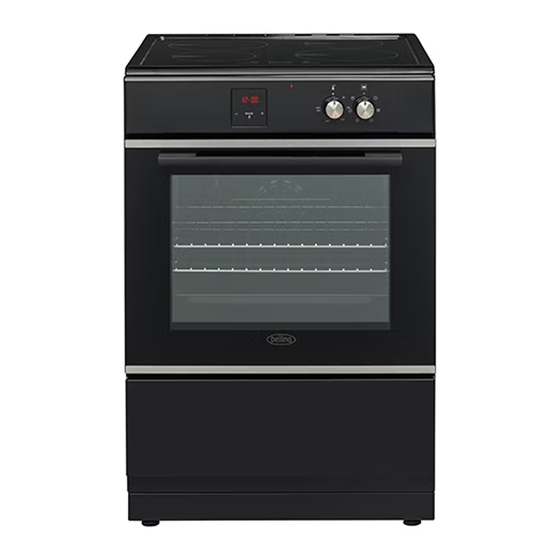
Page 14: Product Features
3. PRODUCT FEATURES Important: Specifications for the product vary and the appearance of your appliance may differ from that shown in the figures below. List of Components 1. Cooktop 2. Control Panel 3. Oven Door Handle 4. Oven Door 5. Adjustable Feet Control Panel 6. -
Page 15: Use Of Product
4. USE OF PRODUCT 4.1 Hob Controls Induction Zone The information given in the following table is for guidance only. Settings Use for Circular Saucepan Base Element off Delicate warming Gentle simmering, slow warming Reheating and rapid simmering Boiling, saute and searing Small Saucepan Saucepan base that Diameter... - Page 16 Switching the Appliance On If the Smart Pause is not de-activated, the cooktop will switch off after 30 minutes. Switch the hob on by pressing the ON/ OFF button . All heating zone displays Press to activate Smart Pause. The show a static “0”...
- Page 17 This operation is acknowledged by a activities will be signalled by the buzzer. buzzer. After successful operation, the key • Normal button activation will be lock indicator will flash and the heating accompanied with a short sound signal. zone will be locked. •...
-
Page 18: Oven Controls
4.2 Oven Controls Fan Function: The oven’s thermostat and Oven function control knob warning lights will Turn the knob to the corresponding symbol switch on, and the of the desired cooking function. For the upper and lower details of different functions see ´Oven heating elements and Functions`. -
Page 19: Use Of The Digital Touch Timer
4.3 Use of the Digital Touch Timer 3. After a few seconds, the dot will stop flashing and will remain illuminated. Key Lock Function Description The key lock automatically activates after the timer has not been used for 5 seconds. “ ” symbol will appear and remain Auto cooking illuminated. - Page 20 10 hours can be set. Prepare the food for cooking and put it in the oven. 3. Use the “+” and “-” buttons to set the 1. Select the desired cooking function and desired finishing time. the temperature using the control knobs. 2.
-
Page 21: Accessories
The deep tray is best used for cooking stews. 5. Press “MODE” until you see “end” and Put the tray into any rack and push it to the symbol on the screen. end to make sure it is placed correctly. The time and the symbols “A”... -
Page 22: Cleaning And Maintenance
Catalytic Cleaning Catalytic liners are installed within the oven 5. CLEANING AND cavity. These are the matte-finished, light- coloured panels on the sides and/or the MAINTENANCE matte-finished panel at the rear of the oven. They work by collecting any grease and oil 5.1 Cleaning residue during cooking. - Page 23 Cleaning the Ceramic Glass them. Ceramic glass can hold heavy utensils but Do not clean the enamelled parts while may be broken if it is hit with a sharp object. they are still hot from cooking. WARNING : Ceramic Cooktops - if the Do not leave vinegar, coffee, milk, salt, surface is cracked, to avoid the water, lemon or tomato juice on the...
-
Page 24: Maintenance
Removal of the Wire Shelf To remove the wire rack, pull the wire rack as shown in the figure. After releasing it from the clips (a), lift it up. If the oven door is a triple glass oven door, the third glass layer can be removed the same way as the second glass layer. -
Page 25: Troubleshooting & Transport
6. TROUBLESHOOTING & TRANSPORT 6.1 Troubleshooting If you still have a problem with your appliance after checking these basic troubleshooting steps, please contact an authorised service person or qualified technician. Problem Possible Cause Solution Check the household fuse for the appliance. -
Page 26: Transport
6.2 Transport If you need to transport the product, use the original product packaging and carry it using its original case. Follow the transport signs on the packaging. Tape all independent parts to the product to prevent damaging the product during transport. If you do not have the original packaging, prepare a carriage box so that the appliance, especially the external surfaces of the product, is protected against external threats EN - 26... - Page 27 WARRANTY The warranty period is 3 years from the date of purchase in Australia and 2 years from the date of purchase in New Zealand. For service advice, please contact the Customer Care Centre on 1300 556 816 (AU) / +64 9 274 8265 (NZ).
Need help?
Do you have a question about the BFS60SCIND and is the answer not in the manual?
Questions and answers