Beef Eater 1600 Series Assembly And Operating Instructions Manual
Hide thumbs
Also See for 1600 Series:
- Assembly and operating instructions manual (28 pages) ,
- Assembly and operating instructions manual (36 pages) ,
- Assembly and operating instructions manual (28 pages)

Related Manuals for Beef Eater 1600 Series


Summary of Contents for Beef Eater 1600 Series
- Page 1 1600 SERIES Assembly and Operating Instructions BUILT IN BBG1630SAE, BBG1640SAE, BBG1650SAE, BBG1630DAE, BBG1640DAE, BBG1650DAE EUROPE FOR OUTDOOR USE ONLY...
-
Page 2: Table Of Contents
CONGRATULATIONS CONTENTS Dear Customer, Important safety instructions ............3 Gas cylinder safety information ...........6 Congratulations and thank you for choosing our barbecue. LPG safety information ..............7 We are sure you will find it a pleasure to use. Before you use the barbecue, we recommend that you read through Product description ..............8 the relevant sections of this manual, as well as the built-in Product dimensions ..............9... -
Page 3: Important Safety Instructions
IMPORTANT SAFETY INSTRUCTIONS this appliance. Please read the user manual carefully and store in a handy place for later reference. • Do not use caustic or abrasive based cleaners on the barbecue. • Do not attempt to dismantle or adjust the control valves. IMPORTANT •... - Page 4 IMPORTANT SAFETY INSTRUCTIONS To the installer WARNING • For fixed installations, this appliance must be installed Failure to follow these instructions and observe the in accordance with local authority and any relevant warnings provided in this operations manual could result in statutory regulations.
- Page 5 • Move the appliance during use. IMPORTANT • Obstruct any ventilation of barbecue or the cylinder. Should the appliance go out for any reason, turn off all • Allow the flexible gas supply hose or any electrical cord control knobs and the cylinder gas valve. Wait 5 minutes to come in contact with hot surface of the appliance.
-
Page 6: Gas Cylinder Safety Information
GAS CYLINDER SAFETY INFORMATION FIG 1 Gas cylinders must be stored outdoors, out of reach of children and must not be stored in a building, garage or any Standard POL regulator other enclosed area. • This appliance is designed to be used with a gas cylinder not exceeding 9kg (20lbs) capacity. -
Page 7: Lpg Safety Information
LPG SAFETY INFORMATION LPG safety information • Use only gas cylinders, which meet national and regional codes. The minimum cylinder size for this barbecue is 6kg. Ensure that the cylinder can provide enough fuel to operate the appliance. If in doubt, check with your local gas supplier. -
Page 8: Product Description
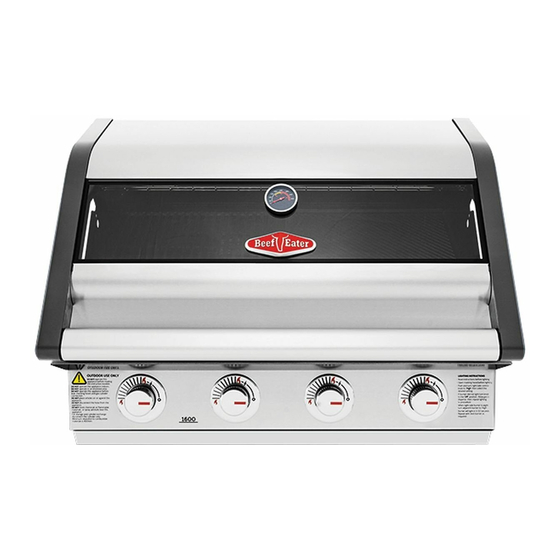
PRODUCT DESCRIPTION Warming rack Thermometer Cast iron grill Burner box (4 burner barbecue BBG1640 shown) Cast iron hotplate Support bracket and fasteners (purchase kit BAH70HS separately, needed for installation in BeefEater outdoor kitchen) Vaporisers Control panel Burners LPG hose and regulator Roasting hood Grease tray PRODUCT DESCRIPTION... -
Page 9: Product Dimensions
PRODUCT DIMENSIONS 804.5mm 4 burner 610mm 975mm 555mm 5 burner PRODUCT DIMENSIONS... -
Page 10: Gas Specifications
GAS SPECIFICATIONS Notes: Connecting the appliance to a LPG gas cylinder • This appliance MUST be installed and serviced only • The appliance has a 9kg gas bottle regulator and hose by a qualified licensed person. already fitted. • This product is intended for outdoor use only. •... -
Page 11: Mounting Enclosure Guidelines
MOUNTING ENCLOSURE GUIDELINES Mounting enclosure dimensions when installed with Beefeater hanging bracket BA70HS 650mm min. 604mm 880mm 4 burner Separation panel 40mm 1050mm 5 burner gap min. Gas bottle Rear wall/splashback to be venting slots Gas bottle non-combustible material venting slots Enclosure construction Enclosure ventilation requirements •... -
Page 12: Assembling The Barbecue
ASSEMBLING THE BARBECUE Tools required: Fasteners supplied (with hanging bracket kit) The barbecue can be mounted into the enclosure by M6 x 25MM using the BeefEater hanging bracket kit BA70HS or by 8 OFF resting the barbecue directly on its base. See step 1-4 for mounting of the hanging bracket kit. - Page 13 ASSEMBLING THE BARBECUE...
- Page 14 ASSEMBLING THE BARBECUE x 3, 4 or 5 ASSEMBLING THE BARBECUE...
- Page 15 Install the flame tamers above the burners that will be under a grill plate. See below for configuration. For 4 burner models: For 5 burner models (to suit Option 1 plate and grill setup, see Step 8, page 13): For 5 burner models (to suit Option 2 plate and grill setup, see Step 8, page 14): ASSEMBLING THE BARBECUE...
- Page 16 ASSEMBLING THE BARBECUE Install the solid plate and grill/s in one of the below configuration options, in order to keep the fat drainage hole from being placed directly above a burner. For easier installation, place the solid plate first, followed by the grill plates. For 4 burner models: For 5 burner models: Option 1...
- Page 17 For 5 burner models: Option 2 ASSEMBLING THE BARBECUE...
- Page 18 ASSEMBLING THE BARBECUE Plate and grill removal The plate and grill may be removed for cleaning following below steps: First lift up the grill from the centre edge as pictured, then remove the solid plate (and 2nd grill if fitted) for cleaning. ASSEMBLING THE BARBECUE...
- Page 19 ASSEMBLING THE BARBECUE...
-
Page 20: Burner Removal, Fittting And Leak Test Procedure
BURNER REMOVAL, FITTING AND LEAK TEST PROCEDURE IMPORTANT After completing the gas hose connections, conduct a leak test following the leak test procedure before using the appliance. WARNING To ensure gas tight connections, complete the gas leak test procedure before and after gas hose connection and after every reconnection of the gas cylinder. -
Page 21: Operating Instructions
OPERATING INSTRUCTIONS Control functions Lighting instructions Before lighting the barbecue: • Do not attempt to light burners with the cooking surfaces covered • Check that all hoses and gas fittings are tight • Read instructions before lighting • Open the roasting hood •... -
Page 22: Cooking Methods
COOKING METHODS Direct cooking method Indirect cooking method This method of cooking can be done with the hood either This method of cooking requires the hood to be closed. closed or open. Indirect cooking involves little or no heat directly underneath Commonly used for traditional barbecuing. -
Page 23: Indirect Cooking/Roasting
INDIRECT COOKING / ROASTING Reposition the grill plates MODEL BURNERS To achieve the best heat circulation around the food, it is best Four Two inside burners off to remove the hotplate from the barbecue and position the burner Two outside burners to medium two grill plates in the centre. -
Page 24: Cleaning And Care
CLEANING AND CARE The cleaning and care instructions are essential for the Cleaning the Burners proper functioning and operation of your appliance over time. • Check main opening of burner regularly for insect nests Failure to adhere to these care instructions may affect your (eg. -
Page 25: Installation Options
INSTALLATION OPTIONS WARNING Partial Enclosures This appliance shall only be used in an above ground, open air situation with natural ventilation, without stagnant areas, where gas leakage and products of combustion are rapidly dispersed by wind and natural convection. Failure to adhere to these installation instructions may cause injury or property damage and affect your ability to make a claim under the manufacturer’s warranty. -
Page 26: Technical Info
TECHNICAL INFORMATION EUROPEAN SPECIFICATION 1600 SERIES 3 BURNER BBQ BE, CH, CY, CZ, BE, CY, DK, EE, AT, CH, DE, SK ES, FR, BG, GR, FR, GB, HU, IT, IE, IT, LT, LU, LT, NL, NO, SE, COUNTRY LV, PT, SK, SI... - Page 27 1600 SERIES 5 BURNER BBQ BE, CH, CY, CZ, BE, CY, DK, EE, AT, CH, DE, SK ES, FR, BG, GR, FR, GB, HU, IT, IE, IT, LT, LU, LT, NL, NO, SE, COUNTRY LV, PT, SK, SI SI, SK, RO, HR,...
-
Page 28: Maintenance
MAINTENANCE This appliance should be checked and serviced by an authorised service person every 2 years to ensure the appliance remains in a safe operating condition. (These services are not covered by warranty).Replacement parts are available from your authorised BeefEater Dealer. Service and Maintenance Schedules Each Use 6 Monthly... -
Page 29: Troubleshooting
TROUBLESHOOTING PROBLEM CAUSE CHECK Barbecue will not light Ignition system not working Check to see visible spark at starter probe - if no spark is present when control knob is turned then the unit may need to be serviced or replaced. Contact your BeefEater dealer. - Page 30 NOTES NOTES NOTES...
-
Page 31: Warranty
This document sets out the terms and conditions of the product 7. Exclusions: You may not make a claim under this warranty unless the warranties for BeefEater 1600 series BBQ. It is an important defect claimed is due to faulty or defective parts or workmanship. This document. - Page 32 For more information on all Beefeater products, or for dimension and installation information, call into your retailer, phone or email our customer care team or visit our website: EUROPE BeefEater Europe PO Box 1238 Cheddar BS27 9AH Tel: +44 (0)1934 743322 Email: sales@beefeatereurope.co.uk web: www.beefeaterbbqeurope.co.uk BeefEater.
Need help?
Do you have a question about the 1600 Series and is the answer not in the manual?
Questions and answers