Advertisement
Quick Links
Advertisement

Subscribe to Our Youtube Channel
Related Manuals for Dunelm Oliver Wide TV Unit


Summary of Contents for Dunelm Oliver Wide TV Unit
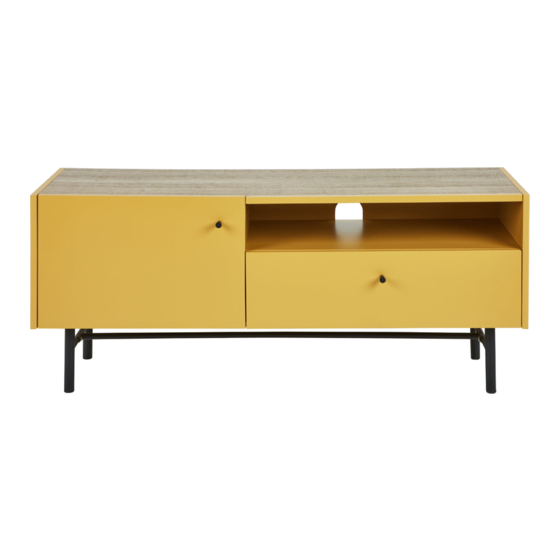
- Page 1 Oliver Wide TV Unit I N S T R U C T I O N S www.dunelm.com...
- Page 2 Thank you Dear Customer Thank you for purchasing your new piece of furniture from Dunelm. We put a lot of effort in the design and construction of our products to ensure they set the standard for quality, durability and ease of assembly.
- Page 3 Component parts supplied Ref Dimensions Visual Ref Dimensions Visual 49.6x32.3cm 117x36.1cm 38x32.6cm 61.5x11.5cm 38x32.6cm 33x11.5cm 67x30.9cm 33x11.5cm 34.5x29.4cm 31.5x4cm 66.6x1.5cm 62.4x32.3cm 117x36.1cm 66.4x18.9cm 118x30.4cm 48.4x30.9cm 31x18cm 103x7.5cm www.dunelm.com...
- Page 4 Parts and fittings Fixtures and fittings supplied(actual size) Re Dimensions 8X30mm 5X40mm 3.5X14mm 4X19mm 6X14mm Fixtures and fittings supplied(not to scale) Dimensions Visual Dimensions Visual www.dunelm.com...
-
Page 5: Exploded View
Exploded view www.dunelm.com... - Page 6 Step 1: Need to assemble drawer runner in the correct pilot hole as the diagram indicates. Need to assemble drawer runner in the correct pilot hole as the diagram indicates. H x 1 C x 6 www.dunelm.com...
- Page 7 Step 2: CAM-LOCK Tighten until shoulder is flush Shoulder with panel.Do not overtighten or undertighten(see example below) NO GAP Panel Panel A x 18 F x 18 www.dunelm.com...
- Page 8 ENSURE STARTING POSITION IS CORRECT BEFORE YOU INSERT CONNECTING CAM-PILLAR TURN CLOCKWISE UNTIL SECURE CORRECT WRONG G x 4 Step 4: WHEN FITTING CAMS ENSURE STARTING POSITION IS CORRECT BEFORE YOU INSERT CONNECTING CAM-PILLAR TURN CLOCKWISE UNTIL SECURE CORRECT WRONG G x 2 www.dunelm.com...
- Page 9 Step 5: WHEN FITTING CAMS ENSURE STARTING POSITION IS CORRECT BEFORE YOU INSERT CONNECTING CAM-PILLAR TURN CLOCKWISE UNTIL SECURE CORRECT WRONG G x 2 Step 6: B x 2 www.dunelm.com...
- Page 10 Step 7: WHEN FITTING CAMS ENSURE STARTING POSITION IS CORRECT BEFORE YOU INSERT CONNECTING CAM-PILLAR TURN CLOCKWISE UNTIL SECURE CORRECT WRONG G x 6 O x 1 Step 8: Please pay attention to the direction of the back panel! www.dunelm.com...
- Page 11 ENSURE STARTING POSITION IS CORRECT BEFORE YOU INSERT CONNECTING CAM-PILLAR TURN CLOCKWISE UNTIL SECURE CORRECT WRONG G x 4 Step 10: Do not tighten the screw until you attach the metal frame onto the bottom panel. E x 4 L x 1 www.dunelm.com...
- Page 12 Step 11: E x 10 L x 1 Step 12: I x 4 www.dunelm.com...
- Page 13 Step 13: J x 2 K x 1 C x 4 D x 1 Step 14: C x 8 www.dunelm.com...
- Page 14 B x 5 Step 16: WHEN FITTING CAMS ENSURE STARTING POSITION IS CORRECT BEFORE YOU INSERT CONNECTING CAM-PILLAR TURN CLOCKWISE UNTIL SECURE CORRECT WRONG F x 5 D x 1 G x 5 K x 1 N x 4 www.dunelm.com...
- Page 15 Step 17: C x 4 H x 1 Step 18: www.dunelm.com...
- Page 16 Step 19: M x 6 www.dunelm.com...
- Page 17 www.dunelm.com...
- Page 18 Assembly instructions www.dunelm.com...
- Page 19 Always lift your furniture into place, avoid dragging it across the floor as this can cause damage to joints. When placing furniture on a wooden or laminate floor, please ensure that the plastic or felt protectors are securely fitted and in place. www.dunelm.com...
Need help?
Do you have a question about the Oliver Wide TV Unit and is the answer not in the manual?
Questions and answers