
Related Manuals for Russell Hobbs RHI002


Summary of Contents for Russell Hobbs RHI002
- Page 1 INSTRUCTIONS AND WARRANTY MODEL RHI002 RUSSELL HOBBS SUPREME GLIDE XL STEAM, SPRAY, DRY IRON...
-
Page 2: Important Safeguards
Congratulations on purchasing our Russell Hobbs Supreme Glide XL Iron. Each unit is manufactured to ensure safety and reliability. Before using this appliance for the first time, please read the instruction manual carefully and keep it for future reference. IMPORTANT SAFEGUARDS... - Page 3 9. To reduce the risk of electric shock, do not immerse or expose the motor/ electrical assembly, plug or the power cord to water or any other liquid. 10. Never immerse the unit in water or any other liquid for cleaning purposes. 11.
- Page 4 29. Deposits or minerals in the water supply will generate scale and block the steam holes in the soleplate. It is advisable to use distilled water when filling your iron. Do not use chemically distilled water. 30. Leave the iron upright to cool down fully before cleaning and storing away. 31.
-
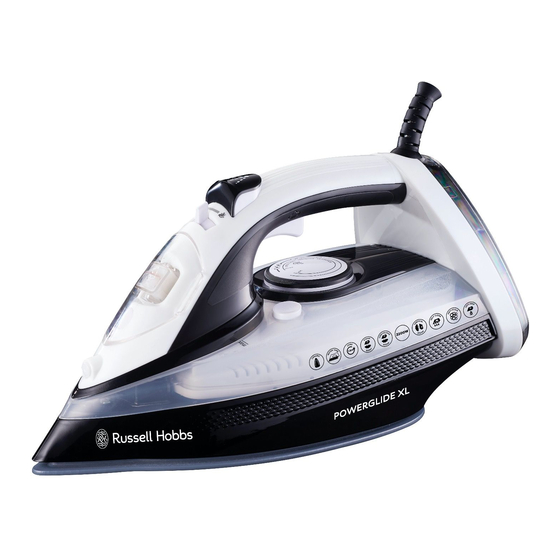
Page 5: Parts Diagram
PARTS DIAGRAM 1. Handle 2. Spray button 3. Burst of steam button 4. Water inlet 5. Ceramic soleplate 6. Cord Guard 7. Water tank 8. Adjustable temperature dial 9. Steam adjustment knob 10. Pilot light 11. Self-clean button OPERATING INSTRUCTIONS BEFORE FIRST USE Remove any protective films or stickers from the soleplate and the Iron’s body. - Page 6 the water tank is empty and there is no more steam that can be produced; the preparation work is completed. The iron is now ready for normal use. Note: It is normal for small amount of smoke to be produced the first time you use the iron, this will quickly disappear.
-
Page 7: How To Fill The Water Tank
NOTE: If the fabric consists of various kinds of fabrics, always select the temperature required by the most delicate fabric. HOW TO FILL THE WATER TANK 1. Disconnect the appliance from main power supply outlet. 2. Ensure that the temperature dial and steam knob are in the “MIN” and “OFF” positions. -
Page 8: Steam Ironing
1. Connect the iron with a suitable mains power supply outlet. 2. Set the steam knob to position “0”/ “no steam”/ “OFF”. 3. Turn the temperature dial to the correct ironing temperature according to the recommendation of the garment label. 4. -
Page 9: Burst Of Steam In Vertical Position
This function works well for tough wrinkles and heavy fabrics. By pressing the burst of steam button, an intense burst of steam is emitted from the soleplate. This can be very useful when removing stubborn creases. This function can be used once the iron has reached maximum temperature. - Page 10 3. Fill the iron as described in “How to Fill the Water Tank” and fill the water tank up to the MAX position. Do not put vinegar or other descaling agents in the water tank. 4. Place the iron on a stable surface in an upright standing position. 5.
-
Page 11: Cleaning And Maintenance
repair charge. CLEANING AND MAINTENANCE • After use, lift the iron with the water inlet filling hole downwards to empty the remaining water from the water tank into the sink. • Insert the plug into the socket and set the temperature dial to MAX for 1-2 minutes to evaporate the remaining water. -
Page 12: Troubleshooting
• Ensure that the steam knob is set to the “0”/ “no steam”/ “OFF” position. • Ensure that all parts are dry before storing. • Store only once the iron has cooled completely. • Store the appliance vertically in its box or in a clean, dry place. •... -
Page 13: Servicing The Appliance
distilled water. Too little water in the water tank. Fill water into the tank as per earlier instructions. Not Spraying There is not enough pressure or Press the spray nozzle by air inside. hand and push the spray button several times continuously. - Page 14 sources may damage the appliance.
- Page 15 * Products returned under warranty with faults due to scale will be subject to a repair charge. AFFIX YOUR PROOF OF PURCHASE/RECEIPT HERE IN THE EVENT OF A CLAIM UNDER WARRANTY THIS RECEIPT MUST BE PRODUCED. 1 YEAR STANDARD WARRANTY Warranty will be extended for another year if you register your product online within 12 months of purchase (visit...
- Page 16 Any accessories supplied with the product, including but not limited to, bowls, jugs, mills or carafes made either of glass or plastic and supplied with this appliance (hereinafter referred to as “the accessory or accessories”), is warranted to be free from material and workmanship defects for the duration of the appliance warranty. The accessories should give trouble free service when used in accordance with the directions described in the instruction manual.
Need help?
Do you have a question about the RHI002 and is the answer not in the manual?
Questions and answers