Table of Contents
Advertisement
Quick Links
Advertisement
Table of Contents

Related Manuals for Russell Hobbs EASYGLIDE RHI500


Summary of Contents for Russell Hobbs EASYGLIDE RHI500
- Page 1 WARRANTY AND INSTRUCTION RHI500 RUSSELL HOBBS STEAM, SPRAY, DRY IRON...
- Page 2 Congratulations on purchasing our Russell Hobbs Steam, Spray, Dry Iron. Each unit is manufactured to ensure safety and reliability. Before using this appliance for the first time, please read the instruction manual carefully and keep it for future reference. FEATURES OF THE RUSSELL HOBBS STEAM, SPRAY, DRY IRON ...
-
Page 3: Important Safeguards
IMPORTANT SAFEGUARDS When using any electrical appliance, basic safety precautions should always be followed including the following: 1. Please read the instructions carefully before using any appliance. 2. Always ensure that the voltage on the rating label corresponds to the mains voltage in your home. - Page 4 15. Do not let the cord hang over the edge of a table or counter. Ensure that the cord is not in a position where it can be pulled on inadvertently. 16. Do not allow the cord to touch hot surfaces and do not place on or near flammable goods, near an open flame, hot gas or electric burner or a heated oven.
- Page 5 36. Always unwind and straighten the power cord before use. 37. Unplug the iron from the mains electrical supply before: Cleaning Filling with water or emptying the water tank Immediately after use When not in use ...
-
Page 6: Before First Use
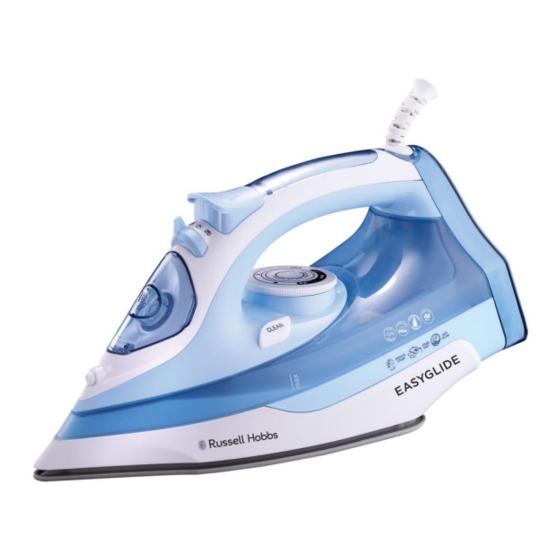
1. Handle 2. Spray button 3. Steam adjusting knob/Self-Clean 4. Water Inlet 5. Ceramic Soleplate 6. Water tank 7. Temperature adjustable knob 8. Pilot Light 9. Cord Guard OPERATING INSTRUCTIONS BEFORE FIRST USE Remove any protective films or stickers from the soleplate and the Iron’s body. Wipe the soleplate with a dry soft cloth. - Page 7 HINTS AND TIPS FOR IRONING 1. Sort the articles to be ironed according to the type of fabric. This will minimize the frequency of temperature adjustment for different garments. 2. Start ironing the fabrics requiring the lowest temperature and progress to the higher ones because the iron heats up quicker than it cools down.
-
Page 8: How To Fill The Water Tank
required by the most delicate fabrics. HOW TO FILL THE WATER TANK 1. Disconnect the appliance from main power supply outlet. 2. Ensure that the temperature dial and steam knob are in the “MIN” and “OFF” positions. 3. Open the water inlet cover. 4. -
Page 9: Steam Ironing
5. When the required temperature is reached, the pilot light goes off. The iron is ready to use. 6. After use, turn the temperature dial to the “0”/ “OFF”/ “MIN” position to switch off. 7. Disconnect the iron from mains power supply outlet. 8. -
Page 10: Burst Of Steam In Vertical Position
BURST OF STEAM This function works well for tough wrinkles and heavy fabrics. By pressing the steam button, an intense burst of steam is emitted from the soleplate. This can be very useful when removing stubborn creases. This function can be used once the iron has reached maximum temperature. - Page 11 1. Make sure that the appliance is unplugged from the mains supply outlet. 2. Set the steam knob to the “0”/ “no steam” / “OFF” position. 3. Fill the iron as described in “How to Fill the Water Tank” and fill the water tank up to the MAX position.
-
Page 12: Cleaning And Maintenance
ANTI-SCALE/ CALCIUM FEATURE An anti-scale agent has been incorporated as an advanced feature in the design of this iron. It is an extra measure to help prevent limescale/ calcium build-up and prolong the life of your iron. CLEANING AND MAINTENANCE ... -
Page 13: Storing The Appliance
use any abrasive or descaling agents to clean the iron. STORING THE APPLIANCE Complete Cleaning and Maintenance as instructed above. Ensure that the steam knob is set to the “0”/ “no steam”/ “OFF” position. Ensure that all parts are dry before storing. ... -
Page 14: Servicing The Appliance
correct position. correct position. A steam hole is blocked. Clean the steam hole with distilled water. Too little water in the water tank. Fill water into the tank as per earlier instructions. No Spraying There is not enough pressure or Press the spray nozzle by air inside. -
Page 15: Changing The Plug
CHANGING THE PLUG Should the need arise to change the fitted plug, follow the instructions below. This unit is designed to operate on the stated current only. Connecting to other power sources may damage the appliance. Connect a three-pin plug as follows: The wires in this mains lead are coloured in accordance with the following code: Green/Yellow = Earth... - Page 16 PLEASE AFFIX YOUR PROOF OF PURCHASE/RECEIPT HERE IN THE EVENT OF A CLAIM UNDER WARRANTY THIS RECEIPT MUST BE PRODUCED. W A R R A N T Y AND EXTENDED WARRANTY Home of Living Brands (Pty) Limited ("Home of Living Brands ") warrants to the original purchaser of this product ("the customer") that this product will be free of defects in quality and workmanship which under normal personal, family or household use and purpose may manifest within a period of 1 (one) year from the date of purchase ("warranty period").
Need help?
Do you have a question about the EASYGLIDE RHI500 and is the answer not in the manual?
Questions and answers