Bolin Technology D Series User Manual
Dante av decoder
Hide thumbs
Also See for D Series:
- User manual (53 pages) ,
- Manual (47 pages) ,
- Quick start manual (19 pages)

Related Manuals for Bolin Technology D Series


Summary of Contents for Bolin Technology D Series
- Page 1 D Series Dante AV Decoder USER MANUAL VERSION: D10H-09232021 DANTE AV DECODER D10H © 2021 Bolin Technology...
-
Page 2: Table Of Contents
Contents IMPORTANT INFORMATION ..............................3 WHAT’S IN THE BOX ................................. 5 OVERVIEW ....................................6 ....................................6 EATURES .................................. 7 ECODER IAGRAMS DECODER INSTALLATION ................................8 ..............................8 OUNT NSTALLATION ..............................11 OUNT NSTALLATION ............................12 INGLE OUNT NSTALLATION .............................. 12 OUNT NSTALLATION ............................ -
Page 3: Important Information
Before operating the unit, please read this manual thoroughly and retain it for future reference. Copyright Copyright 2015-2021 Bolin Technology all rights reserved. No part of this manual may be copied, reproduced, translated, or distributed in any form or by any means without prior consent in writing from our company. - Page 4 Due to uncertainties such as physical environment, discrepancy may exist between the actual values and reference values provided in this manual. Use of this document and the subsequent results shall be entirely on the user’s own responsibility. Safety Information WARNING! Installation and removal of the unit and its accessories must be carried out by qualified personnel.
-
Page 5: What's In The Box
WHAT’S IN THE BOX Accessories (Optional) -
Page 6: Overview
Overview This user guide is suitable for the following models: D10H Features • Dante AV video streaming decoder HDMI 2.0 output • 4K 60 4:4:4 video over standard Gigabit Ethernet • Ultra-low latency real-time video performance over the network • 32-bit wide video interface capable of processing code streams 200-800 Mbps •... -
Page 7: Decoder Diagrams
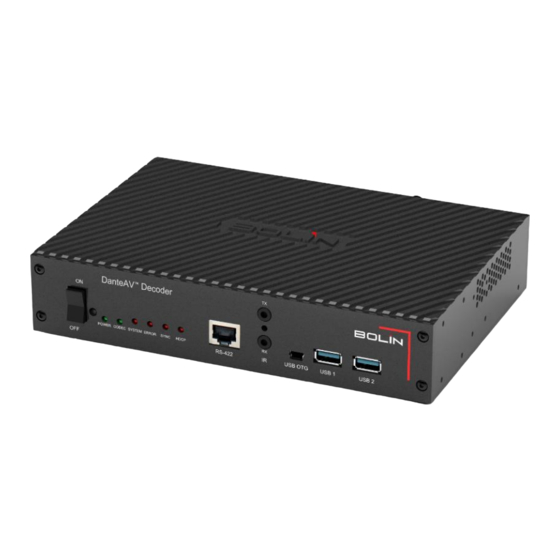
Decoder Diagrams 1. Power Switch To power on / off the decoder 2. 3.5mm IR IN 3. Power LED Indicator Turns green when the decoder is connected to power and switched on 4. Codec LED Indicator Green – Normal Not lit - Abnormal/Error 5. -
Page 8: Decoder Installation
11. USB OTG USB On The Go (OTG), reserved 12. USB 1 Port Used to connect a keyboard 13. USB 2 Port Used to connect a mouse NOTE: • The USB ports can only be used for keyboard and mouse connections - USB flash drives / hard drives are not supported. - Page 9 Din Rail mounting method 2:...
- Page 10 Din Rail mounting method 3:...
-
Page 11: Wall Mount Installation
Wall Mount Installation Need to use Wall Mount Bracket and M4*6PW screws for this installation. Wall Mount Bracket is sold separately. Please following the diagrams below to do wall mount installation. -
Page 12: Single Rack Mount Installation
Single Rack Mount Installation Need to use Single Rack Mount Kit and M3*8K screws for this installation. Single Rack Mount kit is sold separately. Please following the diagrams below to do single rack mount installation. Dual Rack Mount Installation Need to use Dual Rack Mount Kit and M3*8K screws for this installation, Dual Rack Mount kit is sold separately. -
Page 13: Base And Surface Mount Installation
Base and Surface Mount Installation Need to use Base Mount Kit and Surface Mount Kit for this installation. Base Mount kit and Surface Mount kit are included with decoder purchase. Please following the diagrams below to do the installation. Required accessories and components:... - Page 14 Base mount installation 1. HDMI cable mount installation: 2. Base mount kit installation (B-BM10): Surface mount installation 1. Surface Mount kit installation with pole mounting (B-SM10):...
- Page 15 NOTE: To remove the decoder...
- Page 16 2. Surface mount kit installation with surface mounting (B-SM10) NOTE: To remove the decoder...
-
Page 17: System Configuration
System Configuration Connection Dante AV decoder is used to work together with Dante AV camera and Dante AV encoder to decode the Dante AV stream, included audio and video that output from the camera or encoder, and output it to the back- end display device via HDMI. -
Page 18: Obtain Video Signal
Obtain Video Signal Use Dante AV Decoder to obtain Dante AV Camera video stream 1. Use Cat6 network cable to connect Dante AV decoder and Dante AV camera to the same POE network switch. 2. Connect Dante AV decoder’s HDMI to HDMI display device. 3. - Page 19 How to use IR remote controller to remotely control the PTZ camera via Dante AV decoder: 1. Use the IR remote controller to control the PTZ camera directly aiming to the camera. 2. Go to camera OSD setting, set the IR-RECEIVE to OFF. SYSTEM MENU EXPOSURE PELCO ID...
- Page 20 4. Aim IR remote controller to decoder, you can control the Dante AV PTZ camera remotely. 5. When use IR remote controller via decoder, following features with IR control are not functional: • Fn + Scan • Fn + Left Limit •...
-
Page 21: Using Keyboard Controller Via Decoder
Using Keyboard Controller via Decoder Dante AV decoder is equipped with an RS422 interface. Administrators can connect a keyboard controller to the decoder’s RS422 port, and use standard Visca RS422 protocol, to control the subscribed camera through the decoder. RS422 (VISCA) Connection You can use the RS422 port to connect optional controllers, such as a joystick keyboard and a PC control station, to operate and control the connected camera. - Page 22 6. Use the included RJ45 to RS422 Phoenix connecter adaptor to make RS422 connection. 7. Or you can use CAT5/6 T-568B Standard Ethernet cable to direct connect between the decoder and the keyboard controller by making RS422 connection with the pin definition below.
- Page 23 Use serial control over Dante AV network, you need to setup Serial Config and run routing check within Dante Controller. • Set up Serial Config Tab within Dante Controller Dante Controller serial RS422 routing check. • The 'RS-422' ancillary channel on the Bolin-PTZ-Camera-D220 receiver is subscribed to the equivalent channels on the Bolin-Decoder-D10H transmitter.
-
Page 24: Led Indicators
LED Indicators The Dante AV decoder features 2 green LEDs and 4 bi- color LEDs. Green LEDs • POWER LED: Indicates power is supplied to the Dante AV decoder • CODEC LED: Indicates the decoder codec is active Bi-color LEDs •... -
Page 25: Infrared Interface
NOTE: The USB interface on the decoder can only be used for keyboard and mouse connections. USB flash drives / hard drives are not supported. The diagram below illustrates the example setup described above. Infrared Interface Infrared control over IP allows an IR controller to remotely control a device via the Dante network. The decoder equipped with 3.5mm jacks for infrared control over IP, right side is TX and left side is RX. -
Page 26: Dimension
Dimension Unit: mm... - Page 27 2082 TECHNOLOGY LLC BOLIN TECHNOLOGY...
Need help?
Do you have a question about the D Series and is the answer not in the manual?
Questions and answers