
Related Manuals for GF RS


Summary of Contents for GF RS
- Page 1 GEORG FISCHER PIPING SYSTEMS ROTARY PEELER RS Instruction Manual Part # 10014339 (March 2015) GEORG FISCHER CENTRAL PLASTICS...
- Page 2 All rights reserved, in particular the rights of duplication and distribution as well as translation. Duplication and reproduction in any form (print, photocopy, microfilm or electronic) require the written permission of Georg Fischer Piping Systems Ltd.
-
Page 3: Table Of Contents
CONTENTS GENERAL INFORMATION WARNING MESSAGES OTHER SYMBOLS AND DISPLAYS ABBREVIATIONS 1. SAFETY NOTES 1.1 PROPER USE 1.2 SAFETY INSTRUCTIONS 1.3 WORK SAFELY 1.4 WASTE DISPOSAL 1.5 FURTHER SAFETY REGULATIONS 2. GENERAL 2.1 INTRODUCTION 2.2 RANGE OF APPLICATION 2.3 FUNDAMENTAL TIPS 2.3.1 General Tips for Preparation and Assembly of Fittings 2.4 COPYRIGHT 3. -
Page 4: General Information
GENERAL INFORMATION To allow a quick understanding of these instructions and safe handling of the tool, all the warning messages, notes and symbols used in these instructions are presented here along with their meaning. WARNING MESSAGES In these instructions, warning messages are used to warn you about the dangers of injury or material damage. -
Page 5: Abbreviations
1. SAFETY NOTES The Rotary Peeler (also referred to as RS) is state of the art. Usage for purposes other than that described in these instructions can lead to personal injury to the user or others. In addition, the tool or other items could be damaged. -
Page 6: Waste Disposal
Georg Fischer Central Plastics LLC for the latest revision. 2.2 RANGE OF APPLICATION The Rotary Peeler RS should be used exclusively for universal peeling at the pipe end for electrofusion couplings, tees and elbows and as well as for electrofusion saddles. Any other use is not authorized. The manufacturer cannot be held liable for damages resulting from unauthorized use; the user bears sole responsibility. -
Page 7: General Tips For Preparation And Assembly Of Fittings
2.3.1 General Tips for Preparation and Assembly of Fittings • Fusion zones should be well protected from moisture during inclement weather (rain, snowfall etc.). The pipe should be cleaned of all debris before the Rotary Peeler. Use care to remove all embedded debris from the pipe surface or damage to the blade can occur. -
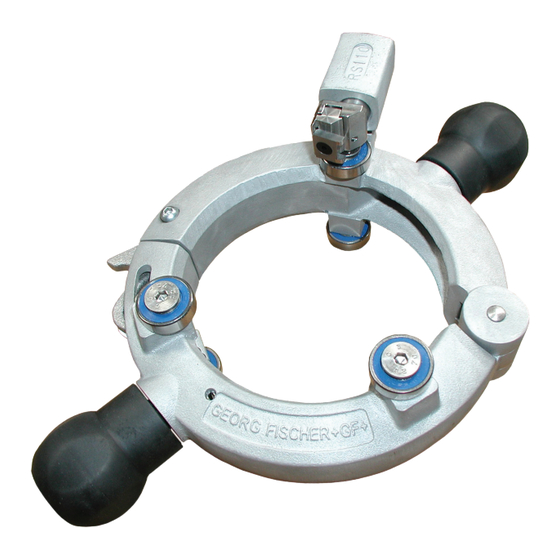
Page 8: Parts List
3. PARTS LIST 1. Pendular with Nut 5. Feed Rolls 2. Peeling Blade 6. Lower Part 3. Upper Part 7. Han 4. Release Handle 3.1 ACCESSORIES Replacement blade for Rotary Peeler For all Rotary Peelers in sizes 1 1/4 through 12 inch. Includes countersunk screw. -
Page 9: Characteristics And Range Of Applications
• Time saving Tool is always ready to use, it can be used for the next peeling without setting the peeling blade back in its origin position. 4.2 RANGE OF APPLICATIONS 4.2.1 Work Area Rotary Peeler For Pipe Outer Diameter (in) Part Number RS 1 ¼ IPS 1.66 10014409 RS 1 ½ IPS 1.90 10014410 RS 2 IPS 2.375... -
Page 10: Receipt Inspection
• Check the delivery for completeness and any transportation damage. • Report any missing parts or transportation damage to your supplier immediately. Package Contents* • Transport Box • One (1) Rotary Peeler RS • One (1) Operating Manual with Spare Parts List *) Subject to Alterations 5.2 TRANSPORTATION The Rotary Peeler is a portable, hand-operated tool. -
Page 11: Mounting The Rotary Peeler Onto The Pipe
6.2 MOUNTING THE ROTARY PEELER ONTO THE PIPE 1. Mark the peeling length (end position) at the pipe - when doing electrofusion saddle preparations mark the start and end position. 1.1 When making electrofusion saddle preparations mark the start and end position. 1.2 When making electrofusion coupling preparations mark the peel length at least 1/2 the length of the coupling. -
Page 12: Peeling The Pipe
6.3 PEELING THE PIPE 1. Turn the Rotary Peeler by handles (See illustration 5) around the pipe in shaft direction (See illustration 6), until the desired peeling length is reached. Illustration 5 Illustration 6 The chip, which results by peeling with the Georg Fischer Rotary Peeler should automatically separate at the end of operating by removing the Rotary Peeler. -
Page 13: Maintenance
7. MAINTENANCE 7.1 EXCHANGE OF SPARE PARTS Danger of cutting hands! The peeling blade is sharp! Danger of cutting hands on the peeling blade. Do not touch the rotating peeling blade. 7.1.1 Changing the Peeling Blade The peeling blade should be changed periodically. For ordering spare parts, see the separate spare parts list. -
Page 14: Changing The Feed Rolls
7.1.2 Changing the Feed Rolls For ordering spare parts, see the separate spare parts list. 1. Loosen flat head screw (See illustration 9) with allen wrench. 2. Change feed rolls. Illustration 9 3. Tighten flat head screw. 8. WHAT TO DO 8.1 PROBLEM SOLVING The following table shows you possible faults and their remedy. -
Page 15: Servicing / Customer Service
For ordering spare parts, see the spare parts list below. For problem solving, please contact your branch office directly. You will find contact information in the back of this manual. Please give the following details: Machine type: Rotary Peeler e.g. RS - size... - Page 16 For more information, please contact: GEORG FISCHER CENTRAL PLASTICS 39605 Independence, Shawnee, OK 74804 (800) 654-3872 (405) 273-6302 GFCentralMarketing@georgfischer.com www.gfcp.com / www.gfpiping.com GEORG FISCHER GEORG FISCHER CENTRAL PLASTICS PIPING SYSTEMS...
Need help?
Do you have a question about the RS and is the answer not in the manual?
Questions and answers