Table of Contents
Advertisement
Quick Links
Advertisement
Table of Contents

Related Manuals for Dual USER MANUAL


Summary of Contents for Dual USER MANUAL
- Page 1 XD6200 INSTALLATION/OWNERS MANUAL AM/FM/CD Receiver with Remote...
-
Page 2: Installation
XD6200 INSTALLATION Preparation Please read entire manual before installation. Before You Start • Disconnect negative battery terminal. (consult a qualified technician for instructions) • Avoid installing the unit where it would be subject to high temperatures, such as from direct sunlight, or where it would be subject to dust, dirt or excessive vibration. -
Page 3: Wiring Diagram
XD6200 INSTALLATION Wiring Diagram Antenna Connector YELLOW Auxiliary Input RCA Cable (sold separately) GREY Rear Preamp Output Connect to amplifier RCA Input BLUE Remote Turn-On Connect to amplifier or power antenna. Insulate wire if not used. BLACK Ground Connect to vehicle chassis ground. -
Page 4: Operation
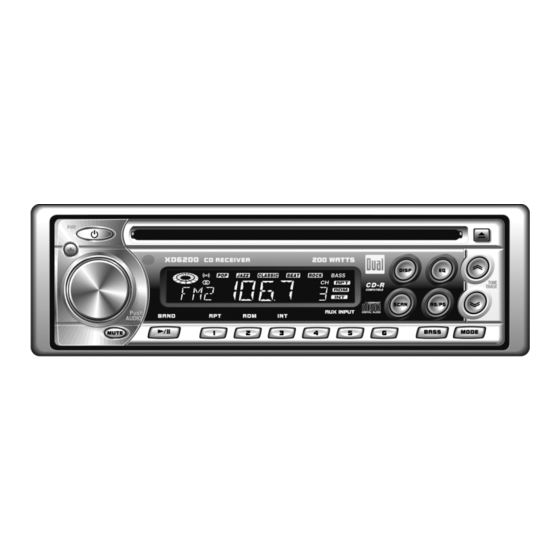
XD6200 OPERATION Control Locations - Receiver Release Mode Power Bass Boost Audio Preset 6 Scan Preset 5 Display Preset 4 Auto Store/Preset Scan Preset 3/CD Intro Preset 2/CD Random Tune/Track Down Preset 1/CD Repeat Eject Play/Pause/Band Tune/Track Up Mute... -
Page 5: Control Locations - Remote
XD6200 OPERATION Control Locations - Remote Power Play/Pause/Band Mute Audio Preset 2/CD Random Volume Up Preset 3/CD Intro Volume Down Preset 4 Tune/Track Down Preset 1/CD Repeat Tune/Track Up Preset 6 Mode Preset 5... -
Page 6: General Operation
XD6200 OPERATION General Operation Faceplate Removal Press REL and pull away from the left side to remove. To re-install, insert right side of faceplate first then push left side to secure. *For semi-permanent faceplate installation, remove trim ring and install supplied Phillips head #1 screw through left side of mounting frame into faceplate. - Page 7 XD6200 OPERATION General Operation Press and hold DISP then press TUNE to select radio Programmable frequency (tuner mode) or CD track/ elapsed time (CD Display Priority player mode) display priority (default). Clock is accessed by pressing DISP momentarily. Press and hold DISP then press TUNE to select clock display priority.
-
Page 8: Tuner Operation
XD6200 OPERATION Tuner Operation Seek Tuning Press TUNE momentarily to seek the next strong station. Manual Tuning Press TUNE for more than 2 seconds, then release. "MANU" will momentarily appear in the display. Press TUNE momentarily to move radio frequency up or down one step at a time. Press and hold to advance quickly. -
Page 9: Cd Player Operation
XD6200 OPERATION CD Player Operation With the label facing up, insert a standard 5" CD into the CD Insert CD slot. The CD will automatically begin playback. Press the EJECT button to stop and eject the CD. The unit Eject CD will change to previous mode of operation (tuner or auxiliary input). -
Page 10: Limited One-Year Warranty
You may also have other rights which vary from service, you must prepay the initial shipping state to state. charges. DUAL will pay the return shipping charges if the product is returned to an address Namsung America Inc. warrants this product to within the USA. -
Page 11: Specifications
XD6200 OPERATION Specifications CD Player Signal-to-noise: >86dB Frequency response: 20Hz-20kHz, ±3dB Channel separation @ 1kHz: >65dB D/A converter: 1 Bit FM Tuner Tuning range: 87.5MHz-107.9MHz FM mono sensitivity: 12dBf 50dB quieting sensitivity (stereo): 16dBf Stereo separation @ 1kHz: 40dB Frequency response: 30Hz-13kHz, ±3dB AM Tuner Tuning range:... - Page 12 Namsung America Inc. 21318 64th Ave. South Kent, WA 98032 U.S.A. Toll Free: 1-866-626-7863 ©2003 Namsung America, Inc. EVOK0303-V02...
Need help?
Do you have a question about the USER MANUAL and is the answer not in the manual?
Questions and answers