Advertisement
Table of Contents
- 1 Safety Information
- 2 Installation
- 3 Operation
- 4 Control Locations
- 5 Remote Control Preparation
- 6 General Operation
- 7 AM/FM Tuner Operation
- 8 USB/SD Operation
- 9 Media Compatibility
- 10 Bluetooth Operation
- 11 Rear Camera Operation - (Optional)
- 12 Troubleshooting
- 13 Limited One Year Warranty
- 14 Specifications
- Download this manual
Advertisement
Table of Contents

Related Manuals for Dual XVM1000Ui


Summary of Contents for Dual XVM1000Ui
- Page 1 XVM1000Ui INSTALLATION/OWNER’S MANUAL Media Receiver with Bluetooth , USBMirror and featuring a 10.1" Touch Screen Display...
- Page 2 FCC Compliance This device complies with Part 15 of the FCC Rules. Operation is subject to the following two conditions: (1) this device may not cause harmful interference, and (2) this device must accept any interference received, including interference that may cause undesired operation. Warning : Changes or modifications to this unit not expressly approved by the party responsible for compliance could void the user’s authority to operate the equipment.
-
Page 3: Safety Information
The SAFETY NOTICE is reminder to drive responsibly and safely while using your mobile phone device, or any APP’s that are compatible with this unit. it is highly recommended that your Dual XVM1000Ui is installed by a professional installer or an authorized dealer. -
Page 4: Installation
XVM1000Ui INSTALLATION Preparation Before You Start • Disconnect negative battery terminal. Consult a qualified technician for instructions. • Avoid installing the unit where it would be subject to high temperatures, such as from direct sunlight, or where it would be subject to dust, dirt or excessive vibration. - Page 5 XVM1000Ui INSTALLATION Wiring Diagram - Inputs/Outputs RADIO Note: When replacing a fuse, make sure to use the correct type and amperage. Using an incorrect fuse could cause damage. The unit uses (1) 10 amp blade-type fuse located on the back of the unit.
- Page 6 XVM1000Ui INSTALLATION Front Panel Installation Guide Step 1: Insert the supplied removal keys into the slots as shown and slide the receiver out of the mounting sleeve. Step 2 : Install the mounting sleeve into the dash or installation kit opening and bend the tapb to secure Step 3 : Connect the power wiring harness.
- Page 7 XVM1000Ui INSTALLATION Front Panel Installation Guide Step 6 : Insert the LVDS cable to the back side of monitor. Step 7 : Align the monitor with the chassis so that you can see a small round hole on either side like below.
- Page 8 XVM1000Ui INSTALLATION Front Panel Installation Guide Step 8 : Insert the included rod to attach the screen to the chassis.
- Page 9 XVM1000Ui INSTALLATION Front Panel Installation Guide Step 9 : Pivot the screen either back or forth to adjust to the best viewing angle then flip the 2 locking tabs (on the sides of the chassis) down to lock the screen into place.
-
Page 10: Operation
XVM1000Ui OPERATION Control Locations Microphone Reset Power/Mute Button microSD Card Slot Voice/Camera Button USB Port Volume Down 3.5mm AUX Input Jack Volume Up Button 1 Power 14 * Key 2 Mode 15 Loudness 3 Play / Pause 16 Number Keys... -
Page 11: Remote Control Preparation
XVM1000Ui OPERATION Remote Control Preparation Remove battery insulation tape . Notes: • The remote control uses one 3 volt Lithium CR2025 battery. Remove the battery if the remote will not be used for a month or longer. • Remove and dispose of battery properly. -
Page 12: General Operation
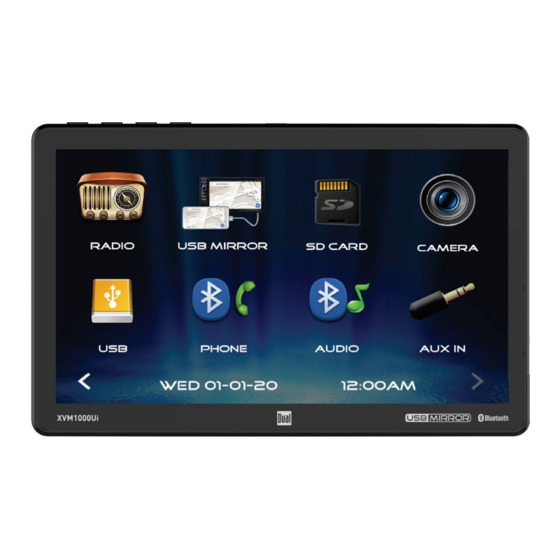
XVM1000Ui OPERATION General Operation Power On/Off Press to turn the unit on. Press and hold to turn the unit off. Mode Press MODE to access available input modes: Radio, USB Mirror, USB, SD Card, Bluetooth Phone, Bluetooth Music, Camera, Auxiliary Input. - Page 13 XVM1000Ui OPERATION General Operation From the Main Menu screen, press Settings in the bottom right corner to Setup Menu access the Setup Menu and select from the following categories: General, Audio, Video and Bluetooth. General: • OSD Language - Select English as the language for the on-screen display.
-
Page 14: Am/Fm Tuner Operation
XVM1000Ui OPERATION AM/FM Tuner Operation Radio Operation Select the Radio icon from the Main Menu screen. Main Menu Press to return to Main Menu screen. Current Mode Indicator Displays current mode of operation. Tune Frequency Down Press momentarily to tune the unit down one step at a time. Press and hold to tune down by seeking the next strong station. - Page 15 XVM1000Ui OPERATION AM/FM Tuner Operation AS/PS Press and hold to automatically store the six strongest stations in the current band as presets. Press briefly for a preset scan, which will scan all preset stations and play 10 seconds of each. Press again to cancel the scan and continue playing the current station.
-
Page 16: Usb/Sd Operation
XVM1000Ui OPERATION USB/SD Operation play MP3 files from a USB device or microSD Card, insert device MP3 or JPG Operation and playback will begin automatically. To return to USB or SD playback from another mode of operation, select the corresponding icon from the Main Menu. - Page 17 XVM1000Ui OPERATION USB/microSD Operation 9 10 Folder Search Press to access the directory of folders and files. Use the up/down arrows to scroll through the folder list, then press on the name of the desired folder to access it. Use the up/down arrows to scroll through the file list, then press on the name of the desired file to access it.
- Page 18 XVM1000Ui OPERATION Media Compatibility - USB/ microSD Card File Type FAT 12 File System FAT 16/FAT 32 .mp3/.MP3/.Mp3/.mP3 File Extension .rmp/.m4a MPEG 1 MPEG MPEG 2 Format MPEG 2.5 MPEG 1 32/44. 1 /48kHz Sampling MPEG 2 12/16/22.05/24kHz Frequency MPEG 2.5 8/11.025/12kHz...
-
Page 19: Media Compatibility
XVM1000Ui OPERATION Media Compatibility Media Compatibility The following types of discs/files are not compatible: • MP3 PRO format, MP3 playlists • RMP format • WAV format • WMV format • WMA format • AAC, protected AAC, M4A format Playback Order MP3 playback sequence begins in the root folder of the USB flash drive or SD card. -
Page 20: Bluetooth Operation
The unit broadcasts the pairing signal constantly when no devices are currently connected. Complete the pairing sequence from your Bluetooth device. Refer to the owner's manual for your device for more details. The device name is "XVM1000Ui". Bluetooth passcode "0000". The unit can be in any mode of operation when pairing is performed. - Page 21 XVM1000Ui OPERATION Bluetooth Operation Screen Press to adjust screen brightness or put the monitor into standby mode. Audio Press to access audio setting such as EQ, Surround Sound Settings and Field Settings (Balance). Settings Press to access the Settings Menu.
-
Page 22: Rear Camera Operation - (Optional)
Note: The external video output is not active when using the rear camera input. Dual iPlug P1 Smart App Remote Control Use the Dual iPlug P1 Smart App Remote Control on an Apple or Android smartphone to control the receiver via Bluetooth. -
Page 23: Troubleshooting
XVM1000Ui OPERATION Troubleshooting General Problem Cause Action Yellow wire not connected or incorrect voltage Check connections for proper voltage (11~16VDC) Unit will not turn on Red wire not connected or incorrect voltage (no power) Black wire not connected Check connection to ground... -
Page 24: Limited One Year Warranty
Dual dealer and used in the U.S.A. • Call us toll-free at 1-866-382-5476 What is covered? This warranty covers all defects •... -
Page 25: Specifications
XVM1000Ui OPERATION Specifications FM Tuner Tuning range: 87.5MHz-107.9MHz Usable sensitivity: 10dBf 50dB quieting sensitivity: 20dBf Stereo separation @ 1kHz: 38dB Frequency response: 30Hz-13kHz AM Tuner Tuning range: 530kHz-1710kHz Usable sensitivity: 24uV Frequency response: 30Hz-2.3kHz Front USB Compatibility: High Speed USB 2.0... - Page 26 Dual Electronics Corp. Toll Free: 1-866-382-5476 Monday-Friday, 9AM-5PM EST www.dualav.com ©2020 Dual Electronics Corp. All rights reserved. NSA0520...
Need help?
Do you have a question about the XVM1000Ui and is the answer not in the manual?
Questions and answers