Table of Contents
Advertisement
Quick Start Guide
For Mechless and CD Receivers
Not all features listed in this QSG
are available on all models.
To download the complete,
model-specific manual, please visit
www.dualav.com/support/manuals.php
or call 1-866-382-5476,
9AM-5PM EST (Monday-Friday).
General Operation
Power On/Off
Press the
button to turn the unit on. Press
turn unit off.
Faceplate Removal
Press RELEASE and pull away from the left side to
remove. To re-install, insert right side of faceplate
first then push left side to secure.
Changing Modes
Press MODE to select between AM/FM, CD player,
auxiliary front/rear, USB and operation of iPod/iPhone.
Modes of operation are shown in the
display.
Volume
Adjust volume using volume knob.
Mute
Press
to silence the audio. Press
listening at the previously selected volume.
Auxiliary Inputs
Insert a 3.5mm cable in the units front AUX port, or RCA
cables into the rear AUX-IN connectors.
Reset
Press the RESET button to reset the unit back to the
factory settings if abnormal operation occurs. The reset
button is located behind the front panel.
Setting the Clock
With the unit on, press and hold DISP until the clock
begins to flash, then release. Press TUNE
ll
the hours and TUNE
to adjust the minutes. Press
DISP momentarily to save the selected time.
Display
Press DISP to toggle display between various displayed
information.
Audio / Menu
Press and hold AUDIO/MENU for more than three
seconds to access the setup menu. Press AUDIO/MENU
momentarily to select between the menu functions and
rotate the volume knob left/right to adjust or activiate the
desired function.
To download the complete Owner's Manual for your radio,
please visit www.dualav.com/support/manuals.php.
Installation
Before You Start
Consult a qualified technician for instructions. Dual always recommends
professional installation.
Disconnect negative battery terminal.
Remove trim ring from unit (if installed).
Remove 2 transit screws located on top of the unit (if applicable).
Insert the removal keys, and remove the mounting sleeve from the head unit.
Note: Most vehicles require an installation kit, wiring harness and/or antenna
adapter (all sold separately) to properly install the head unit in the vehicle.
Installation Process
1. Carefully remove the existing head unit.
2. Connect wiring harness. Consult a qualified technician if you are unsure.
3. Mount the head unit using the mounting sleeve or ISO brackets (depending
on your vehicle's dashboard).
4. Connect wiring harness and antenna. Test the head unit for correct operation.
5. Slide into mounting sleeve to secure, or mount the ISO brackets to the
vehicle.
6. Snap trim ring into place.
Wiring Connections
The chart below the connection for each wire in the wiring harness.
Color
Connection
Red
12V Ignition / Accessory
Yellow
12V Battery / Memory
Black
Ground
Blue
Power Antenna / Amp Turn-on
Grey
Right Front (+)
Grey/Black
Right Front (-)
White
Left Front (+)
White/Black
Left Front (-)
Violet
Right Rear (+)
Violet/Black
Right Rear (-)
Green
Left Rear (+)
Green/Black
Left Rear (-)
AM/FM Tuner Operation
again to
Seek Tuning
Press
TUNE
second to seek to the next strong station.
Manual Tuning
Press
TUNE
radio frequency up or down one step at a time. Press and
hold to advance quickly.
Band
Press BAND to select between FM1, FM2, FM3, AM1
and AM2 bands. Up to six presets can be programmed
for each band, enabling up to 18 FM stations and 12 AM
stations to be stored in memory.
again to resume
Storing Presets
Up to 18 FM and 12 AM stations can be stored. To store
a station, select the desired band and station. Press and
hold the desired preset button (1-6) for more than two
seconds. When stored, the preset number will appear in
the display.
Recalling Presets
Preset stations can be recalled any time by pressing the
nn
corresponding preset button.
to adjust
To download the complete Owner's Manual for your radio,
please visit www.dualav.com/support/manuals.php.
Mounting the Head Unit:
Typical DIN mounting
Step 1:
Insert the mounting sleeve into the
installation kit or dashboard.
Step 2:
Bend multiple mounting tabs around
the mounting sleeve until the mounting
sleeve is secure.
Step 3:
Connect all wiring harnesses and slide
the head unit into the mounting sleeve
Tip:
until it clicks into place.
When a suitable ground wire is
not present in the vehicle wiring
harness, connect the black ground
wire to the vehicle chassis.
Mounting the Head Unit:
Fuse:
ISO mounting
When replacing the fuse, make
sure new fuse is the correct type
Using the existing
and amperage. Using an incorrect
brackets or the brackets
fuse could damage the radio.
supplied with the
installation kit, mount
the brackets to the sides
of the head unit with the
screws supplied with the
head unit.
nn
ll
or
TUNE
for more than one
nn
ll
or
TUNE
momentarily to move
Installation
Single DIN
Mounting Sleeve
Single DIN
Dashboard or Installation Kit
Mounting Tabs
Single DIN
Dashboard or Installation Kit
Head Unit
Single DIN
Decorative
Existing
Bezel
Brackets
New
Radio
Double DIN
Decorative
Bezel
CD Operation*
Insert CD
With the label facing up, insert a standard size CD into
the CD slot. Playback will begin automatically.
Eject CD
Press EJECT (located behind the front panel) to eject the
CD. The unit will change to previous mode of operation.
ll
Track Select
Press TUNE
to skip to the beginning of the next
nn
track. Press TUNE
to return to the beginning of the
nn
current track. Pressing TUNE
again skips to the
beginning of the previous track.
ll
nn
Fast Forward/
Press and hold TUNE
or TUNE
or reverse a track.
Reverse
l
Pause
II
Press
/
to temporarily stop CD playback.
l
II
Press
/
again to resume playback.
Intro
Press INT to access the Intro menu, then turn the volume
knob to select one of the following:
OFF - Cancels the INT function.
ALL - Plays the first 10 seconds of each track.
Repeat
Press RPT to access the Repeat menu, then turn the
volume knob to select one of the following:
ALL - Plays all tracks on CD.
TRACK - Continuously repeats selected track.
Random
Press RDM to access the Random menu, then turn
the volume knob to select one of the following:
OFF - Cancels the RDM function.
ALL - Plays all tracks in random order.
CD-R/CD-RW
Some CD-Rs and CD-RWs may be incompatible
Compatibility
with this unit, depending on media type and
recording method. Refer to the online owner's
manual for details.
* Not available on all models.
To download the complete Owner's Manual for your radio,
please visit www.dualav.com/support/manuals.php.
Dashboard or
Installation Kit
Mounting Sleeve
Mounting Sleeve
Existing
Brackets
New
Radio
to fast forward
Advertisement
Table of Contents

Related Manuals for Dual DXRM57BT


Summary of Contents for Dual DXRM57BT
- Page 1 Installation Installation Before You Start Mounting the Head Unit: Single DIN Consult a qualified technician for instructions. Dual always recommends Typical DIN mounting professional installation. Dashboard or Disconnect negative battery terminal. Installation Kit Step 1: Remove trim ring from unit (if installed).
- Page 2 An iPhone device with a reliable data connection, or an two conditions: vary from state to state. Dual Electronics Corp. warrants this product to the original iPod touch that is connected to wireless internet. (1) this device may not cause harmful interference, and purchaser to be free from defects in material and workmanship for a period of The Pandora App installed on the iPhone/iPod device.
- Page 3 DXRM57BT INSTALLATION/OWNER'S MANUAL AM/FM Receiver with Bluetooth...
- Page 4 DXRM57BT INSTALLATION Preparation Please read entire manual before installation. Before You Start • Disconnect negative battery terminal. Consult a qualified technician for instructions. • Avoid installing the unit where it would be subject to high temperatures, such as from direct sunlight, or where it would be subject to dust, dirt or excessive vibration.
-
Page 5: Wiring Diagram
DXRM57BT INSTALLATION Wiring Diagram Antenna Connector FUSE When replacing the fuse, make sure new fuse is the correct type 10 AMP AGC Fuse and amperage. Using an incorrect fuse could damage the radio. The unit uses one 10 amp ATM fuse located beside the wiring connector. -
Page 6: Control Locations
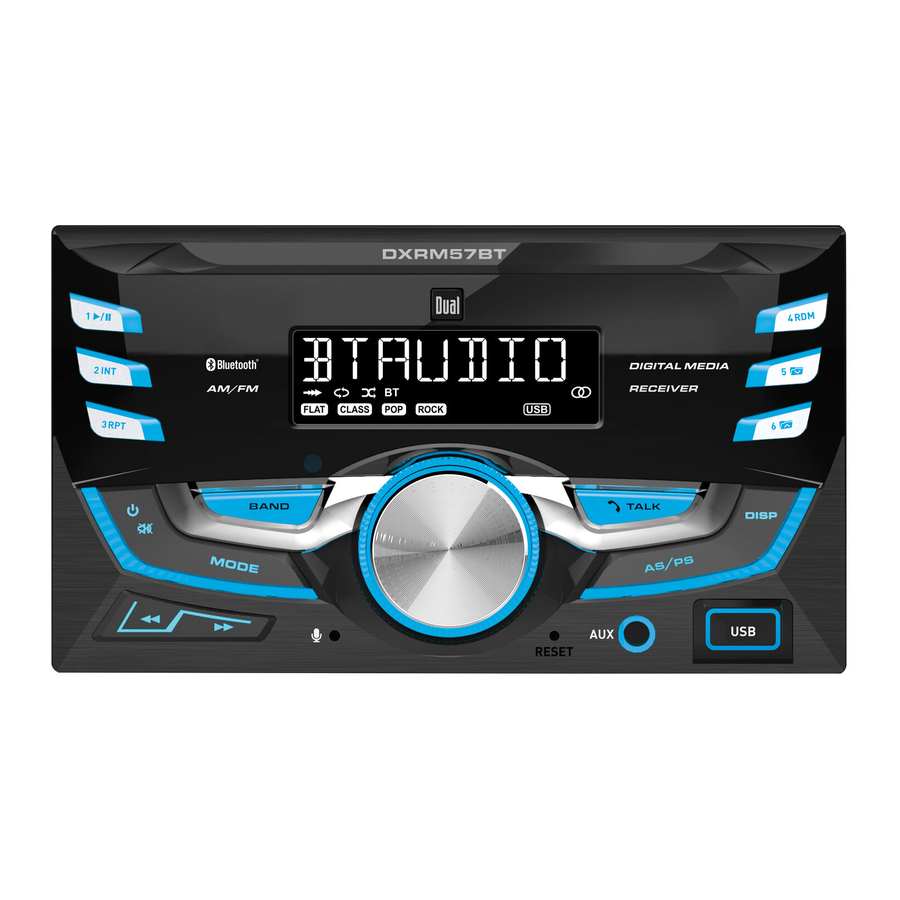
DXRM57BT OPERATION Control Locations 11 12 13 Preset 1 / Repeat Reset Preset 2 / Random Bluetooth Talk Preset 3 / Intro Auxiliary Input Power / Mute USB Port Mode AS/PS Tune / Track Down Display Tune / Track Up... -
Page 7: Remote Control
DXRM57BT OPERATION Remote Control Mode Preset 6 / Folder Up Volume Up Mute Power Audio / Menu Select Preset 5 / Folder Down Tune / Track Up Preset 4 / Play / Pause Volume Down Preset 1 / Repeat Band / Go Back... -
Page 8: General Operation
DXRM57BT OPERATION General Operation Power On/Off Press the button to turn the unit on. Press again to turn the unit off. Changing Modes Press MODE to select between Radio, USB, Auxiliary Input and Bluetooth. Modes of operation are shown in the display. -
Page 9: Am/Fm Tuner Operation
DXRM57BT OPERATION AM/FM Tuner Operation Seek Tuning Press TUNE or TUNE to seek to the previous or next strong station. Manual Tuning Press and hold TUNE or TUNE to enter manual tuning mode, then press TUNE or TUNE momentarily to change radio frequency up or down one step at a time. -
Page 10: Usb Operation
DXRM57BT OPERATION USB Operation Playing MP3 Files To play MP3 files, insert a USB device containing MP3 files. Track Select Press TUNE to skip to the beginning of the next track. Press TUNE to skip to the beginning of the previous track. -
Page 11: Bluetooth Operation
Complete the pairing sequence from your Bluetooth device. Refer to the owner’s manual for your device for more details. The device name is “Dual Media Player”. The Bluetooth passcode is "1234”. Note: The head unit can be in any mode of operation when pairing is performed. -
Page 12: Limited One Year Warranty
2. If you require service during the the original purchase. warranty period, you must carefully pack the product (preferably in the Dual Electronics Corp. agrees, at our original package) and ship it by prepaid option, during the warranty period, transportation with a copy of the original... -
Page 13: Troubleshooting
DXRM57BT OPERATION Troubleshooting Problem Cause Action Yellow wire not connected or incorrect Check connections for proper voltage Red wire not connected or Unit will not turn on voltage (11~16VDC) incorrect voltage (no power) Black wire not connected Check connection to ground... -
Page 14: Specifications
DXRM57BT OPERATION Specifications FM Tuner Tuning range: 87.5MHz-107.9MHz 8.5dBf Usable sensitivity: 10dBf 50dB quieting sensitivity: Stereo separation @ 1kHz: >30dB 30Hz-13kHz Frequency response: AM Tuner Tuning range: 530kHz-1710kHz <42dBu Usable sensitivity: Frequency response: 30Hz-2.2kHz General Speaker output impedance: 4~8 ohms... -
Page 15: Fcc Compliance
DXRM57BT OPERATION FCC Compliance This device complies with Part 15 of the FCC Rules. Operation is subject to the following two conditions: (1) this device may not cause harmful interference, and (2) this device must accept any interference received, including interference that may cause undesired operation. - Page 16 Dual Electronics Corp. Toll Free: 1-866-382-5476 www.dualav.com ©2017 Dual Electronics Corp. All rights reserved. Other trademarks and trade names are those of their respective owners. NSA0217-V01...
Need help?
Do you have a question about the DXRM57BT and is the answer not in the manual?
Questions and answers
What's the orange wire for..u hooked mine up right except that wire and got zero power