Table of Contents
Advertisement
Available languages
Available languages
Quick Links
Ricevitore radio Internet
con sintonizzatore FM e DAB, lettore musicale, Bluetooth
Internet Radio Receiver
with FM and DAB Tuner, Music Player, Bluetooth Interface
WAP-202RS
Bestell-Nr. • Order No.
MANUALE OPERATIVO
INSTRUCTION MANUAL
ELECTRONICS FOR SPECIALISTS ELECTRONICS FOR SPECIALISTS ELECTRONICS FOR SPECIALISTS ELECTRO-
Advertisement
Table of Contents

Related Manuals for Monacor WAP-202RS


Summary of Contents for Monacor WAP-202RS
- Page 1 Ricevitore radio Internet con sintonizzatore FM e DAB, lettore musicale, Bluetooth Internet Radio Receiver with FM and DAB Tuner, Music Player, Bluetooth Interface WAP-202RS Bestell-Nr. • Order No. MANUALE OPERATIVO INSTRUCTION MANUAL ELECTRONICS FOR SPECIALISTS ELECTRONICS FOR SPECIALISTS ELECTRONICS FOR SPECIALISTS ELECTRO-...
-
Page 3: Table Of Contents
Italiano English Possibili utilizzi Applications . . . . . . . . . . . . . . . . . . . . . 4 . -
Page 4: Conformità E Approvazione
Spegnere tutti i dispositivi coinvolti prima di Esiste il rischio di scosse effettuare/scollegare i collegamenti. 1 Possibili usi elettriche. 1) Collegare le prese LINE OUTPUT all‘in- – Il dispositivo WAP-202RS consente l‘ac- gresso di linea di un amplificatore (o un • Utilizzare il prodotto solo in ambienti cesso a migliaia di stazioni radio e po- altro dispositivo a valle come un alto- interni e proteggerlo da gocciolamenti dcast in tutto il mondo tramite Internet. parlante attivo, mixer). e spruzzi d‘acqua e da elevata umidità. Puoi cercare in modo specifico per nome, 2) Per la riproduzione tramite le cuffie, L‘intervallo di temperatura di esercizio... -
Page 5: Telecomando Ir
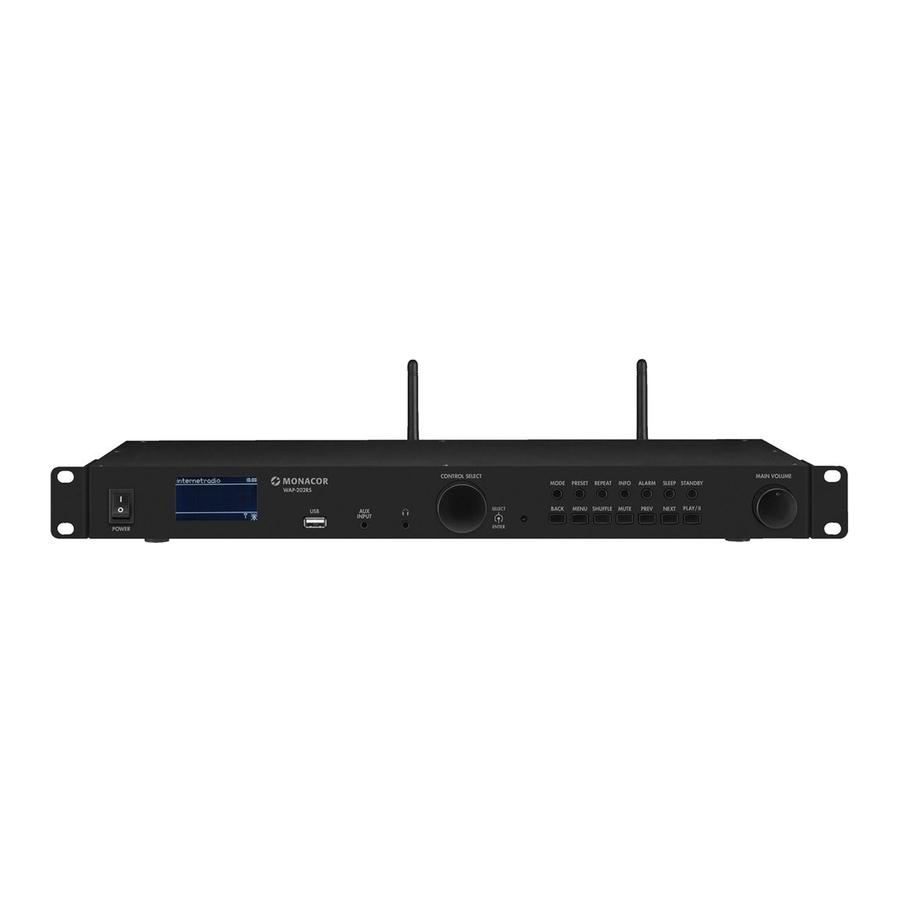
MUTE STOP pausa/riproduzione Sensore IR CONTROL SELECT MAIN VOLUME Internet Radio 19:31 MODE PRESET REPEAT INFO ALARM SLEEP STANDBY HIT Radio-ABC WAP-202RS Jonny White - I can’t forget you BACK MENU SHUFFLE MUTE PREV NEXT PLAY/II SELECT INPUT ENTER POWER... -
Page 6: Prima Accensione E Selezione Della Lingua Del Menu
2.3 Prima accensione e selezione 11) Selezionare la riga Lingua e L‘impostazione attuale è contrasseg- confermare la selezione. Viene visua- nata da un asterisco * (sincronizzazione della lingua del menu lizzato il menu della lingua: automatica dell‘ora tramite Internet). Accendere il dispositivo con l‘interruttore Altre opzioni sono: POWER. BENVENUTO e un grafico a Lan g ua g e barre vengono visualizzati sul display. Sincronizzazione automatica dell‘ora En g lish Viene quindi visualizzata la procedura Danish tramite trasmettitore DAB o trasmetti- Dutch tore FM o impostazione manuale dell‘ora guidata di configurazione*: Finnish (nessun aggiornamento). French Setup wizard N ota: La sincronizzazione automatica La lingua impostata è contrassegnata avviene solo alla ricezione di un tras- Start now? - Page 7 Press SELECT to [Rescan] continue [Wired] 0123456789._- , BKSP [Manual confi g ] Premere prima il pulsante WPS sul rou- abcdefghijklmn opqrstuvwxyzABC ter, quindi premere il pulsante CONT- A Se il dispositivo deve essere utilizzato DEFGHIJKLMNOPQR CANCEL ROL SELECT sul WAP-202RS. La con- senza connessione di rete: nessione è stabilita. Per la procedura Premere il pulsante MENU e il Immettere il nome della rete e con- esatta, segui anche le istruzioni nelle Esegui Ass. Di nuovo al prossimo fermare (per il funzionamento del istruzioni/interfaccia utente del router! avvio? rispondere come richiesto. Il menu di immissione, vedere la de- Metodo 2: Se il router supporta il WPS dispositivo ora può essere utilizzato scrizione in Fig. 22).
-
Page 8: Ulteriori Impostazioni Tramite Il Menu „Impostazioni Di Sistema
CONTROL SELECT per attivare o di- il pin e confermare: Viene visualizzato il oppure, in un menù come in Fig. 22, sele- sattivare la correzione del suono (vo- menu della struttura WPS, che mostra lume = aumento dei bassi e degli alti). zionare il campo “CANCEL” e confermare. un PIN a 8 cifre. Immettere questo PIN e) Quando il suono è impostato come sul router e premere il pulsante CONT- 2.4.1 Retroilluminazione del desiderato, premere il pulsante ROL SELECT sul WAP-202RS. Quindi BACK. La domanda cambia. salvare? display avviare la connessione sul router. Per la confermare con SI. procedura esatta, segui anche le istru- Backli g ht f) Ricompare il menu con le preimpost- zioni nelle istruzioni/interfaccia utente Timeout > azioni del suono (Fig. 27). Affinché On level > del router! l‘impostazione audio abbia effetto, Dim level >... -
Page 9: Internetradio
tramite la voce di menu corrispondente mando per impostare il volume: Mute, 1… 3.1 Internetradio nel menu „Impostazioni di sistema“. Per poter ricevere la radio Internet, devono 4) Regola volume e silenzia: 32. Il pulsante MUTE può essere utilizzato essere state effettuate le impostazioni di Utilizzare il controllo MAIN VOLUME sul dispositivo o i pulsanti VOLUME sul teleco- per disattivare e riattivare l‘audio. Voci del menu Funzioni Impostazione del suono: Cap. 3.4.2 Equalizzatore Impostazioni di rete Impostazioni Internet Ricerca di una rete (come con la procedura guidata di configurazione: capitolo 3.3.1, punto 6) Procedura guidata di rete Connessione alla rete tramite il metodo WPS PBC Struttura WLAN PBC... -
Page 10: Registrazione Gratuita In
rete ( Capitolo 3.3.1 o 3.4). I caratteri ei tre campi possono es- 8) Richiamare le stazioni salvate: sere selezionati ruotando la mano- Premere ripetutamente il pulsante MODE Premere brevemente il tasto PRESET. pola CONTROL SELECT e confermati finché non viene visualizzato Internet Viene visualizzato il menu „Preset“, in premendo la manopola (con teleco- Radio. Se prima non c‘era alcuna connes- cui sono elencate le stazioni salvate. Uti- mando: selezionare con i tasti freccia sione alla rete ( nota sulla connessione lizzare la manopola CONTROL SELECT e confermare con il tasto ENTER). alla rete nel capitolo 4, punto 2), questa per selezionare la stazione e premerla BKSP = cancella l‘ultimo carattere verrà ora stabilita, indicata da appositi per richiamarla. Con il telecomando: Con OK = conferma del nome messaggi. il pulsante o Selezionare la stazi- ANNULLA = torna al menu precedente Viene quindi riprodotta l‘ultima stazione one e richiamarla con il tasto ENTER. -
Page 11: Dab-Radio
finestra di login. Per creare un nuovo ac- Display durante la riproduzione: 9) Determinare l‘ordine delle stazioni count, fai clic su „Accedi“. Nella finestra nell‘elenco delle stazioni: Premere display mostra il nome della stazione che appare poi, eseguire i passaggi e le informazioni sul programma e/o sul il pulsante MENU, selezionare la necessari per la registrazione iniziale. brano musicale corrente. riga Sequenza canali e confermare 3) Dopo aver impostato e confermato l‘ac- la selezione. Sono disponibili le se- 19:27 count, registra il dispositivo sul portale: guenti impostazioni: Radio ABC Inserisci il codice di accesso del dispo- Hits nonstop with Alfanumerico = tutti i canali sono ordi- sitivo e un nome per il dispositivo (sele- DJ Mark nati alfanumericamente. -
Page 12: Lettore Musicale
3.4 Lettore musicale FM station scan Il lettore musicale può riprodurre file audio 3.4.2 Riproduzione in rete in formato MP3, AAC/AAC+, WMA, WAV Stron g stations only? Il dispositivo nella rete locale da cui il o FLAC da un supporto di memorizzazione WAP-202RS riceve i file audio deve sup- USB (memoria USB o disco rigido) o da un YES* portare lo standard UPnP (Universal Plug dispositivo nella rete locale (es. computer). and Play) e deve essere possibile utiliz- Nota: A causa dell‘elevato numero di pro- Selezionare NO ruotando la manopola CONTROL zarlo come server multimediale, ad es. B. -
Page 13: Display E Funzioni
n ome del brano (o il nome del tablet), premere ripetutamente il pulsante „risvegliarlo“ tramite la rete e di connettersi brano e il nome dell‘artista nel caso di una MODE finché non viene visualizzato Audio ad esso. Per rimuovere dall‘elenco i server sorgente UPnP), il tempo di riproduzione Bluetooth. Il display cambia quindi come con punti interrogativi, selezionare la voce del brano (numericamente e sotto forma di segue: di menu Rimuovi server e confermare la grafico a barre) e il tempo di riproduzione richiesta di sicurezza visualizzata con SI. totale. Bluetooth 09:33 Bluetooth Sono possibili quattro modalità di ripro- 3.4.3 Crea e riproduci una playlist Today s Date: duzione: 26/10/2019 Per poter riprodurre determinati titoli da – nessuna pubblicità cartelle diverse, è possibile creare una Tutti i brani (della cartella corrente) * ven- playlist con un massimo di 500 titoli. È pos-... -
Page 14: Sveglia
Per questo è possibile impostare due di- versi orari della sveglia. Per terminare definitivamente la sveglia, ANNULLA = torna al menu precedente premere il pulsante ALARM: Il disposi- 1) Premere il tasto ALLARME. Viene visua- 3) La pagina iniziale dell‘app mostra una tivo torna in modalità standby. lizzato il menu „Sveglia“: panoramica dei dispositivi disponibili. Il N ota: Se l‘allarme non termina, il dispo- WAP-202RS viene visualizzato con il Alarms sitivo torna automaticamente in moda- suo „Friendly Name“ (= nome del dis- Alarm 1: Off [00:00] lità standby dopo 60 minuti. Alarm 2: Off [00:00] positivo nella rete) ( Info nel menu „Im- postazioni di sistema“). 5) In standby, la sveglia può essere attivata Se il dispositivo non viene visualizz- e disattivata con il pulsante ALARM. -
Page 15: Funzionamento Multiroom
Bit di inizio: 1, bit di dati: 8, bit di arresto: 1, 4.1 Funzionamento multiroom la rispettiva icona dell‘equalizzatore). Parità: nessuna È possibile configurare un sistema mul- Comandi di controllo (codice esadecimale): ti-room se nella rete sono presenti più 4.1.2 Impostazioni multiroom sul WAP-202RS. In un sistema multiroom è funzione funzione Comando Comando dispositivo possibile raggruppare i dispositivi per la Il funzionamento multiroom è possibile riproduzione sincrona dello stesso materi- anche senza l‘utilizzo dell‘app UNDOK. Le... - Page 16 Modus DAB RADIO rispondente sul router (che si trova sotto Modus FM RADIO „WLAN“ -> „Sicurezza“ per alcuni router, ad esempio). Modus AUX IN Queste istruzioni per l‘uso sono protette da copyright per MONACOR INTERNATIONAL 6 Specifiche tecniche GmbH & Co. KG. È vietata la riproduzione per propri fini commerciali, anche parziale. Ricezione delle frequenze FM: 87,5-108 MHz DAB (+): da 174,928 MHz a 239,200 Ingresso audio AUX: 1,2 V, jack da...
-
Page 18: Applications
CAUTION Never adjust a very high 2 . if a defect might have occurred headphone volume. Per- 1.1 Conformity and approval after the unit was dropped or suf- manent high volumes fered a similar accident, may damage your hear- Herewith, MONACOR INTERNA- ing! 3 . if malfunctions occur. TIONAL declare that the product WAP-202RS complies with the direc- Any repairs must be carried out by tive 2014 / 53 / EU. The EU declaration specialists. WLAN LINE OUTPUT... -
Page 19: Ir Remote Control
MUTE IR sensor for the CONTROL SELECT MAIN VOLUME Internet Radio 19:31 MODE PRESET REPEAT INFO ALARM SLEEP STANDBY HIT Radio-ABC WAP-202RS Jonny White - I can’t forget you BACK MENU SHUFFLE MUTE PREV NEXT PLAY/II SELECT INPUT ENTER POWER... -
Page 20: Inserting / Replacing The Battery
3. I nstead of English, a different menu Button Function Set timezone language can be set (see chapter UTC +00:00: Dublin, Lon * f unction available depending on the Blue- 3.4.1). UTC +00:30: tooth source used UTC +01:00: Madrid, A... 4. T he wizard can be called up any time UTC +01:30: UTC +02:00: Athen, Kai ... Fig. 3 Functions of the remote control via the menu “System settings”. - Page 21 Press SELECT to confirm your selection. The con- continue input menu, please refer to the nection to the network will be First press the WPS button at the text below fig. 17). established: continue with step 8. router, then press the knob CON- e) In the following two menus, set C If the unit is to be connected to the TROL SELECT at WAP-202RS. The the encryption method used by network via wireless connection connection will be established. For the router. (wireless LAN): detailed information on how to pro- Select the name of your network 7) If the network access is encrypted, ceed, also observe the instructions (SSID)* and then confirm your a menu for entering the network in the manual/user interface of the selection. If the access to the...
-
Page 22: Further Settings Via The Menu "System Settings
Method 2: If the router supports “System settings” 3.4.1 Selecting the menu language Network Clear net- WPS via PIN entry, this method ) and then establish the con- work settin g s Lan g ua g e can be used as an alternative to nection again. En g lish the PBC method. Select and con- Danish firm... - Page 23 Menu items Functions Equaliser Sound adjustment: chapter 3.4.3 Network settings Network Network wizard To search for a network (as by means of the setup wizard: chapter 3.3, item 6) To establish a connection to the network via the WPS method PBC PBC Wlan setup (as by means of the setup wizard: chapter 3.3, item 7, fig. 19) View settin g s To show the settings of the current network connection Wlan re g ion To select the wireless LAN region (as by means of the setup wizard: chapter 3.3, item 5) Manual settin g s...
-
Page 24: Equalizer (Sound Adjustment)
3.4.3 Equalizer (sound adjustment) 3.4.4 Overview of the menu “System settings” Equaliser Fig. 27 Functions of the menu “System set- Normal tings” Flat Jazz Rock 4 Operation Movie 1) Standby and switch-off: When the 1) The current setting is indicated by button STANDBY or, on the remote an asterisk . To use a different set- control, the button is pressed, the 4.1 Internet radio ting, select the setting and confirm. unit will go to the standby mode. To Internet radio can only be received switch the unit on again, press the 2) For a user-defined adjustment, se- when the network settings have been... -
Page 25: Free-Of-Charge Registration In The Internet Radio Portal
call up the station. When a wrong ton PRESET pressed until the menu ferent podcast are the same as for selection has been made, the but- “Save to Preset” appears: stations. ton BACK can be used any time to Save to Preset return to the previous step. 4.1.1 Free-of-charge registration [Not set] in the Internet radio portal [Not set] T o search for a specific station, [Not set] The unit will access the database select the line and Search stations [Not set] of the Internet radio portal “Frontier confirm your selection. The menu [Not set] Nuvola Smart Radio”. Once a user ac- for entering the station name will... -
Page 26: Dab Radio
the Frontier Nuvola database. The fa- LECT to select and then press ated (ideally suited for background Scan vourites and streams added can be the knob to start the scan. music, for example). Press the synchronized for all units or assigned button MENU; select the line 4) To indicate the signal strength separately to individual units. (Dynamic Range Control) and con- received for DAB channels: The firm your selection. The following indication of the signal strength options are available: 4.2 DAB radio received for the DAB channels 5... -
Page 27: Music Player
4.4.2 Replay via the network again. To change the direction of Press the button MODE repeatedly The unit in the local network from the scan, turn the knob briefly into until appears on the dis- Music player which WAP-202RS obtains the audio the direction desired (left = reverse play. Then, the menu “Music player” files must support the UPnP stand- scan; right = forward scan) before will appear: ard (Universal Plug and Play) and it you start the scan. must be possible to use it as a media... -
Page 28: Creating And Replaying A Playlist
4.4.4 Displays and functions 4.5 Replay of a Bluetooth mark will be added to their name in the source list. When such a server is selected and Music player 12:41 To replay audio files from a Bluetooth called up, WAP-202RS will try to “wake Come on my friends source (e. g. smartphone or tablet up” the server and to establish a connec- computer), press the button MODE re- tion. To remove servers with a question 0:26 3:12 peatedly until appears on Bluetooth Audio mark from the list, call up the menu item U S B the display. Then the following menu... -
Page 29: Alarm
3) Select, call up and set the menu 5 Control via the App UNDOK™ music, for example. items one after the other (turn the The app UNDOK™ allows you to oper- knob to select the setting; press the ate WAP-202RS by means of a smart- Press the button SLEEP repeatedly knob to confirm the setting). phone or a tablet computer. The app is until the setting desired is shown: Enable O ff Daily Once available for units with the operating Sleep OFF, 15, 30, 45, 60 minutes Weekends Weekdays system “Android” or “iOS” and can be downloaded from the respective App … Time 0 0:00 23:59 Set sleep time Store free of charge. -
Page 30: Multi-Room Mode
– : At the server of the List current clients to the group or to remove it, tap the group, this menu item can be used 5.1 Multi-room mode field next to its name; a group can be to show the clients of the group; to If there are multiple units WAP-202RS renamed or removed (= dissolved). remove a selected client from the in the network, a multi-room system group, press the knob CONTROL SE- 3) To operate a group: Tap the group can be established. In a multi-room LECT. If you do not want to remove name: The control page for the system, units can be combined as any more clients, press the button group will be opened. A group can... - Page 32 MONACOR INTERNATIONAL GmbH & Co. KG • Zum Falsch 36 • 28307 Bremen • Germany...
Need help?
Do you have a question about the WAP-202RS and is the answer not in the manual?
Questions and answers