Table of Contents
Advertisement
Available languages
Available languages
Quick Links
Advertisement
Chapters
Table of Contents

Related Manuals for Fantini Cosmi C801


Summary of Contents for Fantini Cosmi C801
- Page 1 CRONOTERMOSTATO WIRELESS SETTIMANALE italiano pag. 2 english pag. 22...
-
Page 2: Table Of Contents
IMPORTANTE: Questo manuale deve essere letto attentamente prima di utilizzare il dispositivo ed inoltre, deve essere conservato in un luogo tale da poterlo consultare facilmente in caso di necessità. INDICE Pagina 1. Introduzione e utilizzo previsto 2. Descrizione delle segnalazioni e funzionalità dei tasti 3. -
Page 3: Introduzione E Utilizzo Previsto
È dotato di un sensore interno che rileva la temperatura ambiente, trasmettendone ciclicamente il valore ai termostati dei radiatori. Le comunicazioni radio fra il cronotermostato C801 ed il termostato O81RF sono bidirezionali, in tal modo si garantisce che le informazioni trasmesse pervengano al destinatario ed inoltre si possono gestire le segnalazioni diagnostiche riguardanti la corretta funzionalità... -
Page 4: Descrizione Delle Segnalazioni E Funzionalità Dei Tasti
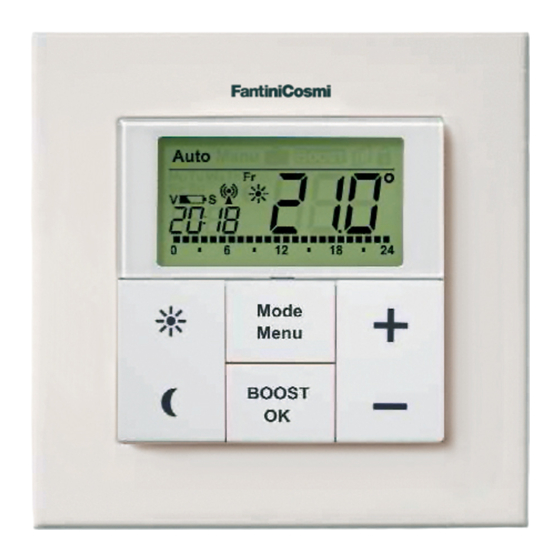
2. DESCRIZIONE DELLE SEGNALAZIONI E FUNZIONALITÀ DEI TASTI Funzionamento automatico (Auto), Funzionamento manuale (Manu), Funzione Holiday ( ), Funzione “Incremento temperatura” (BOOST), Indicazione “Finestra Aperta” ( ), Indicazione “Blocco Tastiera” ( Giorno settimana, indicazione “Batteria Scarica” ( ), indicazione link radio ( ), indicazione regime comfort/economy ( ), ora/data. -
Page 5: Istruzioni Per La Sicurezza
Termostato a Parete (C); Per fare ciò, tenere saldamente il cronotermostato con una mano, estraendo la piastra di montaggio. SOSTITUZIONI SUCCESSIVE Una volta installato, C801 è facilmente estraibile dal telaio, infatti, è suffi ciente estrarlo unitamente alla cornice (B). Le batterie sono italiano... - Page 6 ubicate nella parte posteriore del cronotermostato, come illustrato nella fi gura. Dopo aver tolto le batterie usate, attendere circa un minuto prima di inserire quelle nuove. A quel punto è possibile inserire due batterie alcaline (1,5V formato AAA/Ministilo) nell’apposito scomparto, rispettando la polarità...
-
Page 7: Impostazione Della Data E Dell'ora (Dat)
6. IMPOSTAZIONE DELLA DATA E DELL’ORA (dAt) All’inserimento delle batterie, compare per alcuni secondi la versione fi rmware (1.0 o successive) e poi viene proposto automaticamente il menu d’impostazione della data ed ora. I valori possono essere modifi cati tramite i tasti (+) e (–) confermando poi con il tasto OK. -
Page 8: Montaggio
7. MONTAGGIO Per montare il cronotermostato su una parete o su un’eventuale scatola 502, sono fornite in dotazione delle strisce adesive e delle viti con i relativi tasselli. MONTAGGIO CON BIADESIVO: La superfi cie identifi cata deve essere liscia, pulita ed asciutta. Applicare le strisce adesive in dotazione nella parte posteriore della base di fi... -
Page 9: Apprendimento (Memorizzazione) Dei Termostati O81Rf
Sul display compare “ACC” (= “Accetti?”); se si desidera confermare premere il tasto OK; Al termine dell’operazione, tutti i termostati precedentemente appresi sono rimossi dalla memoria del C801 mentre sono mantenute inalterate tutte le altre programmazioni (profi li orari, set-point ecc.). italiano... -
Page 10: Modi Operativi (Automatico/Manuale/Holiday/Boost)
Ad ogni breve pressione del tasto “Mode”, il cronotermostato passa da una modalità operativa alla successiva. Nota: il cambio di modalità operativa o di temperatura eseguita su un cronotermostato C801 o termostato O81RF, viene acquisito da tutti i dispositivi appartenenti al gruppo del locale/zona. 11. BLOCCO TASTIERA È... -
Page 11: Impostazione Pausa Riscaldamento (On)
12. IMPOSTAZIONE PAUSA RISCALDAMENTO (ON) È possibile prolungare la durata delle batterie disattivando il riscaldamento durante la stagione estiva; in tal caso, la valvola si apre completamente ma la funzione “anti calcifi cazione” rimane in ogni caso attiva. Per l’attivazione della funzione: •... -
Page 12: Menu Di Configurazione (Menu)
14. MENU DI CONFIGURAZIONE (MENU) Il cronotermostato dispone di un menu di confi gurazione per effettuare le varie impostazioni. Si accede al menù premendo per almeno tre secondi il tasto “Mode”. Per navigare nel menu si utilizzano i tasti (+) e (-) e con il tasto OK si entra nel dettaglio della singola voce, mentre con la pressione del tasto “Mode”... -
Page 13: Impostazione Programmi Settimanali (Pro)
14.1 IMPOSTAZIONE PROGRAMMI SETTIMANALI (Pro) Il programma settimanale permette di impostare fi no a sei distinte fasce orarie per ciascun giorno della settimana. Per l’attivazione della funzione: • Premere il tasto “Mode” per almeno tre secondi; sul display compare “Pro”. •... - Page 14 ESEMPI DI PROGRAMMI SETTIMANALI Il cronotermostato consente di realizzare fi no a sei fasi di riscaldamento (13 impostazioni di modifi ca), con impostazioni singole della temperatura per ciascun giorno della settimana. Vengono riportate di seguito le impostazioni di fabbrica. Lunedì –Venerdì: 30 C°...
-
Page 15: Visualizzazione Dell'ora Oppure Della Data (T-D)
14.2 VISUALIZZAZIONE DELL’ORA OPPURE DELLA DATA (t-d) Si può scegliere se visualizzare sul display l’ora (impostazione di fabbrica) oppure la data nel formato GG.MM. Per accedere alla funzione: • Premere il tasto “Mode” per almeno tre secondi; sul display compare “Pro”; •... -
Page 16: Temperature Comfort Ed Economy
14.4 TEMPERATURE COMFORT ED ECONOMY I tasti relativi alle temperature comfort ( ) ed economy ( ) permettono d’impostare agevolmente la temperatura di “comfort” o quella di “economy”. L’impostazione di fabbrica relativa alla temperatura “comfort” è di 21,0°C.; quella della temperatura “economy” è di 17,0°C. Per modifi... -
Page 17: Impostazione Della Funzione "Holiday
Tramite il menu, è possibile impostare i parametri relativi alla funzione “BOOST”, relativamente alla percentuale di apertura della valvola (nell’intervallo 0÷100%) ed al ciclo di durata (0÷60 minuti). Per accedere alla funzione: • Premere il tasto “Mode” per almeno tre secondi; sul display compare “Pro”;... -
Page 18: Impostazione Della Funzione Anti Calcificazione Valvola (Dec)
• Sul display appare la data corrente (formato GG.MM); impostare la data di scadenza della funzione “Holiday” e confermare con il tasto OK. • Sul display appare un valore di temperatura; con i tasti (+) e (-) impostare il valore di temperatura che si desidera avere per il periodo di “Holiday”... -
Page 19: Funzione "Finestra Aperta" (Aer)
14.8 FUNZIONE “FINESTRA APERTA” (Aer) Funzione non presente in questa versione di prodotto. 14.9 FUNZIONE CAMBIO ORA “SOLARE-LEGALE” (dSt) Il cronotermostato include la funzionalità di cambio automatico tra l’orario “legale” e “solare” e viceversa, sulla base delle date pianifi cate nella Comunità... -
Page 20: Ripristino Parametri Di Fabbrica (Res)
15. RIPRISTINO PARAMETRI DI FABBRICA (rES) Il ripristino della confi gurazione di fabbrica del cronotermostato C801 può essere utile quando è necessario reinstallare un sistema funzionante in modo scorretto. Il ripristino dello stato iniziale cancella tutte le programmazioni (data, ora, fasce orarie e programmi settimanali ecc.) e la lista dei termostati O81RF associati al... -
Page 21: Dati Tecnici
1995/5/CE R&TTE ed alle norme EN 60730-1 e parti seconde. La Dichiarazione CE completa è scaricabile dal sito web “www. fantinicosmi.it”. Fantini Cosmi S.p.A. si riserva la facoltà di introdurre tutte le modifi che tecniche e costruttive che riterrà necessarie, senza obbligo di preavviso. italiano... - Page 22 Important notice: Read this manual carefully before starting to use the device. Keep the manual so you can refer to it at a later date should you need to. INDEX Page 1. Introduction and intended use 2. Display and keyboard description 3.
-
Page 23: Introduction And Intended Use
With the weekly thermostat up to 8 radiator thermostats O81RF can be regulated in a room/zone. The weekly thermostat C801 has an internal sensor that measures the temperature in the room/zone and cyclically transmits it to the radiator thermostats O81RF. -
Page 24: Display And Keyboard Description
2. DISPLAY AND KEYBOARD DESCRIPTION Automatic operation (Auto), Manual operation (Manu), Holiday function ), Boost function ( ), Open Window ( ), Operating lock BOOST symbol ( Weekday, Low battery symbol ( ), Radio activity ( ), Comfort/Eco- nomy temperature ( ), time/date. -
Page 25: Safety Instructions
3. SAFETY INSTRUCTIONS Using this device for any purpose other than that described in this operating manual does not fall within the scope of intended use and shall invalidate any warranty or liability. This also applies to any conversion or modifi cation work. This device is intended for private use only. - Page 26 • You can now enter two LR03 alkaline batteries (1,5V Micro/AAA) into the battery compartment, making sure they are the right way round according to the drawings • Put the weekly thermostat (C) back into the frame (B). An empty battery symbol ( ) indicates that the batteries need to be replaced.
-
Page 27: Date And Time Setting (Dat)
6. DATE AND TIME SETTING (dAt) After inserting or replacing batteries the fi rmware version number will be shown briefl y. Accordingly, date and time will be requested automatically. Settings can be changed with the (+) and (-) buttons and confi rmed with the OK button. Year Day and Month Now set the time and confi... -
Page 28: Mounting
7. MOUNTING You can either use screws or adhesive strips to mount the weekly thermostat to a wall in the frame supplied or integrate it into an existing switch. ADHESIVE STRIP MOUNTING: Choose a site for installation. The surface on which you are mounting the weekly thermostat must be clean, dry and greaseless. -
Page 29: Teaching-In Of O81Rf Radiator Thermostats
8. TEACHING-IN OF O81RF RADIATOR THERMOSTATS The C801 weekly thermostat can control up to eight O81RF radiator thermostats. Therefore, all devices are taught-in to the weekly thermostat directly. These then take over the settings of the weekly thermostat (e.g. mode, temperature, week program). To teach in, proceed as follows: •... -
Page 30: Operating Modes (Auto / Manu / Holiday / Boost)
10. OPERATING MODES (AUTO / MANU / HOLIDAY / BOOST) You can choose between the operating modes and function: • Auto: Week program – automatic temperature control according to stored week program. • Manu: Manual operation – the temperature is set manually with the (+) and (-) buttons. -
Page 31: Setting Valve Protection Function (Off)
Note: if this operation is setting, all taught-in radiator thermostats will adjust to this setting. 13. SETTING VALVE PROTECTION FUNCTION (OFF) If the room/zone does not need to be heated, the valve can be closed. The valve is only opened if there is a risk of frost. The calcifi cation protection function continues to run. -
Page 32: Set The Week Program (Pro)
UnL: Teach-out wireless componets (UnL) (see section 9) rES: Reset factory setting (see section 15) Set economy and comfort temperature (see section 14.4) Set Holiday function (see section 14.6) Note: The menu closes automatically after 60 seconds of inactivity. 14.1 SET THE WEEK PROGRAM (Pro) In the week program, for each weekday up to 6 heating phases (13 change settings) can be set separately. - Page 33 In “Auto” mode the selected week program will be automatically adopted by all taught-in O81RF Radiator Thermostats. In “Auto” mode the temperature can be changed at any time with the (+) and (-) buttons or comfor ( ) and economy temperature buttons ( ). The adjusted temperature will be maintained until the next phase in the timer program starts.
-
Page 34: Switching Time/Day (T-D)
14.2 SWITCHING TIME/DAY (t-d) The factory setting will show the time on the display. In the menu the display can be switched to the date. • Open the confi guration menu by pressing the menu button for more than 3 seconds. •... -
Page 35: Comfort And Economy Temperature
14.4 COMFORT AND ECONOMY TEMPERATURE The comfort ) and economy ( ) temperature buttons make switching between comfort and Economy temperature simple and user friendly. The factory setting for the comfort temperature is 21.0°C and the Economy temperature 17.0°C. • Press the comfort or economy temperature button for... -
Page 36: Setting The "Holiday" Function
The length and valve opening of the Boost function can be individually adjusted as follows: • Press the Menu button for more than 3 seconds. • Select the “bOS” menu item with the (+) and (-) buttons. • Confi rm the setting with the OK button. •... -
Page 37: Setting Valve Protection Function (Dec)
14.7 SETTING VALVE PROTECTION FUNCTION (dEC) To prevent the build-up of lime scale in the valve a so called “de- scaling run” will be performed weekly for the radiator thermostats. You can change the set time for this function (factory setting: Saturday, 12:00 p.m.) as follows: •... -
Page 38: Setting The Offset Temperature (Tof)
14.10 SETTING THE OFFSET TEMPERATURE (tOF) As the temperature is measured on the room/zone control unit the temperature distribution can vary throughout a room/zone. To adjust this, a temperature offset of ±3.5°C can be set. If a nominal temperature of e.g. 20°C is set at the room/zone control unit but the room/zone presents with only 18°C an offset of -2.0°C needs to be set. -
Page 39: Troubleshooting
Fantini Cosmi S.p.A. declares that the “C801 Wireless weekly thermostat” device conforms to the 1995/5/CE R&TTE Directive and rules EN60730-1 e 2nd part. The full EC Declaration is available for download from “www.fantinicosmi.it” web site. Fantini Cosmi S.p.A. reserves the right to modify its products without notice. english... - Page 40 FANTINI COSMI S.p.A. Via dell’Osio, 6 20090 Caleppio di Settala, Milano Tel. +39 02 956821 | Fax +39 02 95307006 info@fantinicosmi.it supportotecnico@fantinicosmi.it www.fantinicosmi.it...
Need help?
Do you have a question about the C801 and is the answer not in the manual?
Questions and answers