Aastra CM-16 User Manual
Hide thumbs
Also See for CM-16:
- User manual (34 pages) ,
- Technician installation manual (7 pages) ,
- Installation instructions (4 pages)
Table of Contents
Advertisement
Quick Links
Advertisement
Table of Contents

Subscribe to Our Youtube Channel
Related Manuals for Aastra CM-16


Summary of Contents for Aastra CM-16
- Page 1 All manuals and user guides at all-guides.com...
-
Page 2: Table Of Contents
Battery Charging ..................7 Belt Clip ....................... 7 Using a Headset with your Telephone............8 Battery Status Icons ................... 8 CM-16 HANDSET KEY FUNCTIONS ..........9, 10 Screen Display ..................11 Screen Icons .................... 11 Screen Prompts ..................12 Making and Answering Calls ..............13 Redial ...................... - Page 3 Finding entries in the Directory ..............22 Dialing from the Directory ................. 22 Changing entries in the Directory ............. 23 Deleting an entry in the Directory ............. 23 Appendix A ....................24 Limited Warranty ..................26 Model CM-16 User Guide...
-
Page 4: Safety Information
• Follow the battery installation instructions included with this guide at it NOTE: Th takes two to three charging cycles for the batteries to reach their fully charged state. • Charge the batteries using only the charger stand supplied with this product Model CM-16 User Guide 1... - Page 5 The batteries included with the CM-16 are designed to provide up to four hours talk time and eighty hours standby time. Actual battery performance can be affected by a wide variety of environmental and user factors .
- Page 6 For body worn operation, this phone has been tested and meets the FCC RF exposure guidelines when used with Aastra Telecom accessories supplied or designated for this product. Use of other accessories may not ensure compliance with FCC RF exposure guidelines.
-
Page 7: Installation
All manuals and user guides at all-guides.com INSTALLATION The CM-16 consists of a base station, wireless handset and a charging base stand. The following diagram provides an overview of the installation of the product using the power supply provided. Detailed installation instructions are provided below. -
Page 8: Base Station Wall Mounting
The Base Unit must be connected to a known working M1 port configured for a 2616 wired set. Where possible, verify the port and key assignments by using a 2616 set before connecting the CM-16 to that jack. Refer to Figure 1 and connect the components in this order. - Page 9 M1 port is working at the intended jack with a 2616 set. Next, verify all modular cord connections to this point are correct and making good contact. When both LEDs are indicating properly, continue at step 4. Figure 1 CM-16 Base Unit Connections Base Unit M1 PBX 2616...
-
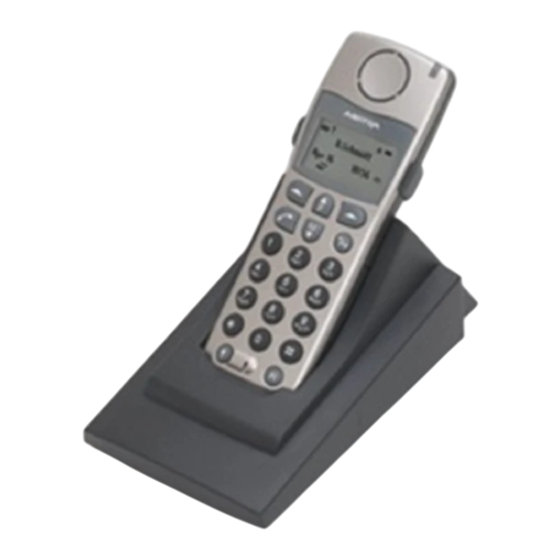
Page 10: Charging Cradle
To install the belt clip, snap one arm of the clip into the slot on the side of the handset and then slide the other arm into the slot on the other side of the handset until it snaps into place. Model CM-16 User Guide 7... -
Page 11: Using A Headset With Your Telephone
All manuals and user guides at all-guides.com Using a Headset with your Telephone The CM-16 accepts headsets through the jack on the bottom of the handset. Contact your telephone equipment retailer or distributor to purchase a compatible headset. Customers should read and observe all safety recommendations contained in headset operating guides when using any headset. -
Page 12: Cm-16 Handset Key Functions
All manuals and user guides at all-guides.com CM-16 HANDSET KEY FUNCTIONS Model CM-16 User Guide 9... - Page 13 • Access key to the different Options • Scrolls down when in the various lists. • Used as Backspace during editing Redial ® ® ® ® key • Displays the last 10 numbers dialed Charging jack Charging contacts Microphone 10 Model CM-16 User Guide...
-
Page 14: Screen Display
All manuals and user guides at all-guides.com SCREEN Screen Display The screen display on the CM-16 provides five lines, 15 characters per line of display area. Pressing any key will light up the display if the Backlight option is On. -
Page 15: Screen Prompts
Microphone mute Appears briefly when pressing a key if out of range Out of range of the base station Will appear if the line cord is not properly connected Check Line Cord to the base station. 12 Model CM-16 User Guide... -
Page 16: Making And Answering Calls
When off hook • Press ® key and the last number dialed will automatically be redialed. In addition to redialing the last 10 numbers, the CM-16 allows redialed numbers to be deleted from the redial list or saved to the Directory, while on hook. -
Page 17: Hold Function
Press the ´ key to mute the handset. Press the ´ key again to disengage mute. Alerter Tones The CM-16 uses tones to provide information as follows: Low Battery one tone every three minutes Out of Range... -
Page 18: To Adjust The Ringer Volume
The green LED light on the handset indicates the following conditions: flashes rapidly solid green Incoming call Call on hold Handset muted flashes rapidly Features activated solid green (only while on hook) / message waiting Model CM-16 User Guide 15... -
Page 19: Feature Key List
FEATURES LIST There are 14 Meridian features available through the CM-16. The features list can be accessed through the Feature ƒ key of the CM-16. When scrolling through the features list, a darker scroll bar highlights the feature that can be selected. -
Page 20: Options
Press ∫ key to quit at any time and to return to the main idle display screen. Language The CM-16 offers a choice of English, French and Spanish display languages. The default language setting is English. The language display in use is always identified with a check mark. -
Page 21: Key Label
Key label The Key label option gives access to the display text associated with the 14 Meridian features that can be programmed with to CM-16 handset. Text to identify a specific feature can be added, modified or deleted or all feature key text can be deleted at once. -
Page 22: Ring Tone
Pressing the ∫ key will return you to the main idle display screen. Vibrate The Vibrate option allows the CM-16 handset to signal an incoming call by vibrating as well as ringing. By default, this option is always Off. To enable this feature, press the Change softkey and the display will indicate Vibrate On and-confirmed- and will quickly return to the previous menu display. -
Page 23: Handset Pairing
Handset Pairing The Handset Pairing option provides flexibility by allowing any CM-16 handset to work with any CM-16 base station. Each handset is factory programmed to work only with the base station shipped with the product. When using this option, be sure to keep the handset at least a few feet away from the base station. -
Page 24: Silent Alert
NOTE: You can active or deactivate the Silent alert by pressing only the key and – then the key. NOTE: The Ringer Icon does not appear on the display when the Silent alert is On. Model CM-16 User Guide 21... -
Page 25: Directory
By default, the first letter of a word or name will be capitalized and the letters following will be lower case. Special characters are entered by pressing the 1 key. Characters will appear in this order: , - ‘ & . ()1 22 Model CM-16 User Guide... -
Page 26: Finding Entries In The Directory
Directory” on page 22 section of this guide. 7. Press the Save softkey to save the revised Directory entry. Will dis- playItem saved. Pressing the ∫ key will return you to the main idle display screen. Model CM-16 User Guide 23... -
Page 27: Deleting An Entry In The Directory
Pressing the ∫ key will return you to the main idle display screen. Deleting all entries in the Directory 1. Press Directory softkey 2. Press Delete softkey. Display shows Press Delete to erase all 3. Press the Delete softkey. Display shows All items erased 24 Model CM-16 User Guide... - Page 28 Base is NOT supplied switch line power. Solid On Base is supplied switch line power The left LED on the CM-16 Base is currently tied to Vcc (Meridian switch power). Center LED The center LED is controlled by the base MCU and indicates Meridian switch communications status.
- Page 29 Solid On The base is currently in a radio link state with a handset Flashing Rapidly Base is attempting a pairing with a handset (enters this mode at power up in addition to pairing button press) 26 Model CM-16 User Guide...
-
Page 30: Limited Warranty
(1) year period from the date of original purchase. If there is a defect or malfunction, Aastra Telecom shall, at its option, and as the exclusive remedy, either repair or replace the telephone set at no charge, if returned within the warranty period. - Page 31 Aastra Telecom offers ongoing repair and support for this product. This service provides repair or replacement of your Aastra Telecom product, at Aastra Telecom's option, for a fixed charge. You are responsible for all shipping charges. For further information and shipping instructions;...
- Page 32 All manuals and user guides at all-guides.com INDEX Handset and Base Station 1 Appendix A 25 Headset 8 Hold 14 Base Station 1 Location 4 Installation 4 Wall Mounting 5 Base Unit 5 Key Functions 10 Batteries 1 Battery 8, 11, 14 Belt Clip 7 Center LED 25 Left LED 25...
- Page 33 All manuals and user guides at all-guides.com INDEX Safety Information 1 Screen Display 11 Icons 11 Screen Prompts 12 Tones 14 Vibrate 11 Volume Receiver 14 Ringer 15 Volume Control 14 Wall jack 5...
- Page 34 All manuals and user guides at all-guides.com If you’ve read this owner’s manual and still have problems, please visit our website at www.aastra.com or call 1-800-574-1611 for technical assistance. © Aastra Telecom Inc. 2005 41-0071-00 Rev 03...
Need help?
Do you have a question about the CM-16 and is the answer not in the manual?
Questions and answers