Primes Cube L1 Original Instructions Manual
Laserdiagnosticssoftware lds
Hide thumbs
Also See for Cube L1:
- Operating manual (48 pages) ,
- Original instructions manual (72 pages)

Related Manuals for Primes Cube L1


Summary of Contents for Primes Cube L1
- Page 1 Original Instructions Cube L1 LaserDiagnosticsSoftware LDS Cube App Revision 03 EN - 03/2021...
- Page 3 Cube L1 IMPORTANT! READ CAREFULLY BEFORE USE. KEEP FOR FUTURE USE. Revision 03 EN - 03/2021...
-
Page 4: Table Of Contents
Cube L1 Table of contents Basic safety instructions Symbol explanation About this operating manual Conditions at the installation site Important notes on the lithium-ion battery Charging the lithium-ion battery ............12 Storing the device with a permanently installed lithium-ion battery ..12 Dangers to health and the environment in the event of damage to the lithium-ion battery ................ - Page 5 Measuring results display ..............42 14.6.1 Display the current measurement in the toolbench Cube measurement ................. 42 14.6.2 Display of the measurements stored in the Cube L1 ....43 14.7 Delete measured values from the memory of the Cube L1 ....45...
- Page 6 Cube L1 Measuring with the optional Cube App Maintenance and service 16.1 Exchanging the protective window on the device ......... 47 16.1.1 Safety instructions ..............47 16.1.2 Exchanging the protective window ......... 49 Measures for the product disposal Declaration of conformity...
- Page 7 Beam quality factor M² Development, production and calibration of the measuring devices is performed at PRIMES. This guarantees optimum quality, excellent service, and a short reaction time, providing the basis for us to meet all of our customers’ requirements quickly and reliably.
-
Page 8: Basic Safety Instructions
In addition, there is an increased risk to health and life. Only use the device in such a way that there is no risk of injury. If you still have questions after reading this operating manual, please contact PRIMES or your supplier for your own safety. - Page 9 Cube L1 • Install safety switches or emergency safety mechanisms that allow the laser to be switched off immediately. • Use suitable beam guidance and beam absorber elements which do not emit any hazardous substances when irradiated. • Wear safety goggles adapted to the power, power density, laser wave length and operating mode of the laser beam source in use.
-
Page 10: Symbol Explanation
Cube L1 Symbol explanation The following symbols and signal words indicate possible residual risks: DANGER Means that death or serious physical injuries will occur if necessary safety precautions are not taken. WARNING Means that death or serious physical injuries can occur if necessary safety precautions are not taken. -
Page 11: About This Operating Manual
Call for observing (visual feedback from the device or the software). X Call for action About this operating manual This documentation describes the installation and operation of the Cube L1 and per- forming measurements with the Cube L1, the Cube App or the optional LaserDiagnos- ticsSoftware LDS. -
Page 12: Important Notes On The Lithium-Ion Battery
Cube L1 Important notes on the lithium-ion battery The device is equipped with a permanently installed rechargeable battery. Be aware that this battery may ignite at high temperatures. For operation, storage and shipping, refer to the information according to chapter 19, „Technical data“, on page 52. -
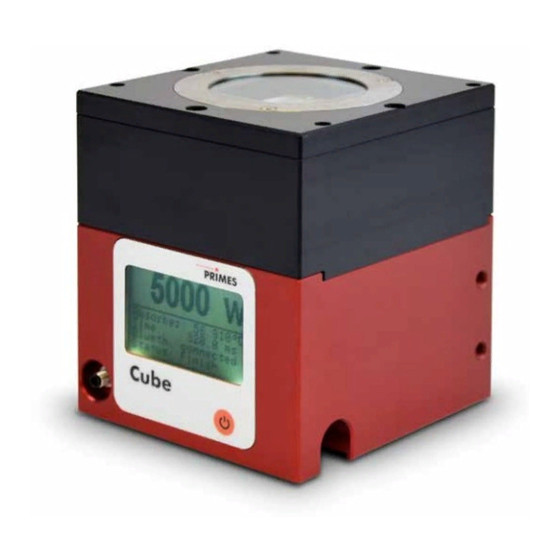
Page 13: Device Description
Cube L1 Device description Functional description With its compact dimensions, the device is used in the narrow conditions of laser sys- tems for power measurement. Normally, the device is positioned underneath the focus position of the beam path. If this is not possible, the device can be positioned above the focus. -
Page 14: Transport
Cube L1 Transport NOTICE Damaging/Destruction of the device Hard impacts or dropping the device can damage the optical and electri- cal components. X Handle the device carefully when transporting or installing it. X To avoid contamination, cover the inlet aperture with the alignment tool provided. -
Page 15: Installation/Removal
X Do not touch the protective window. X Only operate the device with a clean protective window. Mounting position The Cube L1 can be mounted vertically or horizontally. Revision 03 EN - 03/2021... -
Page 16: Align The Device
Cube L1 Align the device The device must be aligned to the laser beam. The laser beam must hit the inlet aper- ture in the middle. Please mind and adhere to the specifications and limit values given in chapter 19, „Technical data“, on page 52. -
Page 17: Align The Device With The Alignment Tool
Cube L1 8.3.1 Align the device with the alignment tool Using the alignment tool and a pilot laser beam, you can position the device with the necessary accuracy (see Fig. 8.2 on page 17). Put the alignment tool on the inlet aperture. -
Page 18: Install The Device
Cube L1 Install the device Align the device with the laser beam as described in chapter 8.3 on page 16 and Fig. 8.1 on page 16. Install the device with the mounting threads as shown in Fig. 8.3 on page 18. Ensure a stable installation of the device: •... -
Page 19: Remove The Device
Cube L1 Remove the device Turn off the laser source. Ensure that moving parts, e.g. robot arms, etc. are at a standstill and that they cannot be set in motion unintentionally. Unscrew the mounting screws from the mounting threads (see Fig. 8.3 on page 18). -
Page 20: Connections
Cube L1 Connections Safety interlock connection Micro-USB socket Fig. 9.1: Connections Safety interlock The use of the safety interlock protects the device from damage in many situations. Nevertheless, depending on the parameters of the laser beam to be measured, damage to the absorber may occur. -
Page 21: Micro-Usb Socket
When using the optional LaserDiagnosticsSoftware LDS (not included in delivery), the device communicates with the LDS via the micro-USB socket or Bluetooth. You will find the PRIMES USB-driver for all USB-capable devices on the PRIMES web- site at: https://www.primes.de/en/support/downloads/software.html. Revision 03 EN - 03/2021... -
Page 22: Bluetooth
Cube L1 Bluetooth A class 1 Bluetooth interface is integrated in the device. This enables a wireless con- nection with the PC, tablet or the smartphone. When connected to a PC with a class 1 Bluetooth stick, the range under free space conditions is approx. 100 m. After switching on the device, the Bluetooth connection is permanently active. -
Page 23: Functions Of The On/Off Button
Cube L1 Functions of the On/Off button The on/off button has several functions: Keystroke Function Short press Turn on 5 seconds Turn off 2 seconds Show measuring values Press again for 2 seconds Turn over measuring value display Tab. 10.1: Functions of the On/Off button... -
Page 24: Displays On The Device
Cube L1 Displays on the device Laser power in Watt Charge status Absorber temperature Bluetooth connection Status message active/inactive Fig. 11.1: Displays on the device 11.1 Status messages Status message Meaning Waiting for laser beam The device is ready for operation, the laser can be turned on. -
Page 25: Warning Message
Cube L1 11.2 Warning message Warning message Reason Safety interlock open The absorber temperature has exceeded 100 °C. In order to protect the device, the safety Interlock is switched to the impermissible operating status. Tab. 11.2: Warning message This warning message does not imply an error. The message is automatically reset as soon as the absorber temperature is below 100 °C again. -
Page 26: Important Information For Measuring With The Cube L1
Cube L1 Important information for measuring with the Cube L1 12.1 Safety instructions DANGER Serious eye or skin injury due to laser radiation If the stability of the device is not ensured or the inlet aperture is not cen- tered and mounted perpendicular to the laser beam, increased scattered or directed reflection of the laser beam will occur. - Page 27 Cube L1 NOTICE Damaging/Destruction of the device Contamination and fingerprints on the protective window can lead to damage or shattering or splintering of the protective window during mea- suring operation. X Do not touch the protective window. X Regularly check the condition of the protective window and exchange it in case of pollution (see chapter 16.1, „Exchanging the protective window...
-
Page 28: Laser Parameter Setting
Cube L1 12.2 Laser parameter setting 12.2.1 Setting the laser rise time The applicable measurement time is between 0.1 s and 2.0 s, which has to be trans- ferred to the laser controller as pulse length. The maximum laser rise time for measuring the power cannot exceed 100 µs. -
Page 29: 12.2.2 Maximum Permissible Power Density
Cube L1 12.2.2 Maximum permissible power density To avoid damage to the optics, the maximum permissible power density of 250 kW/cm² at the optics must not be exceeded. The power density in kW/cm² is calculated according to the formula: Formula 1: Calculation of the power density To determine the maximum laser power, the result is weighted with a safety factor of 2. -
Page 30: 12.2.3 Minimum And Maximum Energy Input Per Measurement
Cube L1 12.2.3 Minimum and maximum energy input per measurement The measured temperature rise in the absorber is decisive for an accurate and re- producible measurement. Regardless of the starting temperature, we recommend an energy input of approx. 500 J per measurement. -
Page 31: Waiting Time Until The Next Measurement In A Measurement Series
Cube L1 Absorber temperature in °C Min. energy input in J Max. energy input in J 4 000 4 000 4 000 4 000 4 000 4 000 4 000 4 000 4 000 1 000 3 700 1 500 3 200 Tab. 12.1: Absorber temperature with the recommended minimum and permissible maximum energy input (ambient temperature 20 °C) -
Page 32: Measurement With Pulsed Lasers
Cube L1 12.4 Measurement with pulsed lasers When it comes to pulsed laser radiation a correct exposure time measurement up to a pulse frequency of 10 kHz and a duty cycle of 50 % is possible. In case of on/off times shorter than 50 μs a correct exposure time measurement is not possible. -
Page 33: Measuring With The Cube L1
Please read chapter 12, „Important information for measuring with the Cube L1“, on page 26 first. 13.1 Start measurement Measurements with the Cube L1 should be performed exclusively with a static (motion- less) laser beam. Observe the safety instructions in chapter 12.1 on page 26. Press the on/off button. - Page 34 Cube L1 The window displays the following mea- surement values: • Laser power in W • Absorber temperature in °C • Corrected burst duration in ms (Time) The max. power of the laser is displayed in W (Pk Pow). The average power of a pulse is displayed in W (Av Pow).
-
Page 35: Measuring Results Display
13.2 Measuring results display The last 14 measuring values can be read off from the display of the Cube L1. You can read off the last 30 measuring values with the optional Android™ PRIMES Cube App for mobile devices or optional LaserDiagnosticsSoftware LDS. -
Page 36: Measuring With The Optional Laserdiagnosticssoftware Lds
Cube L1 Measuring with the optional LaserDiagnosticsSoftware LDS This chapter aims to provide some basic information as you get to know the Cube L1, discussing the example of a measurement with the LaserDiagnosticsSoftware LDS. For a detailed description of the software installation, file management and evaluation of the mea- sured data, please refer to the separate operating manual LaserDiagnosticsSoftware LDS. -
Page 37: Connect The Cube L1 To The Laserdiagnosticssoftware Lds
Cube L1 14.2 Connect the Cube L1 to the LaserDiagnosticsSoftware LDS Connect the USB cable to the Micro-USB socket on the device and with the PC (see Fig. 9.1 on page 20) or activate the Bluetooth function on the PC. When the Bluetooth con- nection is activated, the USB interface is deactivated. -
Page 38: Open Toolbench Cube Measurement
Cube L1 14.3 Open toolbench Cube measurement The Cube L1 is established as a connected device. Click on the connected device. The corresponding Device control opens. The toolbench Cube Measure- ment is opened. If the toolbenches have previously been closed, click the Open mea- surement toolbench button to open it again. -
Page 39: Settings For Trigger Level, Power Saving Functions And Automatic Measurement Readiness
Low is recommended for pulsed beams. With a low trigger level a measurement may be triggered even without a laser beam. In this case set the trigger level to a higher value. The default setting for the Cube L1 is trigger level Medium. - Page 40 Cube L1 Power Saving Function Continuous background on/off Turn off lighting after (in s). The set time only applies if the permanent backlight is switched off. Switch the safety interlock on/off. For safety reasons switching off the safety interlock is not recommended.
-
Page 41: Start Measurement
Cube L1 14.5 Start measurement Measurements with the Cube L1 should be performed exclusively with a static (motion- less) laser beam. The measurement is started automa- tically when the laser is switched on. The display field Start is therefore not active. -
Page 42: Measuring Results Display
Cube L1 14.6 Measuring results display 14.6.1 Display the current measurement in the toolbench Cube measurement The measuring results are displayed in the opened toolbenches once the measurement has been completed (see below). By clicking on the gear symbol you can adjust the displayed parameters. -
Page 43: 14.6.2 Display Of The Measurements Stored In The Cube L1
Cube L1 14.6.2 Display of the measurements stored in the Cube L1 Press the Load measurements button • The last 30 measured values stored in the device are read out of the memory of the Cube L1. Switch to the Projects tab. - Page 44 Cube L1 By clicking on the gear symbol you can adjust the displayed parameters. Revision 03 EN - 03/2021...
-
Page 45: Delete Measured Values From The Memory Of The Cube L1
Cube L1 14.7 Delete measured values from the memory of the Cube L1 The Cube L1 stores the measured values in an internal memory. The measured values can be displayed and deleted with the LaserDiagnostic- sSoftware LDS. Click on the Clear history but- ton. - Page 46 Tab. 15.1: Functions and settings Please find detailed information on the operation of the Cube App in the separate oper- ating manual Cube App. These can be found on the PRIMES website at: https://www. primes.de/en/support/downloads/operating-manuals.html. Revision 03 EN - 03/2021...
- Page 47 The operator is responsible for determining the maintenance intervals for the measuring device. PRIMES recommends a maintenance interval of 12 months for inspection and calibra- tion. If the device is used only sporadically, the maintenance interval can be extended up to 24 months.
- Page 48 Cube L1 CAUTION Burns due to hot components After a measurement the optics below the protective window is hot! Unintentional contact during the protective window exchange could lead to burns. X Do not replace the protective window directly after a measurement.
- Page 49 Check for secure fit of the protective window holder: • The protective window holder must lie flat on the device. Torx screws M3 x 6 mm Protective window holder Protective window O-ring Optics Fig. 16.1: Exchanging the protective window on the Cube L1 Revision 03 EN - 03/2021...
- Page 50 PRIMES gives you the opportunity to return your PRIMES measuring device for free disposal within the scope of the Waste of Electrical and Electronic Equipment (WEEE Di- rective). You can send PRIMES measuring devices to be disposed of within the EU (this service does not include shipping costs) to our address: PRIMES GmbH Max-Planck-Str.
- Page 51 Cube L1 Declaration of conformity Revision 03 EN - 03/2021...
- Page 52 Cube L1 Technical data Measurement parameters Power range 200 – 16 000 W Wavelength range 1 030 – 1 090 nm Beam diameter on the protective window 1 – 7 mm Max. power density on the protective window 250 kW/cm² Irradiation time 0,1 – 2,0 s (depending on laser power) Min.
- Page 53 Cube L1 Supply Data Power supply Built-in lithium-ion battery Maximum charging current 1.3 A Voltage 3.7 V Capacity 1 000 mAh Energy 3.7 Wh Weight of the battery 20 g Shipment classification Lithium ion batteries contained in equipment Temperature range for charging the 0 – 45 °C...
- Page 54 Cube L1 Dimensions Ø 50 35,5 View X All dimensions in mm (general tolerance ISO 2768-v) Revision 03 EN - 03/2021...
- Page 55 Cube L1 Revision 03 EN - 03/2021...
- Page 56 PRIMES GmbH Max-Planck-Str. 2 64319 Pfungstadt Germany Tel +49 6157 9878-0 info@primes.de www.primes.de...
Need help?
Do you have a question about the Cube L1 and is the answer not in the manual?
Questions and answers