
Related Manuals for SHOWTEC EventLITE 4/10 Q4


Summary of Contents for SHOWTEC EventLITE 4/10 Q4
- Page 1 MANUAL ENGLISH EventLITE 4/10 Q4 Ordercode: 44060 Highlite International B.V. – Vestastraat 2 – 6468 EX – Kerkrade – the Netherlands...
-
Page 2: Table Of Contents
EventLITE 4/10 Q4 Table of contents Warning ....................................4 Safety Instructions ................................ 4 Operating Determinations ............................6 Rigging ................................... 6 Connection with the mains ............................7 Return Procedure ................................. 7 Claims ..................................... 7 Description of the device ..............................8 Overview ..................................9 Bottom .................................... - Page 3 EventLITE 4/10 Q4 3. Fade Mode ................................31 4. DMX Address/DMX Channel Mode .........................32 5. Economy ................................32 DMX Channels ................................32 4 Channels ................................32 6 Channels ................................32 9 Channels ................................33 Maintenance ..................................34 Troubleshooting ................................35 No Light ..................................35 No Response to DMX ..............................35 Product Specifications ..............................36...
- Page 4 EventLITE 4/10 Q4 Ordercode: 44060...
-
Page 5: Warning
EventLITE 4/10 Q4 Warning Unpacking Instructions Immediately upon receiving this product, carefully unpack the carton and check the contents to ensure that all parts are present, and have been received in good condition. Notify the dealer immediately and retain packing material for inspection if any parts appear to be damaged from shipping or the carton itself shows signs of mishandling. - Page 6 ● If your Showtec device fails to work properly, discontinue use immediately. Pack the unit securely (preferably in the original packing material), and return it to your Showtec dealer for service.
-
Page 7: Operating Determinations
EventLITE 4/10 Q4 Operating Determinations ● This device is not designed for permanent operation. Regular operation breaks will ensure that the device will serve you for a long time without defects. ● The minimum distance between light output and the illuminated surface must be bigger than 0,5 meter. -
Page 8: Connection With The Mains
EventLITE 4/10 Q4 Connection with the mains Connect the device to the mains with the power plug. Always check if the right color cable is connected to the right place. International EU Cable UK Cable US Cable BROWN YELLOW/COPPER PHASE... -
Page 9: Description Of The Device
EventLITE 4/10 Q4 Description of the device Features The EventLITE 4/10 Q4 is a wireless LED battery spot from Showtec. ● Light source: 4 x 10W RGBW LEDs ● Wireless DMX by Wireless Solutions Sweden ● Controllable with an optional IR remote ●... -
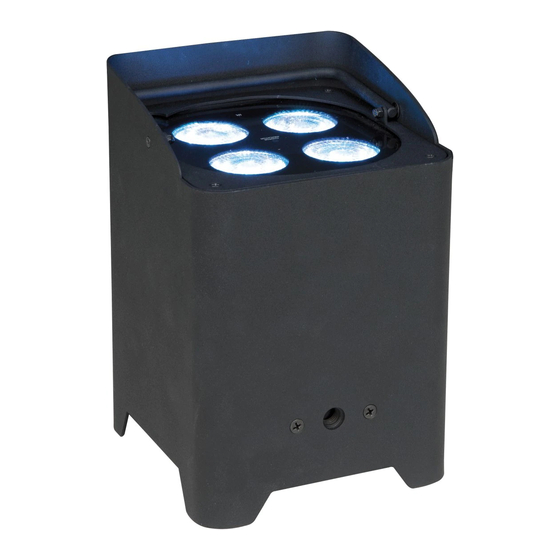
Page 10: Overview
EventLITE 4/10 Q4 Overview Fig. 01 01) Wireless DMX receiving antenna 02) IR remote sensor 03) Charging indicator 04) Mounting hole for truss clamp (M10) 05) 4 x 10W RGBW LEDs Bottom Fig. 02 06) W-DMX LED indicator 07) OLED display + control buttons... -
Page 11: Installation
EventLITE 4/10 Q4 Installation Remove all packing materials from the EventLITE 4/10 Q4. Check if all foam and plastic padding is removed. Connect all cables. Do not supply power before the whole system is set up and connected properly. Always disconnect from electric mains power supply before cleaning or servicing. -
Page 12: Set Up And Operation
EventLITE 4/10 Q4 Set Up and Operation Before plugging the unit in, always make sure that the power supply matches the product specification voltage. Do not attempt to operate a 120V specification product on 230V power, or vice versa. Charging the Built-in Battery 01) In order to charge the battery, you need the included IEC power cable. -
Page 13: Multiple Eventlites (Master/Slave Control)
EventLITE 4/10 Q4 Multiple EventLITEs (Master/Slave control) 01) Fasten the effect light onto firm trussing. Leave at least 0,5 meter on all sides for air circulation. 02) Always use a safety cable (ordercode 70140 / 70141). 03) Use a 3-pin XLR cable to connect the EventLITE and other devices. -
Page 14: Multiple Eventlites (Wireless Master/Slave Control)
EventLITE 4/10 Q4 Multiple EventLITEs (Wireless Master/Slave control) 01) Install multiple EventLITEs at the desired positions (maximum Wi-Fi distance: 250 m). 02) Unlock W-DMX on all EventLITEs (see page 23 for more information). 03) Make sure all the EventLITEs are in “slave” mode. -
Page 15: Multiple Eventlites (Dmx Control)
EventLITE 4/10 Q4 Multiple EventLITEs (DMX Control) 01) Fasten the effect light to a firm trussing. Leave at least 0,5 meter on all sides for air circulation. 02) Always use a safety cable (ordercode 70140 / 70141). Use a 3-pin XLR cable to connect the EventLITEs and other devices. -
Page 16: Multiple Eventlites (Wireless Dmx Control)
EventLITE 4/10 Q4 Multiple EventLITEs (Wireless DMX Control) 01) Install multiple EventLITEs at the desired positions (maximum Wi-Fi distance: 250 m). 02) Make sure the EventLITEs are in “slave” mode. 03) In order for the EventLITEs to receive a wireless DMX signal properly, in main menu, press the UP/DOWN buttons to select 1: DMX and press the ENTER button to enter the submenu. -
Page 17: Connect The Eventlite To The Wireless Dmx Signal Transmitter
The LED indicator lights up for 900ms and then blinks for 100ms (the LED blinks slowly). When the wireless DMX communication is normal, the LED indicator is always ON. The EventLITE 4/10 Q4 cannot receive a wireless DMX signal and a DMX cable signal at the same time. -
Page 18: Fixture Linking
EventLITE 4/10 Q4 Fixture Linking You will need a serial data link to run light shows of one or more fixtures using a DMX-512 controller or to run synchronized shows on two or more fixtures set to a master/slave operating mode. The combined number of channels required by all the fixtures on a serial data link determines the number of fixtures the data link can support. -
Page 19: Control Panel
EventLITE 4/10 Q4 The EventLITE 4/10 Q4 can be operated with a controller in control mode or without the controller in stand-alone mode. Control Panel A) OLED display MENU button C) ENTER button D) UP button DOWN button Fig. 09 DMX Control Mode The fixtures are individually addressed on a data-link and connected to the controller. -
Page 20: Menu Overview
EventLITE 4/10 Q4 Menu Overview Ordercode: 44060... - Page 21 EventLITE 4/10 Q4 Ordercode: 44060...
-
Page 22: Main Menu Options
EventLITE 4/10 Q4 At start-up, the EventLITE will show the currently selected DMX channel mode, the DMX starting address, the battery status and the current temperature. Main Menu Options 01) Press the ENTER button to open the main menu. The display will show: 02) Press the UP/DOWN buttons to select the desired menu. -
Page 23: Address
EventLITE 4/10 Q4 1.1. Address In this menu you can set the desired DMX starting address. 01) Press the UP/DOWN buttons to set the desired DMX address. The adjustment range is between 001- 512. 02) Press the ENTER button to confirm your choice. -
Page 24: W-Dmx Unlock
EventLITE 4/10 Q4 1.4. W-DMX Unlock In this menu you can activate/deactivate W-DMX. 01) The display will show: 02) Press the UP/DOWN buttons to select ON or OFF. ● Select ON in order to activate W-DMX. ● Select OFF in order to deactivate W-DMX. -
Page 25: Auto
EventLITE 4/10 Q4 3. Auto In this menu you can activate the auto program. 01) In main menu, press the UP/DOWN buttons until the display shows AUTO. 02) Press the ENTER button to open the menu. The display will show:... -
Page 26: Master/Slave Mode
EventLITE 4/10 Q4 5. Master/Slave Mode In this menu you can set the device as a master or a slave. 01) In main menu, press the UP/DOWN buttons to choose SLAVE. 02) Press the ENTER button to open the menu. The display will show: 03) Press the UP/DOWN buttons to choose YES or NO. -
Page 27: Curves Select
EventLITE 4/10 Q4 6.1. Curves Select In this menu you can set the dimming curves. 01) Press the UP/DOWN buttons to choose one of the 3 dimming curves. 02) Press the ENTER button to confirm your choice. 6.2. Dimmer Speed In this menu you can set the dimmer speed. -
Page 28: Economy
EventLITE 4/10 Q4 6.3. Economy In this menu you can set the device’s energy-saving mode. 01) Press the UP/DOWN buttons to choose ON or OFF. 02) If you have chosen ON, the EventLITE will operate at 80% of its efficiency (economical mode). -
Page 29: Lock
EventLITE 4/10 Q4 6.6. IR In this menu you can activate the remote control. 01) Press the UP/DOWN buttons to choose ON or OFF. 02) If you have choose ON, you can use the remote control to operate the device. -
Page 30: Information
EventLITE 4/10 Q4 7. Information In this menu you can view the device’s current software version, temperature, total lifetime, operation mode and the device’s UID number. 01) While in main menu, press the UP/DOWN buttons to choose INFORMATION. 02) Press the ENTER button to open the menu. The display will show:... -
Page 31: Remote Control
EventLITE 4/10 Q4 Remote Control Button Function Description On / Off Press to switch the light output ON/OFF. Press to increase the value. Down Press to decrease the value. Auto Press to activate Auto mode. Not functional Built-in color Press to choose the desired built-in color program and set the programs/Strobe strobe frequency. -
Page 32: Auto Mode
EventLITE 4/10 Q4 Not functional Orange Press to activate the Orange LED. Cyan Press to activate the Cyan LED. Pink Press to activate the Pink LED. 01) Press the button to set the device as a master (the display will read MASTER) or a slave (the display will read SLAVE). -
Page 33: Dmx Address/Dmx Channel Mode
EventLITE 4/10 Q4 4. DMX Address/DMX Channel Mode 01) Press the button to set the desired DMX starting address. The display will read ADDRESS. 02) Press the buttons to set the desired DMX address. The adjustment range is between 001-512. -
Page 34: Channels
EventLITE 4/10 Q4 Channel 5 – Blue Dimmer intensity CH1 must be open 0-255 Gradual adjustment Blue, from dark to brightest Channel 6 – White Dimmer intensity CH1 must be open 0-255 Gradual adjustment White, from dark to brightest 9 Channels Channel 1 –... -
Page 35: Maintenance
04) The electric power supply cables must not show any damages or material fatigue. The EventLITE 4/10 Q4 requires almost no maintenance. However, you should keep the unit clean. Otherwise, the fixture’s light output will be significantly reduced. Disconnect the mains power supply, and then wipe the cover with a damp cloth. -
Page 36: Troubleshooting
01) Battery. Check if the battery is fully charged. 02) The LEDs. Return the EventLITE to your Showtec dealer. 03) The internal fuse. Return the EventLITE to your Showtec dealer.. 04) If all of the above appears to be in order, switch the unit on again. -
Page 37: Product Specifications
EventLITE 4/10 Q4 Product Specifications Model: Showtec EventLITE 4/10 Q4 Input voltage: 100-240V AC, 50/60 Hz Battery type: Lithium-ion Battery storage: 4,16Ah Operating time at full RGBW (Full On): 5 hours (at full RGBW) / 12 hours (using a single color) -
Page 38: Dimensions
EventLITE 4/10 Q4 Dimensions Ordercode: 44060... - Page 39 EventLITE 4/10 Q4 Ordercode: 44060...
- Page 40 ©2018 Showtec...
Need help?
Do you have a question about the EventLITE 4/10 Q4 and is the answer not in the manual?
Questions and answers