Becker CentralControl CC51 Commissioning Instructions
Central controller
Hide thumbs
Also See for CentralControl CC51:
- Commissioning instructions (24 pages) ,
- Assembly and operating instructions manual (56 pages)
Table of Contents
Advertisement
Quick Links
CentralControl
CC51
Commissioning instructions
en
Central Controller
Important information for:
• Fitters / • Electricians / • Users
Please forward accordingly!
These instructions must be kept safe for future reference.
4035 630 029 0a 21/07/2017
Becker-Antriebe GmbH
Friedrich-Ebert-Straße 2-4
35764 Sinn/Germany
www.becker-antriebe.com
Advertisement
Table of Contents

Related Manuals for Becker CentralControl CC51


Summary of Contents for Becker CentralControl CC51
- Page 1 CentralControl CC51 Commissioning instructions Central Controller Important information for: • Fitters / • Electricians / • Users Please forward accordingly! These instructions must be kept safe for future reference. 4035 630 029 0a 21/07/2017 Becker-Antriebe GmbH Friedrich-Ebert-Straße 2-4 35764 Sinn/Germany www.becker-antriebe.com...
-
Page 2: Table Of Contents
Table of contents General ........................ 3 Warranty ...................... 3 Items included ...................... 4 Safety instructions .................... 4 Intended use ...................... 5 Dimensions ...................... 6 Device overview .................... 6 Online documentation ................... 7 Mains connection .................... 7 Start / standard screen.................. 8 Commissioning, step-by-step ................ 10 Selecting a language.................. -
Page 3: General
KNX radio and the Centronic I and II range of controls. This device uses free/open source software. The source code can be downloaded from http://www.b-tronic.net/source/. On request, Becker Antriebe will make the source code available on a CD-ROM at cost price. Please contact source@b-tronic.net if you are interested. -
Page 4: Items Included
Items included • B-Tronic CentralControl controller • USB WLAN stick • USB Flash memory stick • USB Centronic stick • USB B-Tronic/KNX stick (optional) • Mains adapter • Fastening material for wall mounting. • Documentation for commissioning Safety instructions General information •... -
Page 5: Intended Use
Attention • Do not let any objects fall onto the control unit. • If a display is present, protect it against being scratched by hard ob- jects (e.g. rings, fingernails, wristwatches) • Wait until the control unit has adjusted to ambient temperature be- fore connecting the control unit to the mains adapter. -
Page 6: Dimensions
Dimensions All dimensions in mm. Device overview 12 11... -
Page 7: Online Documentation
In addition to the present commissioning instructions, we make comprehensive docu- mentation available to you online. Please visit the following Internet site: http://www.becker-antriebe.net/centralcontrol/. Mains connection 1. If necessary, pull the cover off the control unit. 2. First connect the mains adapter to the control unit, then plug it into the socket. -
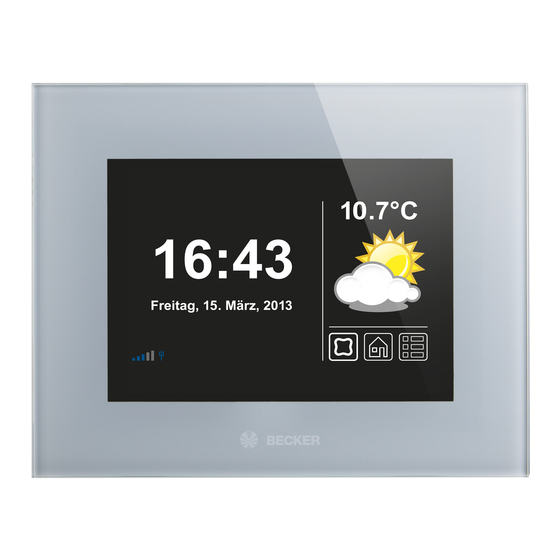
Page 8: Start / Standard Screen
Start / standard screen 1 Main screen area The time and date, and in some cases the weather forecast, are displayed on the main screen area. 2 Navigation and status area The current weather, status information, and the navigation elements for the pro- grammed receivers are shown in the navigation and status area. - Page 9 Network via cable No network via cable Access point available Fault indication An update is available The display of blue triangles indicates that more content is available in the main screen area by scrolling up or down. 6 Main navigation The main navigation is visible, with an identical format, on all the screens.
-
Page 10: Commissioning, Step-By-Step
Commissioning, step-by-step • Selecting a language [} 10] • Network settings [} 11] • Date / time [} 13] • Select weather location [} 15] • Programming receivers [} 17] • Creating rooms [} 20] • Add receivers to rooms [} 22] • Creating groups [} 24] • Program receivers for groups [} 26] Selecting a language 1 Please press the "Programs and set- tings"... -
Page 11: Network Settings
3 Now select "Selecting a language" in the configuration menu. Configuration Selecting a language Please select the Network settings desired menu item Date / time Select weather location Screen settings 4 Choose the language you want in the language menu. Language Deutsch English... - Page 12 2 On the "Programs and settings" screen you should now select the "Configuration" Settings Configuration menu item. House installation Select an application Cameras Radio System information 3 Now select "Network settings" in the configuration menu. Configuration Selecting a language Please select the Network settings desired menu item Date / time...
-
Page 13: Date / Time
7 Key = password (this is only needed for WiFi / WLAN con- Key / password (PSK) nections) Please note that the central control can Network configuration only be linked into a network by means of WiFi / WLAN if the WPA2 encryption is Automatic (DHCP) switched on at the router. - Page 14 2 On the "Programs and settings" screen you should now select the "Configuration" Settings Configuration menu item. House installation Select an application Cameras Radio System information 3 Now select "Date / time" in the config- uration menu. Configuration Selecting a language Please select the Network settings desired menu item...
-
Page 15: Select Weather Location
Select weather location Displaying the weather data requires an Internet connection. In order to be able to display the correct weather data on your B-Tronic CentralControl it is necessary to provide the location for which the weather data is to be displayed. If the place you want is not available in the selection list, choose the nearest larger city. - Page 16 4 The location that is currently set for the weather data is shown on the display. Location: Weather Location for weather Sinn, Germany 5 To change the location, click the field information where the name is displayed. Options Set using location data 6 Now enter the location that you want.
-
Page 17: Programming Receivers
12 After the central controller has entered the weather location according to your Configuration Network settings specifications, the screen returns auto- Please select the Date / time matically to the previous menu. desired menu item Select weather location Location Programming receivers 1 Please press the "Programs and set- tings"... - Page 18 4 Select the [ + ] button in order to add a receiver. Receiver Drive Centronic installation Add / select Dimmer KNX receiver Switch KNX Socket switch KNX A name is first assigned to a new receiver. Receiver name: Do please make sure that you name the receiver receivers in a meaningful way, so that Configure...
- Page 19 8 Selecting the receiver type. Receiver name: Two options are available: receiver Receiver - B-Tronic / KNX (bidirectional - with con- Configure Receiver type: firmation function) settings B-Tronic / KNX-RF - Centronic (unidirectional - without con- Centronic firmation function) Device type: Only certain device types are available for selection, depending on the selected re- Tubular drive / ext.
-
Page 20: Creating Rooms
13 In addition to the information on the screen saying that the programming has Program The receiver has been successfully programmed been completed successfully, many re- and can now be added B-Tronic / KNX-RF ceivers also confirm correct program- to groups or rooms. ming. - Page 21 2 On the "Programs and settings" screen you should now select the "House install- Settings Configuration ation" menu item. House installation Select an application Cameras Radio System information 3 On the "House installation" screen you should now select the "Rooms" menu Setup Receiver item.
-
Page 22: Add Receivers To Rooms
6 The keyboard opens. Enter the name of the new room here. New room Bedroom The name "Bedroom" has been used in Please enter a name the example. 7 You confirm your input and close the keyboard with the green tick. 8 The new room can now be seen in the room selection menu. - Page 23 3 On the "House installation" screen you should now select the "Rooms" menu Setup Receiver item. Please select Groups a function Scenarios Rooms Timers 4 Choose the room in which you want to add receivers. Rooms Bedroom For example: Bedroom Add / select Living room room...
-
Page 24: Creating Groups
8 The chosen receiver (switch) has now been assigned to the room (Bedroom), Bedroom Switch and appears in the list of receivers con- Add / select tained in the room. receiver or edit room Creating groups A "group" is a number of receivers combined on one channel of the transmitter. All re- ceivers in a group respond jointly to signals from the transmitter. - Page 25 3 On the "House installation" screen you should now select the "Groups" menu Setup Receiver item. Please select Groups a function Scenarios Rooms Timers 4 Select the [ + ] button in order to add a Group group. Switch setup Add / select Drives group...
-
Page 26: Program Receivers For Groups
9 You confirm your entries about the new group and close the menu with the green Name group tick. new group Adjust settings Tubular drive / ext. Switching actuator Dimming actuator 10 The new group is now visible in the list Group of all groups. - Page 27 3 On the "House installation" screen you should now select the "Groups" menu Setup Receiver item. Please select Groups a function Scenarios Rooms Timers 4 Select the group to which you want to Group assign receivers. new group setup For example: "New group" Add / select Switch group...
- Page 28 8 The chosen receiver (B-Tronic drive) has now been assigned to the group (New New group Drive B-Tronic group), and appears in the list of receivers Add / select contained in the group. receiver...
-
Page 29: Operation
Operation Operating receivers 1. Press the button in order to open the "My house" menu. 2. Now select the room you want. 3. Then choose the receiver that is to be operated. 4. You can now operate the receiver. 5. Press the " "... -
Page 30: Dimmer Receiver
Dimmer receiver With B-Tronic receivers you get feedback on the current status and have the option of tapping the desired position on the status display in order to initiate a corresponding dimming command. UP button STOP button DOWN button Intermediate position 1 Intermediate position 2 Status display... -
Page 31: Switch Receivers
Switch receivers With B-Tronic receivers you get feedback on the current status. ON button OFF button Status display Operating groups Groups can only consist of receivers of the same type. Just like receivers, groups can be assigned to rooms. 1. Press the button in order to open the "My house"... -
Page 32: Additional Configuration And Operation Options
Our richly illustrated Assembly and Operating Instructions offer detailed information on the full range of available functions, their settings and operator controls and show you how to optimise the configuration of your CentralControl. To download these instruc- tions, please go to our homepage: http://www.becker-antriebe.net/centralcontrol/. -
Page 33: Installation
Installation Caution Lay the mains connecting cable in such a way that nobody can tread on it or trip over it. Wall mounting 1. Check that the transmitter and re- ceiver, and the WLAN if present, are working properly before mounting in the desired position. -
Page 34: Technical Data
Technical data Supply voltage 230 V/50 Hz Degree of protection IP 20 Permissible ambient temperature and air humid- 0 °C to +55 °C at a relative humidity of between 20 % and 80 % (non- condensing) Maximum emitted transmission output ≤... -
Page 35: Simplified Eu Declaration Of Conformity
Simplified EU declaration of conformity Becker-Antriebe GmbH hereby declares that this radio control system complies with Directive 2014/53/EU. The full text of the EU declaration of conformity is available at the following web ad- dress: www.becker-antriebe.com/ce Subject to technical changes without notice.
Need help?
Do you have a question about the CentralControl CC51 and is the answer not in the manual?
Questions and answers