Becker CentralControl CC51 Assembly And Operating Instructions Manual
For operation with the local interface central controller
Hide thumbs
Also See for CentralControl CC51:
- Commissioning instructions (24 pages) ,
- Commissioning instructions (36 pages)
Table of Contents
Advertisement
Quick Links
CentralControl
CC51, CC31
Assembly and operating instructions for op-
en
eration with the local interface
Central controller
Important information for:
• Fitters / • Electricians / • Users
Please forward accordingly!
These instructions must be kept safe for future reference.
4035 630 147 0 25/07/2017
Becker-Antriebe GmbH
Friedrich-Ebert-Straße 2-4
35764 Sinn/Germany
www.becker-antriebe.com
Advertisement
Table of Contents

Subscribe to Our Youtube Channel
Related Manuals for Becker CentralControl CC51


Summary of Contents for Becker CentralControl CC51
- Page 1 Central controller Important information for: • Fitters / • Electricians / • Users Please forward accordingly! These instructions must be kept safe for future reference. 4035 630 147 0 25/07/2017 Becker-Antriebe GmbH Friedrich-Ebert-Straße 2-4 35764 Sinn/Germany www.becker-antriebe.com...
-
Page 2: Table Of Contents
Table of contents General ........................ 5 Warranty ...................... 5 Items included ...................... 6 Safety instructions .................... 6 Intended use ...................... 8 Dimensions ...................... 9 Device overview .................... 10 Start / standard screen.................. 13 Mains connection .................... 14 Explanation of pictograms .................. 14 Explanation of the operator controls .............. 16 Operating the house automation with other devices on the home network.... 17 Operating the house automation through a device with mobile Internet access from outside........................ 18... - Page 3 My Home settings .................... 27 Adding a room .................... 27 Sorting rooms.................... 27 Deleting a room ..................... 27 Renaming a room................... 27 Allocating elements to a room ................. 28 Sorting elements in a room ................ 28 Deleting elements from a room ............... 28 Adding a group ....................
- Page 4 Resetting the background colour and the visual background effects to the factory settings ...................... 41 Information settings ..................... 41 System information .................. 41 Reading out the error memory ................ 41 Reading update news .................. 42 System settings .................... 42 Setting the language .................. 42 Setting the location ..................
-
Page 5: General
KNX radio and the Centronic I and II range of controls. This device uses free/open source software. The source code can be downloaded from http://www.b-tronic.net/source/. On request, Becker Antriebe will make the source code available on a CD-ROM at cost price. Please contact source@b-tronic.net if you are interested. -
Page 6: Items Included
Items included CC51 CC31 • B-Tronic CentralControl control unit • B-Tronic CentralControl control unit • USB WLAN stick • Flash memory SD card • USB Flash memory stick • USB Centronic stick • USB Centronic stick • USB B-Tronic/KNX stick •... - Page 7 • Switch the control unit off immediately if the mains ad- apter and the plug to which it is connected is burnt or damaged. If a mains adapter is damaged, replace it with an original one. A faulty mains adapter must not under any circumstances be repaired.
-
Page 8: Intended Use
Intended use The B-Tronic CentralControl may only be used for the operation of suitable drives and control units with bidirectional KNX radio and with the Centronic I and II range of con- trols. You can operate a group, or multiple groups, of devices with this controller. •... -
Page 9: Dimensions
Dimensions All dimensions in mm. CC51 CC31 28,5... -
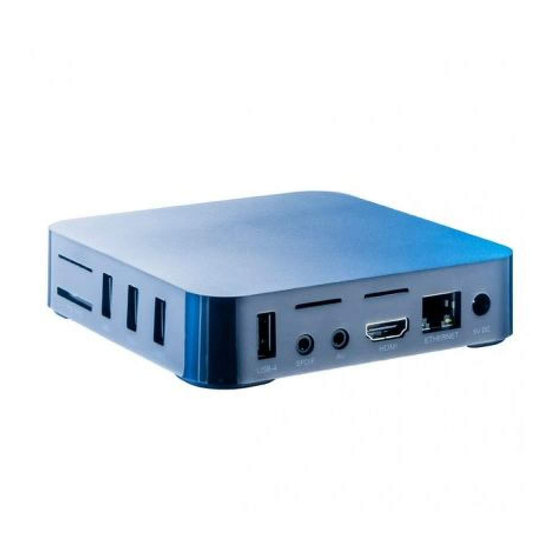
Page 10: Device Overview
Device overview CentralControl CC51 12 11 1. Integrated front camera 10. B-Tronic KNX stick 2. Light sensor 11. Connection for mains adapter 3. Loudspeaker 12. Audio output (3.5 mm jack) 4. Touchscreen 13. WLAN stick 5. Operating status LED 14. Network connection (RJ45) 6. - Page 11 CentralControl CC31 Connections/slots 1. Mains connection 7. USB connection for B-Tronic KNX stick 2. LAN connection 8. USB connection for Centronic stick 3. HDMI connection 9. USB connection for keypad stick 4. AV connection 10. Card slot for SD card 5.
- Page 12 External keypad 1. Touchpad 6. LED light 2. ON/OFF switch 7. Battery compartment 3. Keypad 8. Compartment for keypad receiver 4. No function 9. Battery compartment cover 5. Light button...
-
Page 13: Start / Standard Screen
Start / standard screen 1 Main screen area The time and date, and in some cases the weather forecast, are displayed on the main screen area. 2 Navigation and status area The current weather, status information, and the navigation elements for the pro- grammed receivers are shown in the navigation and status area. -
Page 14: Mains Connection
Network via cable No network via cable Access point available Fault indication An update is available The display of blue triangles indicates that more content is available in the main screen area by scrolling up or down. 6 Main navigation The main navigation is visible, with an identical format, on all the screens. - Page 15 All the symbols in square boxes can be found on the screen and should be operated there using the mouse or touchscreen. All the symbols in circles provide operating information that should be imple- mented if a symbol is illustrated in a circle. Continue with the entries at the point indicated.
-
Page 16: Explanation Of The Operator Controls
Explanation of the operator controls The operator controls may execute different functions depending on the receiver type. Local interface Move UP/move IN Switch on the light and increase the brightness Manually set the temperature higher STOP button Switch off the light Move DOWN, move OUT Switch on the light and reduce the brightness Manually set the temperature lower... -
Page 17: Operating The House Automation With Other Devices On The Home Network
Local interface Fold out the foldable roller shutter Fold up the foldable roller shutter Operating the house automation with other devices on the home network You can use the B-Tronic CentralControl to “remotely control” home automation functions using a large number of end devices that are in your home network. -
Page 18: Operating The House Automation Through A Device With Mobile Internet Access From Outside
Operating the house automation through a device with mobile Internet access from outside You need to register with the Becker Gate- way Service for easy remote control of your central controller over the Internet. A login code is required once in order to set up gateway access at www.beckercon-... - Page 19 3. The Start / standard screen [} 13] appears. 4. You can now input further entries via the internal keypad, or via the external keypad supplied. Via PC, notebook or tablet There are a number of options: • WLAN • Ethernet (an Ethernet cable is not included in the scope of supply) WLAN The configuration WLAN of the B-Tronic CentralControl (access point) is used to make the first connection with...
-
Page 20: Commissioning With The Local Interface
Ethernet (an Ethernet cable is not included in the scope of supply) 1. Connect the B-Tronic CentralControl to your input device (PC, notebook or tablet) using the Ethernet cable. Wait until the Ethernet connection is established. Caution Lay the Ethernet cable in such a way that nobody can tread on it or trip over it. -
Page 21: Establishing A Network Connection
Establishing a network connection The full home automation functionality of the B-Tronic CentralControl is naturally avail- able even when it is not connected to a network. However, some additional functions and access options are only possible with network or Internet access. To be able to use these functions, please ensure that the B-Tronic CentralControl is connected to your network, that there is an Internet connection and that the time is set correctly. -
Page 22: Setting The Location
Setting the location This setting affects the weather information used, the time zone and the Astro function. Local interface Location Adding a Centronic receiver Local interface... -
Page 23: Adding A B-Tronic Receiver
Adding a B-Tronic receiver Local interface Adding a room Local interface Adding elements to a room Local interface End of commissioning... -
Page 24: Building Wiring System Settings
Building wiring system settings Adding a Centronic receiver Local interface Adding a B-Tronic receiver Local interface... -
Page 25: Deleting A Centronic Receiver
Deleting a Centronic receiver Local interface Deleting a B-Tronic receiver Local interface... -
Page 26: Renaming A Receiver
Renaming a receiver Local interface The following functions are unavailable on the local interface. Please make this setting on the web interface. Adding a Centronic or B-Tronic transmitter Deleting a Centronic or B-Tronic transmitter Renaming a transmitter Adding a Centronic or B-Tronic sensor Deleting a Centronic or B-Tronic sensor Renaming a sensor Adding an internal object... -
Page 27: My Home Settings
My Home settings Adding a room Local interface Sorting rooms Local interface Deleting a room Local interface Renaming a room Local interface... -
Page 28: Allocating Elements To A Room
Allocating elements to a room Local interface Sorting elements in a room Local interface Deleting elements from a room Local interface Adding a group A “group” is a number of receivers combined on one of the transmitter’s channels. All the receivers in a group respond jointly to signals from the transmitter. It is important to note that only receivers of the same type –... -
Page 29: Sorting Groups
Local interface The list of receivers also contains groups and scenarios, and these can also be assigned to rooms in the exact same way as individual receivers. Sorting groups Local interface Deleting a group Local interface Renaming a group Local interface Allocating elements to a group Local interface... -
Page 30: Deleting Elements From A Group
Deleting elements from a group Local interface Adding a scenario Several receivers are combined in one scenario. All the receivers in a scenario respond jointly to the commands for starting or stopping the scenario. In contrast to the group, devices combined in one scenario do not have to consist of receivers of the same type. They can approach positions that have been individually defined beforehand, or can as- sume switching states. -
Page 31: Sorting Scenarios
Sorting scenarios Local interface Deleting a scenario Local interface Renaming a scenario Local interface Allocating elements to a scenario Local interface... -
Page 32: Deleting Elements From A Scenario
Please note that the central controller can only display native MJPEG/MJPG streams. You can find a list of the cameras that Becker has already tested and incorporated at http://www.becker-antriebe.net/centralcontrol/. You will also find a list of the camera- specific settings there. -
Page 33: Changing Camera Settings
Changing camera settings Local interface Adding a radio Local interface Sorting radios Local interface Deleting a radio Local interface... -
Page 34: Changing Radio Settings
Changing radio settings Local interface Automation settings Setting the memory function (ON/OFF) The CentralControl enables configuration of a number of timer functions. Particularly in installations where the central controller is installed at a later time, memory functions that have been set in the drives may already exist. To completely set all the times through the central controller, the memory times stored in the drives can be switched off using the “Internal memory function”... -
Page 35: Setting The Automatic Roof Window
Setting the automatic roof window Local interface Automation options Automatic roof window Setting the holiday function Your CentralControl includes a holiday function, so that even when you are not there, any possible observer would be given the impression that the drives are not controlled automatically, but manually. -
Page 36: Setting The Sun Protection Function
Setting the sun protection function Local interface Adding a timer To ensure that time commands are executed correctly, you need to create a shared group for receivers of the same type. This group can then be applied to the timers. This measure ensures that the receivers all receive the travel/switching commands at the same time. -
Page 37: Deleting A Timer
Local interface You will find a more detailed explanation of the Astro function under Astronomical function [} 53]. Deleting a timer Local interface Setting the heating functions Please note that all the heating actuators in a room auto- matically form a joint climate zone and are controlled to- gether. -
Page 38: Access Settings
Access settings Generating a service code Local interface Service Generate service code... -
Page 39: Setting Up Remote Access For An Existing Account
Setting up remote access for an existing account Local interface Remote access Please take note of the code and complete the registration process in the web browser using a computer, tablet or mobile phone. Then enter the following address in the web browser: www.beckercontrol.de/ Log in Activate device... -
Page 40: Setting Up Remote Access For A New Account
Setting up remote access for a new account Local interface Remote access Please take note of the code and complete the registration process in the web browser using a computer, tablet or mobile phone. Then enter the following address in the web browser: www.beckercontrol.de/ Create new account. -
Page 41: View Settings
View settings Setting the background colour This function is unavailable on the local interface. Please make this setting on the web interface. Setting the visual background effects This function is unavailable on the local interface. Please make this setting on the web interface. Resetting the background colour and the visual background effects to the factory settings This function is unavailable on the local interface. -
Page 42: Reading Update News
Reading update news Local interface News System settings Setting the language Local interface Language Setting the location This setting affects the weather information used, the time zone and the Astro function. Local interface Location... -
Page 43: Setting The Time And Date
Setting the time and date Local interface Date/time Establishing a network connection The full home automation functionality of the B-Tronic CentralControl is naturally avail- able even when it is not connected to a network. However, some additional functions and access options are only possible with network or Internet access. To be able to use these functions, please ensure that the B-Tronic CentralControl is connected to your network, that there is an Internet connection and that the time is set correctly. -
Page 44: Update
To do so, please download the “CC Updater” onto your PC by using the following link: https://www.becker-antriebe.de/produktue- bersicht/hausautomatisierung-centralcontrol/manuelles-update.html Then start the “CC Updater” and follow the instructions on the screen. -
Page 45: Restoring From Backup
Restoring from backup Local interface Backup + Restore Restore settings Factory reset All settings will be reset, and all rooms, scenarios, groups, receivers and so forth will be deleted. Local interface Factory settings Reboot Local interface Reboot... -
Page 46: Rooms
Rooms Setting receivers to Automatic mode The B-Tronic CentralControl enables you to control receivers, groups or scenarios ac- cording to time. All the control tasks carried out by the CentralControl based on programmed specifica- tions (such as switching times) are referred to as “Automatic functions”. Automatic functions can be activated or deactivated for either one single receiver or for several receivers (the entire home or one room) at the same time. -
Page 47: Setting All The Receivers In The Home To Manual Mode
Setting all the receivers in the home to Manual mode Local interface Operating receivers Local interface Adding favourites Local interface Favourites Deleting favourites Local interface Favourites... -
Page 48: Groups
Groups Operating groups Local interface Scenarios Operating scenarios Local interface Cameras Calling up cameras Local interface Radios Starting a radio Local interface... -
Page 49: Stopping A Radio
Stopping a radio Local interface Weather forecast Local interface Changing the batteries of an external keyboard Dispose of exhausted batteries properly. Only replace batteries with ones of the identical type (LR03; AAA). 1. Open the cover of the battery com- partment. -
Page 50: Technical Data
Technical data Technical data for the CC51 Supply voltage 230 V/50 Hz Degree of protection IP 20 Permissible ambient temperature and air humid- 0°C to +55°C at a relative humidity of between 20% and 80% (non- condensing) Maximum emitted transmission output ≤... -
Page 51: Technical Data For The Cc31
Technical data for the CC31 Supply voltage 230 V/50 Hz Degree of protection IP 20 Permissible ambient temperature and air humid- 0°C to +40°C at a relative humidity of between 20% and 80% (non- condensing) Maximum emitted transmission output ≤ 25 mW Radio frequency 868.3 MHz/2.4 GHz ARM9 454 MHz... -
Page 52: What To Do If
What to do if...? Problem Remedy B-Tronic CentralControl is not working/ Check the mains connection (see Device does not start. overview). Weather is not displayed. Connect the B-Tronic CentralControl to the network and Internet (see Establishing a network connection [} 43]). Radio does not work. -
Page 53: Simplified Eu Declaration Of Conformity
You will find further information at http://www.becker-antriebe.net/centralcontrol/. Simplified EU declaration of conformity Becker-Antriebe GmbH hereby declares that this radio control system complies with Directive 2014/53/EU. The full text of the EU declaration of conformity is available at the following web ad- dress: www.becker-antriebe.com/ce... - Page 54 ASTRO DAWN Winter time Summer time Winter time Astro dawn without any additional set- Jan. Feb. Mar. Apr. June July Aug. Sep. Oct. Nov. Dec. tings: The desired action is performed at the time of sunrise. Winter time Summer time Winter time Astro dawn with blocking time: Apr.
- Page 55 Winter time Summer time Winter time Astro evening with shift: Apr. June July Aug. Sep. Oct. Nov. Dec. Jan. Feb. Mar. The desired action is not carried out at evening itself, but is shifted by whatever "Astro shift" has been set. In the example, 1 hour has been set as the Astro shift.
Need help?
Do you have a question about the CentralControl CC51 and is the answer not in the manual?
Questions and answers