
Subscribe to Our Youtube Channel
Related Manuals for Sartorius LMA100P


Summary of Contents for Sartorius LMA100P
- Page 1 Operating Instructions Sartorius LMA100P, LMA110S Model Mark 3 Electronic Moisture Analyzers 98648-016-12 98648-016-12...
-
Page 2: Table Of Contents
Contents Contents � � � � � � � � � � � � � � � � � � � � � � � � � 2 Delete Program � � � � � � � � � � � � � � � � � � � � 43 Introduction �... -
Page 3: Introduction
Operating Instructions to learn the safe operation of this analyzer� The device version of the field-proven Mark 3 from Sartorius� This analyzer is a modular ana- has many features that will be described lytical instrument that can be configured and can be of benefit to your moisture to meet various performance require- testing program�... -
Page 4: Warning And Safety Information
Warning and Safety Information This moisture analyzer complies – The moisture analyzer may be with the European Council Direc- operated only by qualified persons who are familiar with the properties tives as well as international regu- lations and standards for electrical of the sample to be analyzed�... - Page 5 In case you have any problems with ture Analyzer to AC Power” in the your moisture analyzer: chapter entitled “Getting Started”) $ contact your local Sartorius office, – The analyzer comes with a power dealer or service center supply that has a grounding con- ductor –...
-
Page 6: Sample Pans
Corrosion: Hazards for persons or equipment – Substances that release aggressive posed by using specific samples: vapors during the heating process (such as acids): In this case we recom- mend that you work with small sample quantities� Otherwise, vapors can con- Fire Explosion dense on cold housing parts and cause... -
Page 7: Safety Precautions
Caution Safety Precautions Do not touch the metal surfaces inside Danger the drying chamber while removing or placing a sample in the analyzer since Use of this product in a manner the surfaces are very hot� not specified by the manufacturer may impair any safety protection Do not touch the heater hood ventila- provided by the equipment! -
Page 8: Getting Started
Getting Started Storage and Shipping Conditions Thank you for choosing the Sartorius Allowable storage temperature: moisture analyzer� The modular analyti- –10 to +50°C cal instrument is designed to be confi- –14°F to +122°F gured to meet various performance requirements� Each analyzer consists... -
Page 9: Instructions For Recycling The Packaging
– Sample pans § Inspect each module for physical dam- age and report any damage immediately – Operating instructions manual to Sartorius or the distributor that you purchased the analyzer from� Only model LMA100P: § Verify that you have received the –... -
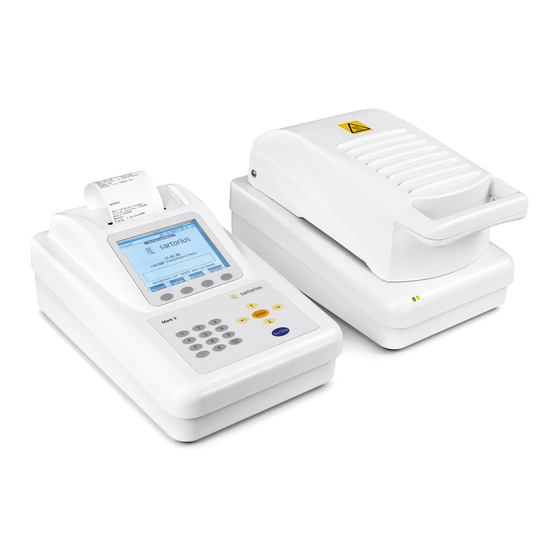
Page 10: General Views Of The Moisture Analyzer
General Views of the Moisture Analyzer Designation Designation Heater Module Control Module Pan shield Only model LMA100P: Printer cavity Pan support VGA display Cylindrical quartz heating tubes Soft keys and display overlay RTD temperature sensor Keypad Heater adjustment tool connector... - Page 11 LMA100P: General View Control Module Connector Panel Heater Module Connector Panel Cables Connected to Control and Heater Modules * = only for model LMA100P...
-
Page 12: Assembly
(MOD COMM 1 connector) and the heater module, observing the connector orien- tation� Only for model LMA100P: 6� Open the printer cavity cover and, if necessary, place the roll of paper with spool and two end caps into place (see page 20, Internal Printer)�... -
Page 13: Choosing A Suitable Location
If your voltage is not a warm-up period as noted on the within this rating, do not connect the screen� Should the analyzer display power cord to the power supply� any warnings, consult the trouble- shooting section of this manual, or call Sartorius�... -
Page 14: Leveling The Moisture Analyzer
Leveling the Moisture Analyzer Warm-up In order to function properly, the heater To enable the analyzer to function module should be horizontal� The heater optimally, plug it in and leave it pow- module has a level vial� You can tell ered on for a minimum of 15 minutes�... -
Page 15: Operating Design
Press to finalize the entry of a numeric value – Selects the highlighted menu selection in a list – From the Standby screen will print the last result Only for model LMA100P: Printer paper feed Paper Feed (advances 1 line per press) - Page 16 Soft keys: Used to select an operator� Name will Users The functionality of these keys will be printed on the results printout� change depending on what is on the display� A label on the display just Display will return to the previous above the key will describe the key menu�...
-
Page 17: Display Modes
Display Modes The large quarter VGA display is designed to make operation and setting up the analyzer easy through of detailed information in clear descriptions, choices or menus� The analyzer will display information in several different formats as described below: Warm-up: D e f a u l t 0 9 / 0 7 / 2 0 1 2 0 2 : 1 4 P M... - Page 18 Graph: D R Y M I L K P O W D E R 0 9 / 0 7 / 2 0 1 2 0 2 : 1 4 P M T e m p e r a t u r e / t i m e 25.67 % The graph mode can be entered during or after a test to show a graph of the weight versus time,...
-
Page 19: Menu Structure
Menu Structure The set up software is structured according to a series 0 9 / 0 7 / 2 0 1 2 0 2 : 1 4 P M S e t u p M e n u of menus� The Setup menu lists several topics of 1 ) P r o g r a m m a n a g e instrument setup�... -
Page 20: Data Output
Internal Printer the paper through the print head� Use the Print Feed key to advance the The LMA100P comes standard with an paper more, if desired� integral 40– character thermal printer for hard-copy documentation of results, §... -
Page 21: Led Status Lights
Flashing YELLOW Flashing GREEN Sample loading Steady GREEN Flashing GREEN Below target Within target Flashing YELLOW Steady GREEN Above target Flashing RED Steady GREEN Diagnostics Balance LED Heater LED Failed diagnostics Flashing RED Flashing RED * = only for model LMA100P... -
Page 22: Operating The Moisture Analyzer
Sartorius will support you in finding the set of testing parameters (referred to as a program) you need for your specific tests� On request, Sartorius will provide a chart... -
Page 23: Standby Temperature With A
Functions available from the Standby screen: § Press Start|Stop key to initiate a test § Press Recall soft key to change the program to be used for testing a sample § Press User soft key to select an operator name (feature must be turned on in Setup) §... -
Page 24: Default Drying Program
You will notice if you are in the default program or Standby temp=60C, a specific material program by the program name Equilibration=Off* at the top left of the display� Ideal weight=5g, Lock=Off Target limits=Off Mode=Standard * = only for model LMA100P... -
Page 25: Recalling A Program
– LMA100P: 300 drying programs – LMA110S: 60 drying programs Recalling a Program Drying programs are stored for easy access at a later time� This eliminates the need to change parameters for frequently tested samples� Following drying programs can be stored: Creating and storing a program is described under Developing a Drying Program�... -
Page 26: Testing A Sample
Testing a Sample D R Y M I L K P O W D E R 0 9 / 0 7 / 2 0 1 2 0 2 : 1 4 P M S t a n d b y Standby A test can only be initiated from the Standby or Test Done screen�... - Page 27 The printer will begin to print as the test begins� Print- out information can be selected in Setup menu under Printer (LMA100P only)� At the end of the test the display will show “Test D r y M i l k P o w d e r...
- Page 28 Press the Start|Stop key to begin the The display will prompt you, the operator to remove the sample next test using the same program� before the next sample can be Note tested� Open the hood and carefully remove this sample using tweezers, The analyzer balance must be calibrated and while the hood is open, add before putting the unit into routine...
-
Page 29: Setup Menu
Setup Menu All settings including changing of instrument options and program parameters, are selected in the Setup menu� Each subject is listed on the Setup menu screen� To enter the Setup menu: § From the Standby screen, press the Setup soft key to 0 9 / 0 7 / 2 0 1 2 0 2 : 1 4 P M S e t u p M e n u display the Setup Menu screen�... -
Page 30: Edit Current Program
Edit Current Program D e f a u l t 0 9 / 0 7 / 2 0 1 2 0 2 : 1 4 P M P r o g r a m M a n a g e M e n u All parameters associated with a currently stored drying 1 ) E d i t c u r r e n t p r o g r a m program can be edited and re-stored or changed with-... - Page 31 Lower limit Set lower limit of result tolerance Turn limits Turns target limit feature Off Mode Mode Standard Standard test mode Syringe* Initial weight taken by difference Concentration Corrects a result for sample volume * = only for model LMA100P...
-
Page 32: Units
Factor Places LMA110S: § Note that there is an advanced options indicated * = only for model LMA100P by Factor on the soft key� To change this feature, see “Factors�” § When all the parameters for units have been changed, then press the arrow soft key to accept the changes�... -
Page 33: Factors
( R e s u l t ) * ( F a c t o r ) + O f f s e t § Press the Arrow soft key to return to the Units screen� (result) · (scale) + offset * = only for model LMA100P... -
Page 34: Temperature 1 And 2
The ramp rate is the time it takes to obtain the drying temperature� Most applications will use the standard ramp rate� To set or change ramp rate: § Press the Ramp soft key to toggle between Standard and Rapid� * = only for model LMA100P... -
Page 35: Time 1 And 2
Time 1 and 2 Slope Each the Temperature 1 and 2 setting The slope function provides an auto- can have a set period of time� Time 1 or matic endpoint for the test� The slope 2 is the time during which the sample function consists of two variables: will be dried at each temperature before window of time and percent of initial... - Page 36 To set or change slope: § Press the 4 key from the Program Menu to display the Slope screen� The current initial weight percentage is shown� § Use the numeric keys type in the desired %IW, then press the Enter key� §...
- Page 37 E q u i l i b r a t i o n t i m e : O f f * press the Enter key again or Arrow key to return to the Program Menu� Equil Clear * = only for model LMA100P...
- Page 38 LMA100P: Equilibration Time The equilibration time is a time in minutes that the standby temperature must be maintained before the next test can be started� To set or change equilibration time: § Press the Equil soft key to display the equilibration screen�...
- Page 39 Ideal Weight Percent Limit Ideal Weight Lock The ideal weight limit is a tolerance When activated, the ideal weight lock range for the ideal weight in percent prevents the use of any other sample that the sample weight must be in� weight other than the one that is within Example: If the ideal weight is 10 grams, the target limits�...
-
Page 40: Target Limits
Arrow key to accept the changes� The display will return to the Program Menu� On/off Note only for LMA100P: The limits are set in the current unit with the exception of ppm Moisture and ppm Solids� These are set in percent� Example: If you wish to set a lower limit of 50 ppm M, enter 0�005�... -
Page 41: Test Mode
The display will return to the weight of the initial weight� Program Menu� LMA100P: § Syringe: used for volatile liquid samples to prevent evaporation of the sample prior to obtaining an initial weight�... -
Page 42: Program Name
Program Name Each program is stored by a unique program name� Your analyzer may be preprogrammed with a default set of programs or a set customized for your company� Program names can be alphanumeric and have some characters� To change or set the program name: §... -
Page 43: Create A New Program
The analyzer will store following drying At times you may want to delete programs: a drying program that you will no – LMA100P: 300 drying programs longer need� – LMA110S: 60 drying programs To delete a program: § From the Program Manage menu, press... -
Page 44: Configuring The Printout
Configuring the Printout Print All Programs To print all programs with parameters: § From the Program Manage menu, press Print Current Program the 8 key� The list of programs with To print the parameters of the current program as shown in the top left corner parameters will be printed�... -
Page 45: Data Log
Data Log The analyzer will store the last 999 test results� Results can easily be sorted, viewed on the display or printed� In addition, you can perform statistical analysis on sorted or selected results for viewing or printing� Sorted data may be also downloaded� Note The default setting for the data log is Off�... -
Page 46: Device Information
§ Toggle the Select All or Clear All soft To select by date range: § From the Data Log menu screen, press key to select or deselect all data in order the 3 key for Select by date range to go to define a known starting point�... -
Page 47: Modify Operators
Modify Operators The analyzer may be programmed with a custom list of operators specific for your company� Operators can be alphanumeric and contain various characters� To change or set operator names: § Press the 3 key from the Setup menu to display the current list of operators�... -
Page 48: Graphing
Graphing To return to the Percent|Time graph: Your analyzer is able to display and § From either the Weight|Time or print a graph of the current or last test� Temp|Time graphs, press the % (result) Three styles of graphs are available: soft key�... -
Page 49: Results Printout Format
8 . I n t e r v a l p r i n t O f f 9. W e i g h t i n f o 0 . S i g n a t u r e l i n e O f f On/Off * = only for model LMA100P... - Page 50 - - - - - - - - - - - - - - - - - - - - - - - - - - - - - - 0:00 5.167 0.00 RESULT on 06/15/2012 at 10:24 AM Elapsed time: 07:13 52.466 %M Target: PASS Initial Weight = 5.1671 grams Final Weight = 2.4561 grams Weight Loss = 2.7110 grams Signature: * = only for model LMA100P...
- Page 51 To edit or change header lines: 0 9 / 0 7 / 2 0 1 2 0 2 : 1 4 P M H e a d e r § From the Results Printout menu press the 1 key� 1 . H e a d e r l i n e 1 2 .
-
Page 52: Setting The Time And Date
Setting the Time and Date The time and date along with the date format will need to be set to your local time on setup� The date will automatically roll to the next year� The analyzer will set the day of the week automatically� To set the time and date (and format): §... -
Page 53: Communication Ports
Mark 2) or interface with a PC Note To download or upload drying programs § USB – For Sartorius Service only from another Sartorius product (Mark 3, Mark 2, Omni 1) refer to § Ethernet – connect to a network operating instructions “Transfer... -
Page 54: Serial Command List
SET MODE STANDARD “STANDARD”/”SYRINGE”/ ”CONCENTRATION” MODE STANDARD SYRINGE* MODE SYRINGE CONCENTRATION MODE CONCENTRATION SET PROGRAMNAME string String PROGRAMNAME string Max: 15 characters GET TEMP1 Float (0-210) 0=OFF TEMP1 x GET TEMP2 Float (0-210) 0=OFF TEMP2 x * = only for model LMA100P... - Page 55 1=Monday…7=Sunday SET CONSERVE x CONSERVE x 0-60 minutes SET TIME xx:xx AM/PM TIME 01:00 PM hh:mm am or hh:mm pm SET DATE mm/dd/yyyy DATE 01/18/2005 mm/dd/yyyy SET TIMEFORMAT 0-1 TIMEFORMAT 0 0=AM/PM, 2=24 hr * = only for model LMA100P...
- Page 56 Command Format Limit Description Response Format Range SET DATEFORMAT 0-1 DATEFORMAT 0 SET PASSNUM xxxxx PASSNUM xxxxx SET ACCESS 1-9 ON ACCESS 1-9 ON/OFF Security access 1-9 corre- spond to menu items 1-9 1-9 OFF SET OP X string OP x string Operator Names: 1-19, 15 character max�...
- Page 57 SIGNATURE ON SIGNATURE OFF SET INTERVAL x INTERVAL 30 Print Interval: 0=OFF, 2, 5, 10, 30, 60 seconds GET HEADER 1 Print header 1: SARTORIUS GET HEADER 2 Print header 2: GET HEADER 3 Print header 3: GET PRINTHEADER PRINTHEADER ON...
- Page 58 Command Format Limit Description Response Format Range System DO Commands DO TRANSFER MARK3 DO TRANSFER MARK2 DO CAL INTERNAL Internal Calibration Complete DO CAL EXTERNAL Calibration Complete DO WEIGHT RAISE DO WEIGHT LOWER DO PROGRAMS CLEAR PROGRAMS CLEAR DO PROGRAMS SAVE PROGRAMS SAVE DO PROGRAMS ALPHABETIZE PROGRAMS ALPHABETIZE...
- Page 59 Scale Offset (X�XXX) Default=0�000 Temperature 1 (XXX) Ramp 1 (0=Standard, 1=Rapid) Time 1 (XX�X) Temperature 2 (XXX) Ramp 2 (0=Standard, 1=Rapid) Time 2 (XX�X) Test Mode (0=Standard, LMA100P: 1=Syringe, 2=Concentration, 3=Fat LMA110S: 1=Concentration, 2=Fat) Start Delay (seconds) Output Example: # 1,Default,0,1�0,0�050,0,60,0,5�0,10�0,0,100�00,0�000,0,3,1�000,0�000,105,0,0�0,0,0, 0�00,128/r/n...
- Page 60 Mark 2 Program Download Format Field Description Program Number (#XXX) Units (M,S,W,V,L) Ideal Weight (XX�X, Negative value indicates ideal wt� loading locked 90-110%) Temp 1 (XXX) Temp 2 (XXX) Time 1 (Seconds) Time 2 (Seconds) Standby Temp (XXX) Slope Mode (0=Actual, 1=Calc1, 2=Calc2, 3=Calc3) Slope Time (Tenths of minutes, example: 50=5�0 minutes) Slope % (XX�XXX) Start Delay of Initial Wt�...
-
Page 61: Conserve Mode
Conserve Mode The Conserve Mode allows the analyzer to manage the heating elements to be turned Off when the analyzer is not in use� In addition, a time schedule can be set for each day of the week for a Sleep mode and a Wake mode�... -
Page 62: Security
Security The security mode allows the analyzer to be pass code protected from making unauthorized changes or to access selectable features including the setup configu- ration, programs, the data log and other areas� The security mode is also where important actions can be taken, including clearing the data log or operators, as well as managing program storage or restoring the ana- lyzer to original or factory default settings�... -
Page 63: Setup Security Access
To deactivate security: § From the Setup menu screen press the 8 key or high- light Security and press the Enter key� § Type the set pass code and press the Enter key� The security protection of the analyzer will now be deactivated�... -
Page 64: Clear Data Log
Clear Data Log The data log holds 999 results� Periodically it may become full or you may elect to clear all current results in the data log� Security must be deactivated to perform this function� To clear the data log: §... -
Page 65: Restore Factory Defaults
Restore Factory Defaults At some time it may be necessary to return the analyzer to factory default settings� Security must be deactivated to perform this function� To restore factory defaults: § From the Security Menu screen, press the 5 key or highlight Restore factory defaults and press the Enter key to display a confirmation screen�... - Page 66 Clear All Programs Load User Programs To clear all programs: If the user selectable programs become § From the Security Menu screen, press altered, the last stored backup set of the 6 key or highlight Manage program programs may be re-loaded from the storage and press the Enter key to archive�...
-
Page 67: Transfer Programs
The analyzer has been designed for the 6 key or highlight Manage program easy uploading or downloading of all storage and press the Enter key to programs from other Sartorius moisture display the Manage program storage analyzers to the device� The follow- screen�... -
Page 68: Audio, Video And Language
Audio, Video and Language The analyzer audio and video appearance may to adjusted to your desired taste or lighting conditions� Audio Adjustments An audio beep may be activated or turned off for a keystroke, when adding sample during the test mode or at the end of a test�... -
Page 69: Video Contrast Adjustment
Video Contrast Adjustment To change the video contrast: § From the Audio & Video screen, press the 4 key for Video contrast to display the Video contrast screen� § Press a number key between 1 and 9 to change� 0 9 / 0 7 / 2 0 1 2 0 2 : 1 4 P M V i d e o c o n t r a s t A smaller number will make the screen appear lighter, 1 ) L e v e l... -
Page 70: Service
§ Adjusting the temperature § Establishing a calibration schedule § Troubleshooting and diagnostics (Factory secured area, under the guidance of Sartorius Service personnel only) System This screen will display important information about your analyzer including model, serial number, software version, dates of last calibration and adjustment, instal- lation date and MAC address�... -
Page 71: Calibration | Adjustment Functions
(one year is typical)� LMA100P: The balance may be calibrated and adjusted using the internal 100g calibration weight or a known external calibration weight� LMA110S: The balance may be calibrated manually with a Known external calibration weight�... - Page 72 Zero Note Permissible external calibration weights include: LMA100P: 10, 20, 30, 40, 50, 60, 70, 80, 90 and 100 g� LMA110S: 10, 20 and 30 g� Weights must be within 2% of tolerance� § When this procedure has been completed, the display will show “Calibration complete”...
- Page 73 To schedule calibration/adjustment: § From the Calibrate balance screen, press the 3 key 0 9 / 0 7 / 2 0 1 2 0 2 : 1 4 P M S c h e d u l e c a l i b r a t i o n for Schedule calibration to display the Schedule 1) O f f calibration screen�...
-
Page 74: Heater Adjustment
Heater Adjustment Adjust Temperature or Verify Temperature The temperature of the analyzer should be verified and adjusted as needed periodically at some interval con- sistent with your quality program (one year is typical)� To perform an adjustment the optional temperature calibration and adjustment kit is needed�... - Page 75 § To initiate an automatic temperature calibration and 0 9 / 0 7 / 2 0 1 2 0 2 : 1 4 P M A u t o t e m p c a l adjustment, press the 5 for Automatic Temp Cal� The Cal 1 screen will change to the Temperature screen�...
- Page 76 (“fixture”)� § Press the Print soft key to print a temperature verification report (LMA100P only)� § If the agreement of the selected temperature and the actual temperature are not within 2 degrees for any of...
- Page 77 To change the temperature adjustment schedule: § From the Service menu, press the 3 key to display the Adjust Temperature screen� § Press the 3 for Adjust schedule� The screen will change 0 9 / 0 7 / 2 0 1 2 0 2 : 1 4 P M S c h e d u l e c a l i b r a t i o n to the Schedule temp adjust screen�...
-
Page 78: Concentration Mode78Syringe
Concentration Mode The device is able to determine Total To select the concentration mode: § Press the 9 key from the Program menu Suspended Solids in low solids samples, such as for wastewater samples� The to display the Mode screen� sample solids are first concentrated §... -
Page 79: Syringe Mode
Then add sample to the pad� achieve the most accurate results it is § At the prompt, remove the pan and pad� desirable to use the LMA100P syringe mode� This mode consists of obtaining the initial sample weight by recording §... -
Page 80: Multi-Module Mode
Multi-module screen description: § Heater module icon: Separate display of operator to simultaneously control up heater module information including: to 4 (LMA100P: 4 units connectable; LMA110S: 2 units connectable) heater § Status: warm-up, test done, pass/fail, modules connected to a single Control Module�... - Page 81 The inter-module cables between program)� The printer will also print the control module and heater module are result at the end of the test (LMA100P so short that only one heater module on only)� the left and right of the control module can be connected�...
-
Page 82: Cleaning
Cleaning Recommended care § Remove and clean the recessed area For best performance and reliable under the pan shield: usage, the analyzer requires periodic – Remove the pan support and pan cleaning� shield� Danger – Remove the two screws holding the Before beginning the cleaning process: perforated plate�... -
Page 83: Tga Formulas
TGA Formulas (LMA100P) § To turn the TGA mode On, press the TGA (Thermal Gravimetric Analysis) 1 key for Units followed by either 8 key mode provides the capability of distin- guishing two components of a sample for TGA moisture or the key for TGA material by heating at two different volatiles�... - Page 84 %M = IW1-FW2 ——————– ——————– ——————– Note Only the total percent result is stored in the Data Log� LMA100P Moisture Analyzer Module 1: M30604026 Program 1: TGA UNITS: TGA Moisture MODE: Standard START DELAY: 0 sec M2 TEMP1: 60C, Std TIME1: 2�0 TEMP2: 130C, Std TIME2: 2�0...
-
Page 85: Recycling
Recycling The packaging is made Sartorius will not take back from environmentally- equipment contaminated friendly materials that can with hazardous materials (ABC be used as secondary raw contamination) either for repair materials� If you no longer or disposal� need this packaging, bring... -
Page 86: Specifications
Specifications Models LMA100P LMA110S Display of Results 0�001% 0�001% Balance Resolution 0�0001 grams 0�0001 grams Balance Capacity 100 grams 40 grams Reproducibility of the Sample weight = 1g : 0�1% measurement Sample weight = 5g : 0�02% Balance Repeatability ±0�1 mg ±1�0 mg... -
Page 87: C Marking
The operator shall be responsible for any modifications to Sartorius equip- and European Standards: ment and for connections of cables not Council Directive 2004/108/EEC: supplied by Sartorius and must check “Electromagnetic compatibility and, if necessary, correct these modifi- (EMC)” cations� On request, Sartorius will... - Page 89 Sartorius Lab Instruments GmbH & Co. KG Weender Landstrasse 94–108 37075 Goettingen, Germany Phone: +49.551.308.0 Fax: +49.551.308.3289 www.sartorius.com The information and figures contained in these instructions correspond to the version date specified below. Sartorius reserves the right to make changes to the technology, features, specifications and design of the equipment without notice.
Need help?
Do you have a question about the LMA100P and is the answer not in the manual?
Questions and answers
Al precionar enter no se activa el equipo sigue en modo calemtamiento (warning up)
The Sartorius LMA100P remains in warming up mode when pressing Enter if the equilibration time is activated. The equilibration time is the period the standby temperature must be maintained before starting a test. A test cannot begin with the Start|Stop key until the set equilibration time has elapsed.
This answer is automatically generated