Table of Contents
Advertisement
Quick Links
Advertisement
Table of Contents

Related Manuals for ViTiny VT300 PLUS


Summary of Contents for ViTiny VT300 PLUS
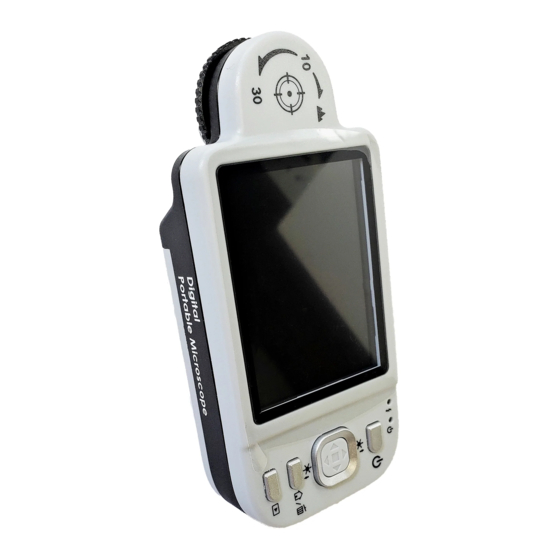
- Page 1 VT300 PLUS User’s Guide Digital Portable Microscope Version 2.1A...
-
Page 3: Table Of Contents
Contents Products Introduction ........2 Packing Contents ........2 Functions of Microscope ....... 2 Operation of Microscope ...... 6 Microscope Programming Functions ..8 External Interfaces of Microscope ..24 Program Installation ........27 Insert CD (Step 1) ....... 27 Install Application Program (Step 2) ... -
Page 4: Products Introduction
1. Products Introduction 1.1 Packing Contents Objects packed inside the box include one host and seven accessories as follows. Please charge the Li-ion battery for 6 to 8 hours for the first time. Name Name Portable Microscope Li-ion Battery User‟s Guide USB2.0 Cable Adaptor Clean Cloth... - Page 5 (1) Camera/Video REC : the button is applied to photograph in observing mode [please refer to item (1) of Section 1.4]. Press the button for a long time to enter/quit Comparison mode. In the Video Play mode, it can open video files [please refer to item (2) of Section 1.4].
- Page 6 play mode the button is used for stop playing video. In other modes, it is used for choosing „up‟. (8) Select „right ‟ button: Press the button for 2 seconds to show Crossing Alignment in the center of the LCD Display. Or the button is used to next sequent „right‟...
- Page 7 (16) Lens: the lens is applied to photography. (17) Battery Container: Where is the Li-ion battery put. [please refer to item (5) of Section 1.5]. (18) RESET Hole: in case the machine stops (which means no reaction in the image by pressing any button), insert slender clip into the hole to trigger the RESET button.
-
Page 8: Operation Of Microscope
1.3 Operation of Microscope First, please choose long shot or flush-way shot, then adjust the focus button. (1) Focus way : the focus dial is labeled to indicate the magnification amount (10x, 30x, and long shot ). Rotate the focus wheel from position (A) to position (B) is for long shot, need tuning the clear focus between (B) &... - Page 9 (3) Long Shot: Rotate the Focus dial next to 10X‟s right side, then slightly tuning so that to get the best image. Photography is same as the way of camera and scene mode is selectable. [please refer to (B) of item (1) of Section 1.4].
-
Page 10: Microscope Programming Functions
1.4 Microscope Programming Functions There are 8 function modes in the programming interface. Press the Function Menu /Delete button to switch functional modes in the Camera. In other modes, press the button of Preview Photo /Back to back to the Menu and switch function as displayed in the following image: (1) Camera : Observation mode. - Page 11 Please refer to the above image. Small icons are used to represent function modes. (A) Mode : the machine is in observing mode. (B) Scene Mode : Press the button for a long time to switch the six scene modes and select the modes by using buttons of (B-1) : Automatic mode (default).
- Page 12 (C) Special Effects : press button to choose the following special effects models in observing model: Normal : general model without any special effect. Grey Scale : shows by grey scale to simplify and easily identify images. Reversed-phase : shows by complementary colors to strengthen faint-colored or over-lighted image.
- Page 13 The following images are presented while charging USB Source : the graphic will be presented under two circumstances. One is insert USB power supply without using battery, and the other is insert USB source and use full-charged. (F) Optical Digital Magnification : represents current magnification rate.
- Page 14 Adjust optical magnification to 31 times, and the total magnification can be 155 times. Rates at different stages as follows: 30x optical rate [31* (1+0.5*stage)] Stage Rate Stage Rate 108x 124x 138x 155x Note: this formula is for 0-8 stages. (G) Digital Magnification Stage: digital magnification rates at different stages are listed as follows: (H) Alignment in Range...
- Page 15 long time to display the scale, and press it long time again to shut down the scale. Press the button of without releasing to select different scales. After selection, release the button. The two types of scales are showed as follows: L-shaped Scale Crossing Scale ...
- Page 16 example: 「IMGYYMMDD_HHMMSS_L1.JPG」, the “L” means optical low magnification. “1” digit means the stage number of digital zoom 「IMGYYMMDD_HHMMSS_H8.JPG」, the “H” means optical high magnification, “8” digit means the stage number of digital zoom. The above file name, capital letter L means the optical mag 10x, H means 30x. If the magnification icon shows “…x”...
- Page 17 The photo which taken under contacted observation can do measurement from “Application Program”. The taken photo image quality will decide the accuracy on measurement. (If the taken photo is not clear or missing focus, then the measurement might not be correct.) It is suggested to key in all values from the look-up table before start measurement.
- Page 18 (K) Preview mode:Press under preview mode to enter photos browsing. View taken photo in the window. The series number of the current photo is shown at the upper left. Press button to go next photo. Press button to go previous photo. It can enlarge and shrink the viewing photo by &...
- Page 19 Under browsing photo, press for 10 seconds, it can enter Comparison mode. See below illustration. At the moment, all buttons are same function but only allow to control the right window. Press button to swift next photo and press to return the preview photo. Press &...
- Page 20 (2) Play : Please refer to below following for a description the Video Play mode. (A) Open File : Press the button of (Camera) in the mode of Video Play to enter the interface of file selection. Select the demanded file as in the following image. After selection, press the button of to play.
- Page 21 (B) Stop : Press the button of to stop playing video. (C) Play : After selecting file, press the button of (Confirmation) to play the video, and the sign of will be changed to (pause). Press the button of (Confirmation) to pause playing. (D) Last File : Press the button of to play the last file.
- Page 22 (A) Current Mode : After entering Video REC mode, the mark of Current Mode showed as representing video is recording. Press the button to record video, and the Current Mode turns to be from (B) Recording Time: After recording, recording time will be counted in second.
- Page 23 (5) USB Disk : VT300 has its internal memory(2G), save files as USB storage device directly to C Slot. For transmission files to PC, please refer to item (1) of Section 1.5 and the following image. (A) Refer to section 1.5.5 to connect to computer. (B) Access “USB disk”...
- Page 24 (A) Refer to section 1.5.5 to connect to computer. (B) To operate by the device, please access “PC cam” and press “confirm”. (C) Start the application in the computer as introduced in section 2.2. (D) Click “connect” on the application as shown in section 3.4.
- Page 25 bottom left of the image. Please note that the scale on the image will not show if this function is activate. If want to show the Timestamp on the image, please turn off the scale function. : This function can help you shut off (C) Auto Power Off the machine after a selected period of inactivity.
-
Page 26: External Interfaces Of Microscope
(8) About : the model to check relevant information of the product. Press button (Confirmation button) to quit the model. (9) Date:(YYYY-MM-DD):Display the system date. (10) Time:(HH:MM:SS):Display the system time. 1.5 External Interfaces of Microscope The machine contains many external interfaces. The following contents give instructions about assembly of the accessories. - Page 27 (1) Connect USB Cable: The smaller connector end is used to connect with the machine, the larger connector end is used to connect USB port on PC. While connecting to computer, power source can also be provided besides transmitting images (PC Camera). Please refer to the following image for the USB connection.
- Page 28 (3) Install Battery: remove the battery cover and input the battery by placing the written face up and complying with positive and negative poles correctly. Close battery cover finally. Please refer to the following image. (4) Install Wrist Strap: Remove battery cover. Hang the wrist strap on the hook, then close the battery cover.
-
Page 29: Program Installation
2. Program Installation 2.1 Execute Auto run program (Step 1) 2.2 Step 2 2.3 Step 3... -
Page 30: Printed Notice
3. Printed Notice Please read the following information before operate. 3.1 Maintenance Please follow below instructions for storing or using the product: (1) Keep dry: do not place the product in a humid environment. Dry surroundings are helpful to extend the life of the product. (2) Avoid temperature shock: temperature shock will cause internal condensation inside the machine, for example, take the product into a warm room from cold environment. -
Page 31: Product Sizes
Electric 5V/250mA(Default) Consumption Size 121(L) ×56(W) ×26 (T) mm Host weighs around 90 grams (130 grams Weight including the battery) Operation Temperature -5℃ ~ 50℃; Humidity-lower Environment than 85% (No Condensation) For any change, please visit http://www.vitiny.com to check information. -
Page 32: Safety Instructions
Do not discard them in public waste field. (9) Do not disassemble the machine for inspection on your own. For any problem occurred in the machine itself, please switch off the machine and then contact us by e-mail to the following address: mltc@vitiny.com... - Page 33 VT300 PLUS Warranty Product Portable Digital Microscope Machine Type Serial Number Purchase Date Month Year Purchaser Purchaser Address Email Machine Type Distributor Seal for Confirmation ( Stamp is necessary for validation of the Warranty ) ※Distributor‟s seal shall include name of the shop, telephone and...
- Page 34 1. Service fees (including transportation fees) of product inspection. 2. Repair fees. 3. Fees of replaced parts. ViTiny Service Center Tel: 07-657-9551 Fax: 07-657-9561 Address: 10 F., No.1, Section 1, Syuecheng Road, Dashu District, Kaohsiung City 840, Taiwan (R.O.C.)
- Page 36 © MicroLinks Technology Corp. All rights reserved. HTTP://WWW.VITINY.COM...